Author Topic: 1/72 Zeppelin-Lindau (Dornier) Rs II  (Read 28161 times)

Online RAGIII

  • Hero Member
  • *****
  • Posts: 18793
Re: 1/72 Zeppelin-Lindau (Dornier) Rs II
« Reply #90 on: November 26, 2017, 09:01:23 AM »
Outstanding work on the rigging and strut location issue!
RAGIII
"A man has to know his limitations": Harry Callahan

"Don't slop it on" Lynda Geisler

Offline Des

  • Administrator
  • Hero Member
  • ******
  • Posts: 9325
    • ww1aircraftmodels.com
Re: 1/72 Zeppelin-Lindau (Dornier) Rs II
« Reply #91 on: November 26, 2017, 09:11:39 AM »
Superb job with the rigging on the boom and tail, this is shaping up beautiflully.

Des.
Late Founder of ww1aircraftmodels.com and forum.ww1aircraftmodels.com

Offline lone modeller

  • Hero Member
  • *****
  • Posts: 5300
Re: 1/72 Zeppelin-Lindau (Dornier) Rs II
« Reply #92 on: November 27, 2017, 07:49:48 AM »
Evening All,

Thanks Frank, Dave, Lance. Ian, Rick and Des for Dropping by and leaving those really positive and encouraging comments. I do appreciate them all very much.

Ian: I had thought of the problem of what to do with this before I started: I have ordered and received a special display box with a clear perspex cover. I have made these myself in the post but this one needs to be larger and I want to make a different base to just the usual flat surface, so as I mentioned in the opening post of this build log, I intend to make a small scene based on Seemoos where this machine was built and launched. I have some plans in my head and have sketched them out to real size on a piece of paper but have done no more yet because as you are aware a deadline looms in early January. When the model aircraft is finished I will start on the base and will post a log on this and the other site in the diorama sections (although strictly speaking mine will not be a proper diorama, rather a scene based on a photo).

I have been thinking about the struts for some time now. The wing is heavy and I am concerned that plastic strip, even the size that I intend to use, 120 thou x 40 thou, will bend or flex under the weight. I have worked out the construction sequence from here on and it will be make the struts and dry fit,  mount the engine nacelles on the hull, fix the cabane struts and put on the wing, add the V struts to the sides, add the tail unit and other details. This means that the cabane struts must be strong enough to hold the wing in place as I simply cannot put on those and the V struts at the same time. If the cabane struts are not strong enough the wing may collapse on to the engines and I will be a little discombombulated.....! The question that I have not been able to answer is will the cabanes be able to support the wing on their own? Do the V struts also need to be reinforced? I have held the wing in the centre and it shows no sign of sag at the ends - I would be surprised if it did because it is three sheets of 60 thou card laminated and I have found from experience that by laminating card that problem is solved. However there is still the weight problem.

So! I have made a decision. I will reinforce the cabane struts and hope for the best with the V struts. I am going to reinforce the cabanes using a method that Ian (Limeypilot) has demonstrated. I measured the lengths of 120 x 40 thou Evergreen strip from the plans and cut them slightly too long, then scraped and shaped them to aerofoil section. That did not take long and gives a better shape than the preformed aftermarket materials, plus I have the size that I want. I then cut the strip lengthwise into three equal widths. The centre piece was discarded and replaced with a length of 3/64 inch (1.19mm) brass rod. The strut was re-assembled with CA and the gaps filled with standard filler and allowed to dry out. After a couple of sessions of sanding and filling small gaps, the whole was coated with Mr Surfacer to get a nice even finish and the lot was repainted:


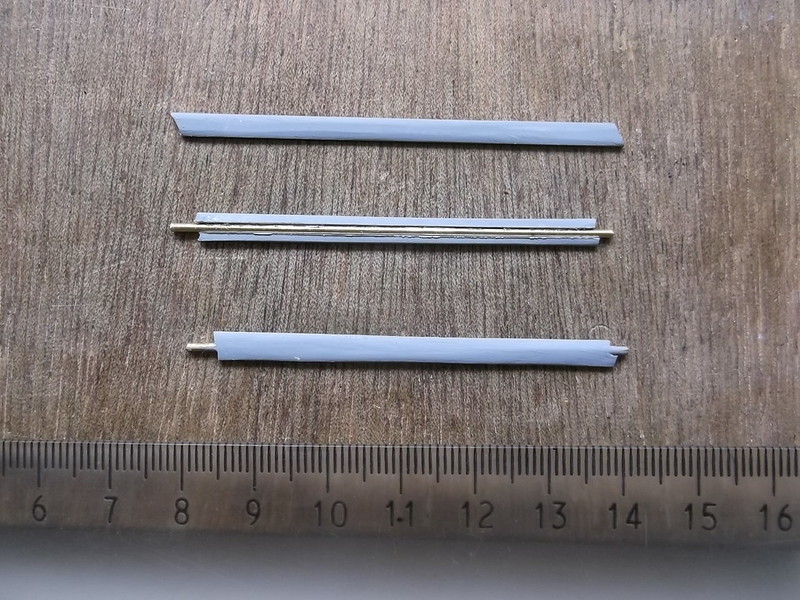
The top piece is the original strip which has been scraped and shaped and painted! (I know, I should not have bothered but....). The second shows the rod in place between the two parts of the strip which will form the front and rear of the strut. The lower piece is a completed strut. Can you see the joint? No? Good!

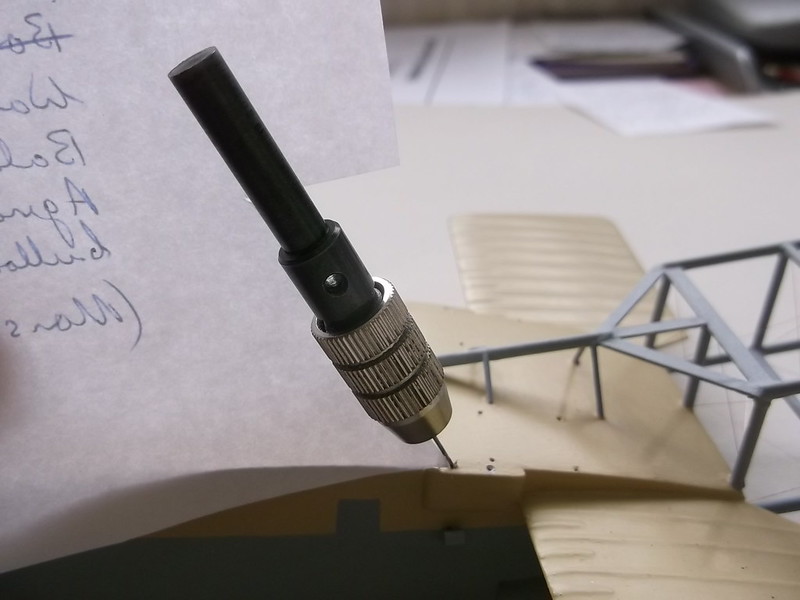
Before I start to fit the engine nacelles I must first drill the holes to take the ends of the brass rod in the hull. All three struts are angled, which means that the holes must be angled too because bending the ends of brass rod is NOT easy. So the angles of the struts were measured from the plans, a complex(!) jig was made and put into place on the hull so that I could align the drill correctly, and I held my breath 6  times as I drilled away....


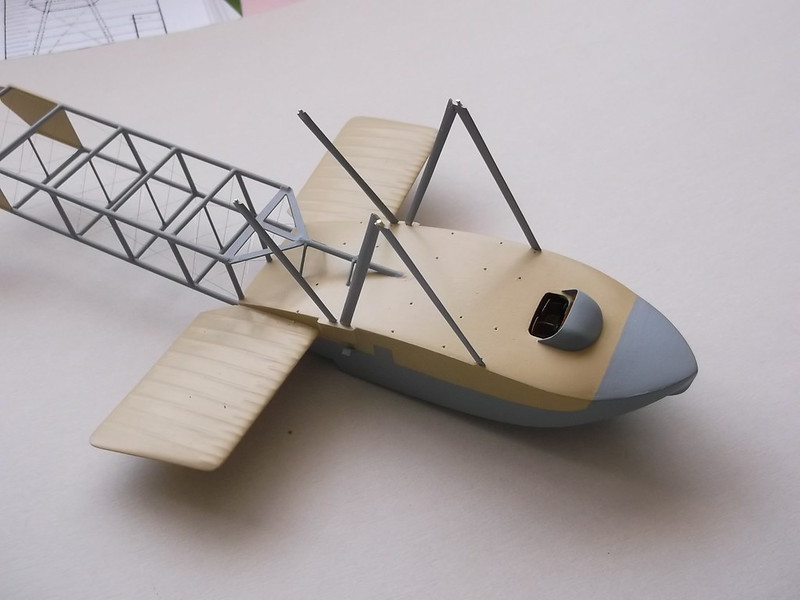
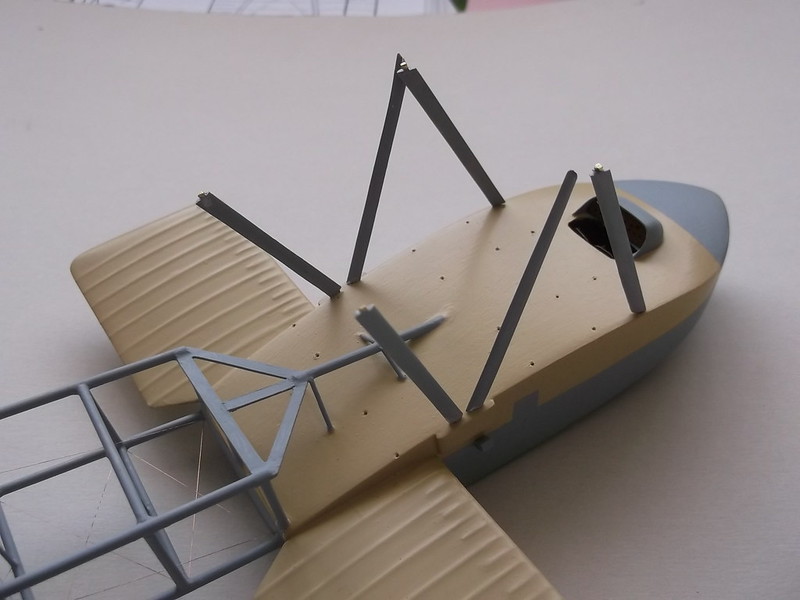
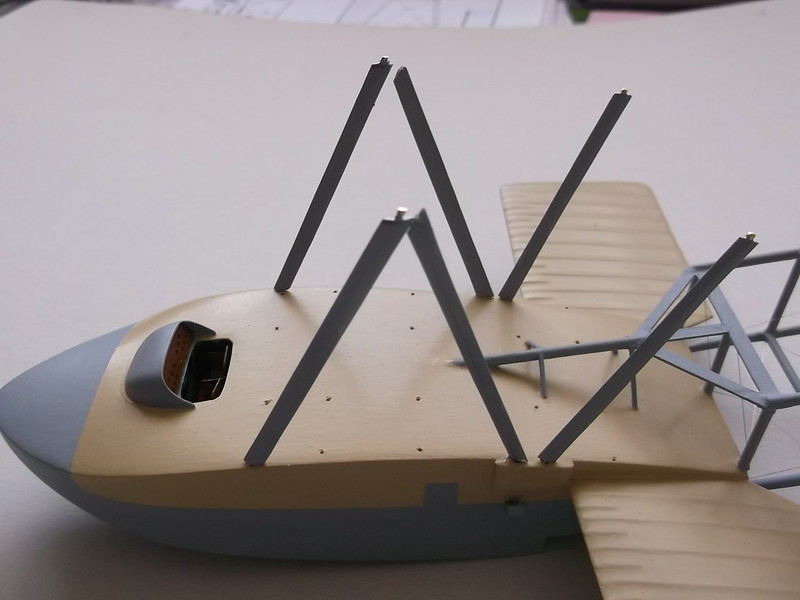
Those pieces of plastic stuck to the sides of the hull are to represent some form of structure which had to be added to the sides of the hull of the machine because the hull tapers gently to the rear. In order that the front strut is exactly in line with the two at the rear they had to put a bulge at the top of the hull in this area. It is not clear from either photos or plans how this looked exactly, so I have put two pieces on which I think are sufficiently accurate.

A dry fit of the struts was then made: they are too long I know but I intend to trim them when I put the wing on: that is why the forward pair cross over. It may look messy but when I fit the wing I can sort out any small problems: for now I just want to make sure that they are at the correct angles and line up front to rear.


The next update will be a little delayed as I have to go on my travels again.

Thanks for looking.

Stephen.

Offline lone modeller

  • Hero Member
  • *****
  • Posts: 5300
Re: 1/72 Zeppelin-Lindau (Dornier) Rs II
« Reply #93 on: December 06, 2017, 04:10:58 AM »
Evening All,

I have been away for a few days and therefore am getting behind for the GB, so I have spent longer than normal today trying to catch up, which means that other urgent tasks will have to be addressed tomorrow! Damn. Anyway I have got the engine mounts for the port (left) engine made, and I have made them so that they fit properly. A little thought when I was traveling suggested the following sequence should work - and amazingly it did!

I started by fixing the horizontal tabs to the sides of the nacelles: I have no idea what they were for but they are very clearly present in the photographs and drawings. The exhaust covers were made from 60 thou rod which had been cut to length and then filed in half, one end rounded and the rear drilled to leave a hole before the piece was glued into place. Next I measured the lengths of the legs at the front and rear of the nacelle from the plans, and cut some 30 thou rod. One end of each piece of rod was cemented to the indents in the nacelle and the cement allowed to set slightly. When the cement was stiff I placed the ends of the legs into the holes in the hull and adjusted the angles of the legs so that the nacelle was correctly aligned horizontally, vertically and laterally. This was left to dry out overnight - no jig or support was needed as the cement was sufficiently set to hold the nacelle.


I could then add the horizontal bracing struts between the legs: this immediately gave strength to what was otherwise a weak structure. This was allowed to set for an hour just to be sure.


With these legs secure I could add the additional legs which make the two towers on which the front and rear of the nacelle are mounted to the hull. The horizontal cross bracing went in next, followed by the slanted pieces, all held in place with liquid cement and all measured to fit using a pair of dividers.


When all of this was dry I could remove the nacelle and legs assembly so that I can now paint them as trying to paint these in place and not mark the hull would be beyond my ability. This means that I will now be able to put this back on to the hull and all of the legs will fit into the holes.


Next step will be to paint the legs.

Thanks for looking.

Stephen.

Offline Borsos

  • Hero Member
  • *****
  • Posts: 3315
Re: 1/72 Zeppelin-Lindau (Dornier) Rs II
« Reply #94 on: December 08, 2017, 03:18:46 AM »
Outstanding build, Stephen, it is very impressive to watch how you manage all these countless struts.
Best wishes
Andreas
"Deux armées aux prises, c'est une grande armée qui se suicide."
Barbusse.
"Ein Berg in Deutschland kann doch einen Berg in Frankreich nicht beleidigen. Oder ein Fluß oder ein Wald oder ein Weizenfeld."
Remarque.

Offline Thumbs up

  • Hero Member
  • *****
  • Posts: 568
Re: 1/72 Zeppelin-Lindau (Dornier) Rs II
« Reply #95 on: December 08, 2017, 06:41:50 AM »
 :o Blood amazing!

Offline Juan

  • Hero Member
  • *****
  • Posts: 2455
  • All gave some, some gave all.
Re: 1/72 Zeppelin-Lindau (Dornier) Rs II
« Reply #96 on: December 08, 2017, 06:46:13 AM »
My head is exploding, amazing work.

Offline lone modeller

  • Hero Member
  • *****
  • Posts: 5300
Re: 1/72 Zeppelin-Lindau (Dornier) Rs II
« Reply #97 on: December 11, 2017, 08:21:20 AM »
Evening All,

Thanks Andreas, Thumbs Up and Juan for your kind remarks which I greatly appreciate. I do not think that you will be quite so impressed with my strut handling capabilities when you read on Andreas......

For the starboard (right) nacelle towers I was supposed to iterate the procedure described in the last post for the port (left) nacelle and all would be fine. Well that was the plan....... except that it didn't quite work that way. I assembled the starboard (right) nacelle support towers as previously described and put the right and left nacelle sub-assemblies on to the model just to see how it looked. It did not look at all right. Reason? I had somehow mis-measured the height of the horizontal struts on the right nacelle towers with a result that looked awful!

At this point I would like to remind fellow modellers that if you wish to know how to make a mistake when modelling, I am the first port of call! I could write a book on the subject! How I mis-measured I do not know, but the solution was to remove all the smaller struts, leaving just the legs in place, and start again. Fortunately the legs held and I was able to replace all of the offending parts relatively quickly....but I was a tad annoyed. Painting followed for both sides, (at which point I corrected the colour for the bits on the sides of the nacelles that I had previously painted the wrong shade of grey!), and then I glued the port (left) nacelle into place on the hull, followed by the centre legs. Rigging followed using 40 SWG rolled copper wire held in place with CA as per the tail boom. This was necessary for two reasons:

1. with the cabane struts and wing in place these nacelles would be nearly impossible to get to;

2. with one nacelle in place rigging the inner part of the second one was difficult enough.


The starboard nacelle followed, CA'd into place on the hull and rigged:


Although I did not take a photo I did try out the cabane struts just to make sure that there is a  gap between them and the nacelles and that the sticking out bits on the nacelles do not foul the struts: they do not. When scratch building these small things can go wrong, (as did the strut assembly described above), and in this case the consequences would have been pretty serious if they had because simply re-positioning the sticking out pieces would have made the whole thing look odd. There was very little room for error there.

At last this is beginning to look like the machine in the photographs. There is still a lot more to do before I can think about putting the wing on: rig the boom, add engine radiators and associated pipes and bracing, check the location slots in the wing, make the large V struts, etc. More later.

Thanks for looking.

Stephen.


Offline RLWP

  • Hero Member
  • *****
  • Posts: 1494
  • Bodger
Re: 1/72 Zeppelin-Lindau (Dornier) Rs II
« Reply #98 on: December 11, 2017, 08:24:10 AM »
This seems grossly inadequate:

WOW!

Richard
Hendon for flying - the fastest way to the ground!

Offline Des

  • Administrator
  • Hero Member
  • ******
  • Posts: 9325
    • ww1aircraftmodels.com
Re: 1/72 Zeppelin-Lindau (Dornier) Rs II
« Reply #99 on: December 11, 2017, 09:04:45 AM »
Absolutely amazing work Stephen, the engine nacelles look fantastic as does the rest of the model, a true masterpiece in the making.

Des.
Late Founder of ww1aircraftmodels.com and forum.ww1aircraftmodels.com

Offline IanB

  • Hero Member
  • *****
  • Posts: 2435
Re: 1/72 Zeppelin-Lindau (Dornier) Rs II
« Reply #100 on: December 11, 2017, 09:40:36 AM »
Beautifully done Stephen! This is really starting to look very special!

Ian

Offline Manni

  • Hero Member
  • *****
  • Posts: 1768
    • Der Militärmodellbauer
Re: 1/72 Zeppelin-Lindau (Dornier) Rs II
« Reply #101 on: December 11, 2017, 06:08:54 PM »
Amazing build, Steven! Looks really great.
Manni
"Ich hab' da mal was vorbereitet.": Jean Pütz
"Warum noch mehr Bausätze?!?": meine Frau

Offline lcarroll

  • Administrator
  • Hero Member
  • ******
  • Posts: 8547
Re: 1/72 Zeppelin-Lindau (Dornier) Rs II
« Reply #102 on: December 12, 2017, 12:54:40 AM »
Stephen,
 Your quote:
"At this point I would like to remind fellow modellers that if you wish to know how to make a mistake when modelling, I am the first port of call! I could write a book on the subject!"

    Stand in line old friend! You are in no way unique in that regard! I've made doing things twice an art form in my modelling adventures and will no doubt continue the trend......
    The important element here is the final result, and yours is spectacular. The photos of the intricate strut assemblies supporting those perfectly crafted nacelles are hard to recognize as scratch built components, this is great work thus more then one attempt seems perfectly normal to me. It's already a superb example of the modeller's art and it gets better with every update, stay the course!
   Looking forward to the now so close Completed Models entry.
Cheers,
Lance

Online RAGIII

  • Hero Member
  • *****
  • Posts: 18793
Re: 1/72 Zeppelin-Lindau (Dornier) Rs II
« Reply #103 on: December 12, 2017, 01:19:42 AM »
Stephen,
 Your quote:
"At this point I would like to remind fellow modellers that if you wish to know how to make a mistake when modelling, I am the first port of call! I could write a book on the subject!"

    Stand in line old friend! You are in no way unique in that regard! I've made doing things twice an art form in my modelling adventures and will no doubt continue the trend......
    The important element here is the final result, and yours is spectacular. The photos of the intricate strut assemblies supporting those perfectly crafted nacelles are hard to recognize as scratch built components, this is great work thus more then one attempt seems perfectly normal to me. It's already a superb example of the modeller's art and it gets better with every update, stay the course!
   Looking forward to the now so close Completed Models entry.
Cheers,
Lance

After reading your post and the response from Lance I know I can't say it any better! One addition, I am the guy they made the saying about, Measure once cut twice  ::)
RAGIII
"A man has to know his limitations": Harry Callahan

"Don't slop it on" Lynda Geisler

Offline lone modeller

  • Hero Member
  • *****
  • Posts: 5300
Re: 1/72 Zeppelin-Lindau (Dornier) Rs II
« Reply #104 on: December 15, 2017, 10:03:28 AM »
Evening All,

Thank you Richard, Des, Ian, Lance, Manni and Rick for you very kind and encouraging remarks. I am very re-assured by your comments Lance and Rick that you too have to perform some operations more than once. I sometimes wonder if I have any sense at all when I make silly mistakes such as those mentioned in the last post.... I am also at a stage in this build that is causing me considerable angst as I will describe shortly so to read your comments was very helpful.

FYO a modeller on another site has described this as "scaffolding with wings" which I thought was rather appropriate and another has called it my "Pokemon"!

On to the build as time is beginning to run short and I will be away for some of the holiday period and am aware that days can slip by with little being achieved. I have still to work out precisely how the wing is going to be fitted: I am trying to think of a jig which will not be more complicated than the model...............

I am also concerned about the strength of the cabane struts, which as shown earlier I have reinforced with brass rod, but still cannot make up my mind whether to reinforce some of the V struts. The problem with the latter would be how to fix them to the attachment points on the hull because if I do  it  would require drilling holes at awkward angles in a very small piece of plastic. The  V struts are also long and inserting rod and keeping the strut even would not be simple. I have a feeling that I am going to just use thick wide strip and hope it works: if it does not.....dammit it will!!!

Before the wing can be fitted however I had to put on the radiators above the engines. They were scraped and shaped from plastic card with grilles scribed with a sharp knife. The filler caps were from two thicknesses of rod. The bracing, supports and radiator pipes were also rod.


I have tested the cabane struts again as part of the planning for placing the top wing: I keep having different ideas about how to do this and none of them seem to be practical. This is what the struts look like minus the wing:


You can see in these photos that there is not a great deal of attachment between the tops of those struts and a large and heavy wing. Araldite will be the bonding of choice because it will give me wriggle time but will be strong. The question is still how to fix the struts and the wing in a single operation.... I need some form of jig but not one which is too complicated: I think that I may have one and hope to be able to report in the next few days. If I do not then you can reasonably assume that it did not work and I may be on the way to giving up this one for a time because there is a real risk of damaging the engine installations and radiators which are a bit precarious up there, and I may have to tackle another project and come back to this one later.

More in due course I hope.

Stephen.