Author Topic: 1/72 Zeppelin-Lindau (Dornier) Rs II  (Read 28484 times)

Bughunter

  • Guest
Re: 1/72 Zeppelin-Lindau (Dornier) Rs II
« Reply #105 on: December 15, 2017, 08:07:06 PM »
Wow! For my eyes the real plane arises, not a model!
Thank you for showing your progress on this beauty.

Cheers,
Frank

Offline Juan

  • Hero Member
  • *****
  • Posts: 2456
  • All gave some, some gave all.
Re: 1/72 Zeppelin-Lindau (Dornier) Rs II
« Reply #106 on: December 15, 2017, 09:45:30 PM »
Stephen, she is taking on a beautiful shape.  This is going to be one truly beautiful and unique plane thanks to your talents.

Offline lcarroll

  • Administrator
  • Hero Member
  • ******
  • Posts: 8551
Re: 1/72 Zeppelin-Lindau (Dornier) Rs II
« Reply #107 on: December 15, 2017, 11:20:24 PM »
" The question is still how to fix the struts and the wing in a single operation.... I need some form of jig but not one which is too complicated"

https://forum.ww1aircraftmodels.com/index.php?topic=8518.msg157112#msg157112

Stephen,
    I studied your photos last night, "slept" on them, and looked over the problem again this morning and although I'm not positive I've grasped the situation entirely I have a possible, maybe only part solution to suggest. It seems to me that the basic "Vertigo Jig" we discussed here at great length earlier this year offers a format that would lend itself to this process. It's simple yet could be set up to provide the proper stagger and distance between the upper wing and fuselage and support them while the glue sets on those delicate strut joins. Perhaps you could even construct a quick simplified version tailored to this one project. Check it out in Petov's 17 May post on the link I've included, might be worth consideration or perhaps I'm not grasping the requirement accurately. Hope this might be of some help.
Cheers,
Lance

Offline lone modeller

  • Hero Member
  • *****
  • Posts: 5317
Re: 1/72 Zeppelin-Lindau (Dornier) Rs II
« Reply #108 on: December 19, 2017, 06:15:15 AM »
Evening All,

Thank you Frank, Juan and Lance for your very positive remarks. Yes Juan, at last it is beginning to look like the original but it has taken a long time to get there.

Lance: many thanks for the helpful advice about jigs. I looked at the link but have decided not to go down that road because I consider those things to be too complex for me. I am a simple modeller and like wherever possible to keep things simple. In that way I make fewer mistakes! I have managed to solve some tricky problems on builds in the past, but I have also learned (and forgotten!) that the more I think and worry about a problem, the more difficult I imagine it will be....... Then when I actually bite the bullet, it is not nearly half as difficult as I imagine. This was so in this case.

Yes gentlemen I have managed to fix the top wing into place ........... at the third attempt! I will not distract you with too many details but just a few notes to anyone else who wants to attempt this sort of thing in future, here were my mistakes:

Attempt 1. I measured the struts and shortened the tops by a couple of mm: this was intentional as I have found from experience that trying to cut pieces such as these directly from plans is a recipe for failure as there are always tiny discrepancies on models (or at least there are on mine). Having cut the struts so that the front pair joined at the top I proceeded to apply the araldite, put the lower ends of the struts into the holes in the hull and put araldite into the holes on the underside of the wing. The wing was placed upside down on a sheet of expanded styrene so that I could clearly see the top ends of the struts, and I gently lowered the inverted hull assembly on to the wing, easing the struts into the holes. The rear of the booms were rested on a support on the styrene. This is the jig support:


And here is the model inverted and supported on the support:


In the meantime I checked for alignment using a large set square that I used to use for drawing maps: this made sure that the wing leading edge was at 90 degrees to the thrust line of the hull. All was left overnight to set and in the morning I found that the wing was not level - ie it was about 1cm down on one side and the same amount up on the other! It took about 10 minutes to find out why: the N strut junction on the port (left side) was not sitting as it should. I had not shortened the angled strut enough and so it was holding up the wing at that point, and because the wing is so big, the distortion was magnified at the tips.

Attempt 2. By carefully cutting and prising the offending araldite joint with a new scalpel blade I was able to release the wing from the struts, and then using the same procedure I was able to extract the strut from the hole in the hull. This took about 15 minutes of nerve stretching activity but I managed it without damaging the other joints. The strut was shortened and re-inserted, again with some difficulty, and the model put back on to the jig and left to dry out. Next day I checked again and this time I found that the wing was misaligned so that the leading edge was not at 90 degrees to the thrust line - I had forgotten to put a support in to stop distortion while the new joint dried out!

Attempt 3. This time I dismantled the whole of the struts assembly - not intentionally but by degrees as I tried unsuccessfully to correct the misalignment by juggling with different positions of struts. It was easier in the end to start again, cleaning out all of the old araldite from the holes in the wing, scraping a tiny bit more from a couple of struts and re-assembling the structure. This time I intended to make sure that horizontal alignment would be correct AND that the wing leading edge would also be at the correct angle. This meant that the wing had to be on top this time so that I could hold the hull and wing at the correct angles. I abandoned the styrene jig and used other materials instead viz a pile of books, a paint pot, graph paper and a pair of my late mother's hair grips.


[url=https://flic.kr/p/22zPshs][url]

[url=https://flic.kr/p/CZsGT8][url]

This time it worked! I know that some of you write/talk about kits "fighting you" - this is not a kit but I certainly have had a battle with this particular assembly. I have checked both the alignment of the wing to hull - correct, and the height of the wing tips from the desk top - there is about a 2mm discrepancy and as I cannot see it by eye I can live with it. So here is the model as of this evening, ready for me to start putting the large under-wing V struts into place. I am breathing normally again and I think that I should be able to complete this before the January deadline, provided that I do not drop it or run into another unforseen problem.

[url=https://flic.kr/p/CZsHgx][url]

[url=https://flic.kr/p/CZsHw2][url]

[url=https://flic.kr/p/CZsHJ6]]

Thanks for looking. 

Stephen (aka von Jigmeister)

My apologies for the repeated photos and text in the original post of this part: I was having real problems with Flickr and did not realise what a dog's breakfast this had become. Hopefully this is better now.
« Last Edit: December 20, 2017, 05:03:30 AM by lone modeller »

Offline RLWP

  • Hero Member
  • *****
  • Posts: 1494
  • Bodger
Re: 1/72 Zeppelin-Lindau (Dornier) Rs II
« Reply #109 on: December 19, 2017, 06:41:29 AM »
Still wow!!

I'm struggling to find anything stronger to say

I've also been through those struggles in the past when something that should be simple fights you to the end. And you won!

Oh, and now it looks more like an aeroplane than a boat - result!

Richard

<Richard makes a note - buy another large box of exclamation marks>
Hendon for flying - the fastest way to the ground!

Offline lcarroll

  • Administrator
  • Hero Member
  • ******
  • Posts: 8551
Re: 1/72 Zeppelin-Lindau (Dornier) Rs II
« Reply #110 on: December 19, 2017, 10:09:21 AM »
Stephen,
    I should have known! I didn't label you von Jigmeister for nothing, and again you've lived up to the title. Great work, great results, and your improvisation skills save the day again, and a beautiful model emerges!
Cheers,
Lance

Offline Juan

  • Hero Member
  • *****
  • Posts: 2456
  • All gave some, some gave all.
Re: 1/72 Zeppelin-Lindau (Dornier) Rs II
« Reply #111 on: December 19, 2017, 11:19:57 AM »
Enjoying a work of art that I will probably never see again, in any scale (come on WNW,  LOL)

Offline Manni

  • Hero Member
  • *****
  • Posts: 1768
    • Der Militärmodellbauer
Re: 1/72 Zeppelin-Lindau (Dornier) Rs II
« Reply #112 on: December 19, 2017, 05:55:47 PM »
 :o Wow, what a great model! With the wings on it looks so great.
chapeau!
Manni
"Ich hab' da mal was vorbereitet.": Jean Pütz
"Warum noch mehr Bausätze?!?": meine Frau

Offline lone modeller

  • Hero Member
  • *****
  • Posts: 5317
Re: 1/72 Zeppelin-Lindau (Dornier) Rs II
« Reply #113 on: December 22, 2017, 06:40:13 AM »
Evening All,

Thank you Richard, Lance, Juan and Manni for your very complimentary remarks. As always I really appreciate them especially as they come from modellers who's skill and ingenuity I greatly admire and respect. The jig has not finished work yet either Lance, as you will see bleow.

I am aware that time is pressing and that I will be away for part of the holiday break - specifically New Year so I want if possible to have this finished before I go because I will not then be thinking about it all the time. Of course there is still plenty of time for me to make more mistakes, as I found out today - details to follow, and I do need to allow some time for the possibilities of these happening again! The deadline for the GB is 7th January 2018.

I had cut the underwing V struts from 40 x 120 thou Evergreen strip - 2 pairs per side - and scraped and shaped them into aerofoil section a little while ago. I had also painted them and drilled holes to take the angled braces between the struts and the upper V and the wing. I drilled two holes on the upper side of the lower struts to take a pair of generators later.

I had measured the lengths from the plans and thought that I had allowed a little extra for trimming to the actual required size.


In fact I had not! Do not ask how....... as stated in an earlier post if you need advice on how to get things wrong, just ask me! The struts on the port (left) side were just 1mm too long, but on the starboard (right) side they were 2.5mm too short! So I proceeded to put the port side struts on and am in the process of making new longer ones for upper V the right side: I have cut down the existing longer ones to make new short ones if that makes sense! Fitting them was much easier than I anticipated. The photos show that I had already cut the ends which will attach to the small lugs on the sides of the hull and it was a simple job to just file the last few microns to be able to get a near perfect fit. The the top of the lower V and bottom of the upper V ends were filed flat where they are attached to the hull to remove the paint and improve the junction between the pairs as the originals seem to have been welded together. The ends which attach to the wing had also been filed so that they would fit snugly into the slots which I had drilled and cut to receive them. I glued the upper pair at the V joint first, and when this had dried for about 15 minutes I made the final adjustment to length and glued it into place. The lower V was fitted in the same way. Finally I measured the gaps between the struts on the model using dividers and cut lengths of 40 thou rod to make up the bracing both between the struts and the struts and the wing: the ends of the rod were fixed into the holes in the wing and struts which had been made earlier.


The jig that I had prepared earlier to support the model while I put the wing on came into its own for this operation, and I shall use it again when I attach the remaining struts and add the rigging in this area. And before anyone asks what ids the hole doing in the hull, it was not a drain on the original aircraft! This is a large model for me and I therefore intend to display it on a covered base: I want to try to represent the turntable outside the hangar at Seemoos where the machine was built which can be seen in the photographs referred to at the start of this thread, and I have had suggestions from two people that I should motorise the turntable! I have bought a railway turntable motor and the hole in the hull was drilled to take the drive shaft from the motor. I will start a new thread to describe this when I start to make the base in January, and will post it in the relevant section.

Thanks for looking..

Stephen. (von Jigmeister)

Offline Des

  • Administrator
  • Hero Member
  • ******
  • Posts: 9325
    • ww1aircraftmodels.com
Re: 1/72 Zeppelin-Lindau (Dornier) Rs II
« Reply #114 on: December 22, 2017, 07:46:59 AM »
This build continues to amaze me, brilliant work fitting the top wing and the strut work is superb.

Des.
Late Founder of ww1aircraftmodels.com and forum.ww1aircraftmodels.com

Offline RAGIII

  • Hero Member
  • *****
  • Posts: 18840
Re: 1/72 Zeppelin-Lindau (Dornier) Rs II
« Reply #115 on: December 22, 2017, 10:41:31 PM »
Des is correct! Brilliant work indeed! The model has taken on a whole new look with the upper wing in place. The struts are looking terrific!
RAGIII
"A man has to know his limitations": Harry Callahan

"Don't slop it on" Lynda Geisler

Offline jeroen_R90S

  • Hero Member
  • *****
  • Posts: 1060
Re: 1/72 Zeppelin-Lindau (Dornier) Rs II
« Reply #116 on: December 23, 2017, 05:54:56 AM »
That is one great model, of one odd looking aeroplane! Simple does it -I tend to over-analyze stuff too and either get it perfect on the first try or not at all! :)

Offline lone modeller

  • Hero Member
  • *****
  • Posts: 5317
Re: 1/72 Zeppelin-Lindau (Dornier) Rs II
« Reply #117 on: December 28, 2017, 06:27:53 AM »
Evening All,

Tank you Des, Rick and Jeroen for the very kind comments.

Time has been pressing because while there are about 10 days to go to the end of the GB of which this is part, I do not have 10 days at home between now and the end of the GB so I have been spending as much time as possible trying to get this one done.....and have succeeded as the following will I hope show.


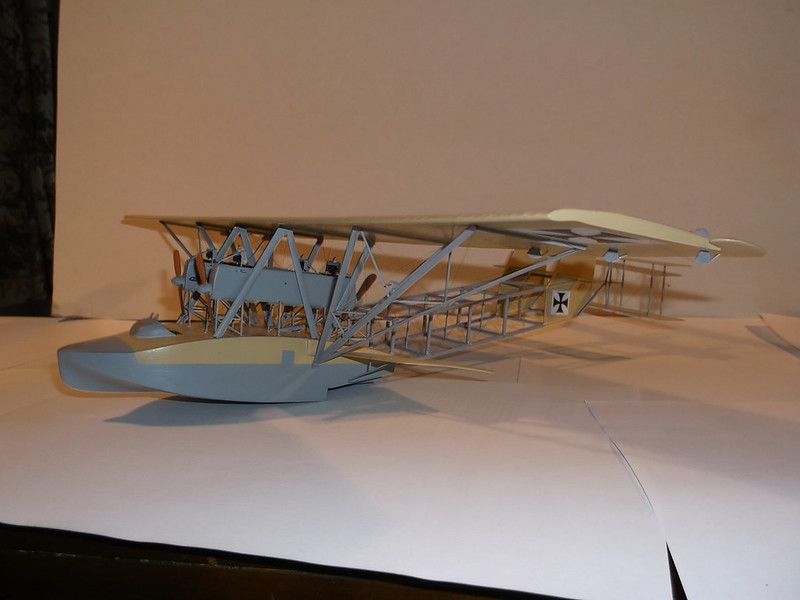
First I completed the large under wing struts and bracing on the port (left) side, having made a new pair of longer struts for the purpose.


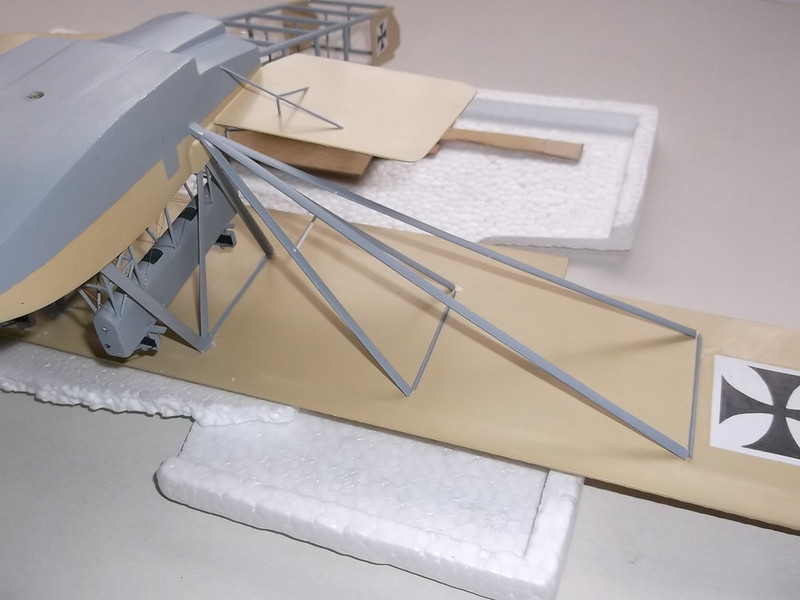
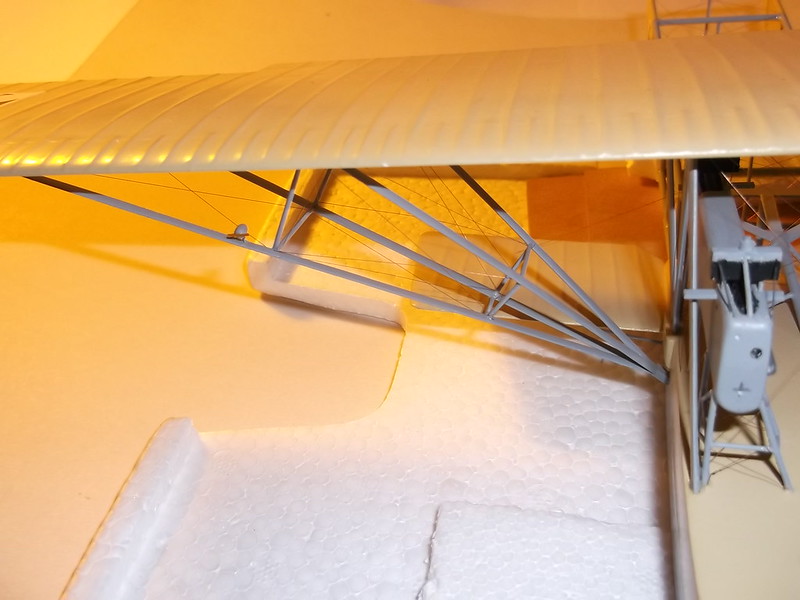
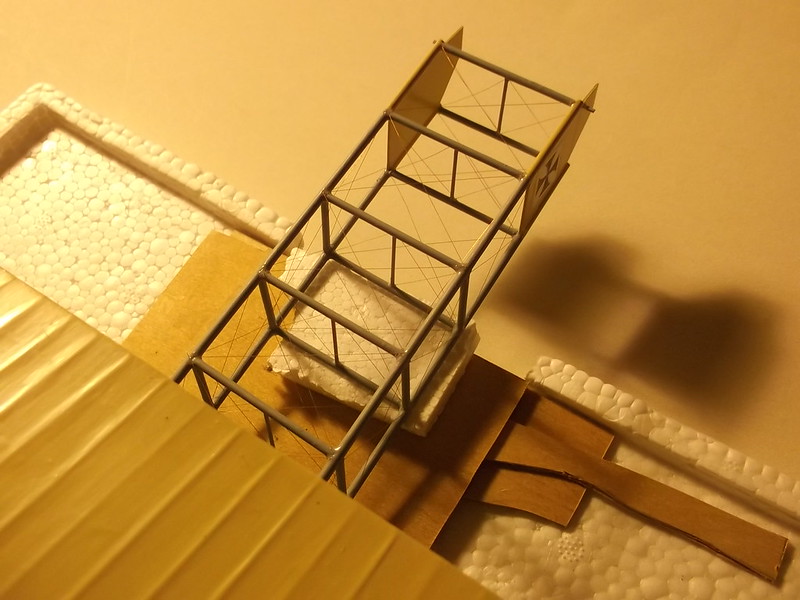
This meant that I could now rig both sides and I decided that this would be a good time to finish rigging the boom too.


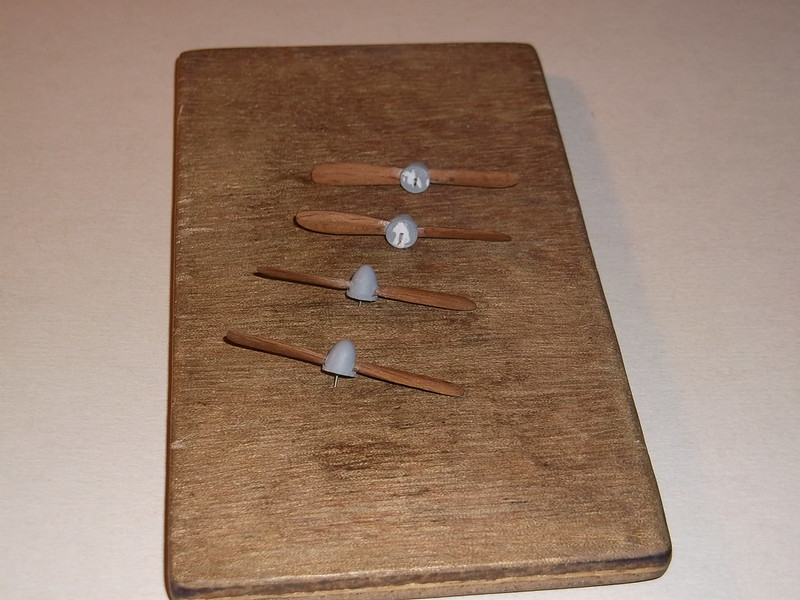
 I have been making the propellors on and off during the build, and I had made the spinners at the same time as the cockpit screen, so it was time to put these together:


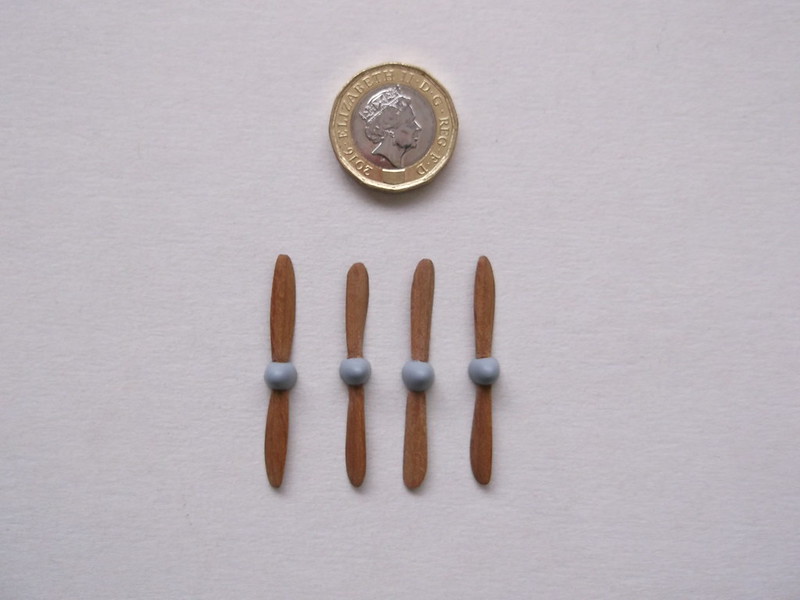
I realised that the propellors needed backing discs - easily sorted by marking out circles of the correct diameter with a pair of dividers on a sheet of 30 thou card and then cutting the circles out and finishing them with a file. These were glued to the backs of the spinners and any small gaps filled and the result painted again:


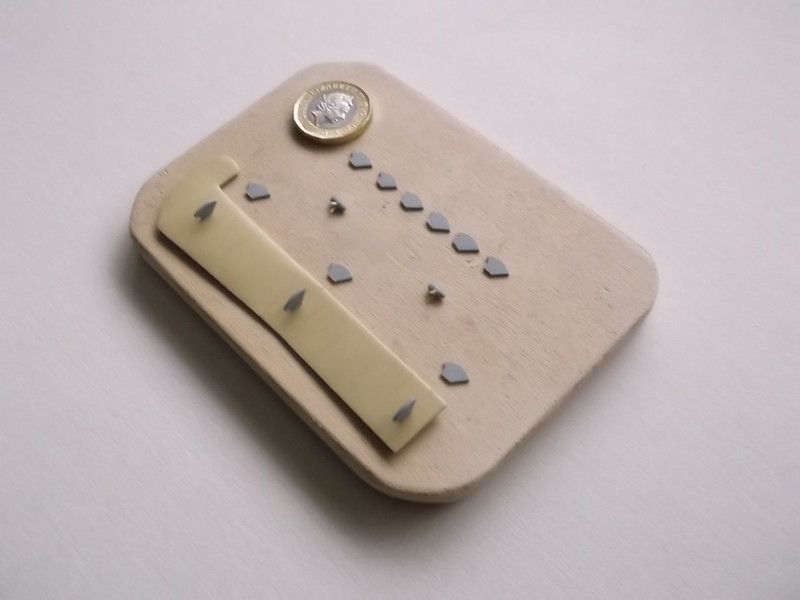
These were not fitted until the rest of the model was nearly finished. Next up were the small generators on the V struts: small pieces of 60 thou rod were shaped and propellors made from 10 thou card. Two small legs from 20 thou rod were added so that they could be secured to the struts. The aileron horns were cut from 20 thou card and shaped with round and flat files and glasspaper, and then painted. I have started to add them to the port (left) aileron in this image. The small pieces in the middle are the generators:


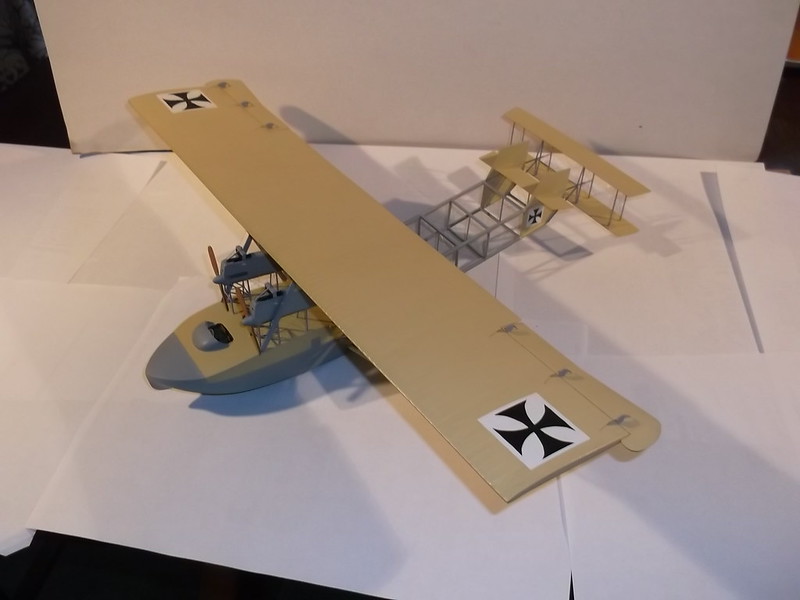
With the ailerons ready I inserted three small pieces of wire in holes which I had drilled into the leading edges of each aileron: the wires were held with CA. The other ends of the wires could then be inserted into holes in the trailing edges of the wing and also held with CA, and the control wires added to the horns. With the rigging finished it was time to go for the finish.... the propellors were added one at a time, again using wire to hold them in place in the nacelles. Two clear windscreens were shaped from some acatate sheet which was part of an old bubble pack from an Airfix kit from years ago - also CA'd into place. Last but not least I had to cut lengths of 30 thou plastic rod to add to the elevator sub-assembly so that this could be attached to the rear ends of the tail boom and the model is finished.


I am sorry about the quality of the photos but the light at the moment leaves a great deal to be desired and the weather is not suitable for taking this rather delicate model outside! I will post more photos in the completed models section soon.

Stephen.

Offline lcarroll

  • Administrator
  • Hero Member
  • ******
  • Posts: 8551
Re: 1/72 Zeppelin-Lindau (Dornier) Rs II
« Reply #118 on: December 28, 2017, 06:35:57 AM »
   Congratulations on meeting the deadline Stephen, and also on a very fine model! I'll be watching for the photo coverage in the Completed Models section.
Cheers,
Lance

Offline Dirigible-Al

  • Hero Member
  • *****
  • Posts: 530
Re: 1/72 Zeppelin-Lindau (Dornier) Rs II
« Reply #119 on: December 29, 2017, 04:26:39 AM »
WOW!
I heard that it all started when a bloke called Archie Duke shot an ostrich 'cause he was hungry!