Author Topic: Roden Fokker D.VI 1:32  (Read 16572 times)

Offline Fvdm

  • Sr. Member
  • ****
  • Posts: 326
Re: Roden Fokker D.VI 1:32
« Reply #30 on: December 29, 2020, 09:11:21 PM »
Thanks for the comments.

In the meantime I glued de fuselage and I'm prepping everything for some black paint. I want everything painted black ( this sounds somewhat familiar  :D) before decalling because I think it's less noticable when a decal isn't 100% perfect.

At first I have a pic of the seat in the cockpit to show the seatbelts. I think they are in a nice natural way. If not, please say so.


The stains on the seat are made with a light leather color and are sponged on the chair

The horizontal stabilisor and the elevators are glued and the control horns got holes drilled in it of 0,3mm.


The wing between the wheels is glued and the wheels are on the axles.


The wings are glued together but I forgot to take a pic of it. When I dry-fitted the cowling I noticed that the engine didn't fit. I expected this so I toke the proxxon and a round bit and sanded the cowling on the inside till the engine fitted. Luckily I don't have to sand the engine. Now it fits. The Aviattic cowling is still out of stock so i will use the kit one because I don't want to wait for it.


The fuselage


The seem on the back of the fuselage is completly gone. The paint will show if I'm correct.


Thanks for watching.

Ferry

(ps, sorry guys for not showing pics but links. pics are available now)
« Last Edit: December 29, 2020, 11:16:36 PM by Fvdm »

Offline TimDEFR

  • Newbie
  • *
  • Posts: 32
Re: Roden Fokker D.VI 1:32
« Reply #31 on: December 29, 2020, 09:50:17 PM »
Nice progress, Ferry. Modifications look good and clean.

Best,
Tim

Offline Alexis

  • Hero Member
  • *****
  • Posts: 7947
  • Love the self
Re: Roden Fokker D.VI 1:32
« Reply #32 on: December 29, 2020, 11:37:37 PM »
Motoring right along nicely  :)


Alexis
Hurra ! , Ich Leben Noch
Body and life is a vessel we use to travel the planet . Femininity is the gift , The miracle comes from what we do with it .

Offline RAGIII

  • Hero Member
  • *****
  • Posts: 18844
Re: Roden Fokker D.VI 1:32
« Reply #33 on: December 30, 2020, 01:14:12 AM »
Coming along very nicely! I am certainly inspired by your work and must do a DVI someday!
RAGIII
"A man has to know his limitations": Harry Callahan

"Don't slop it on" Lynda Geisler

Offline rhwinter

  • Hero Member
  • *****
  • Posts: 1135
Re: Roden Fokker D.VI 1:32
« Reply #34 on: December 30, 2020, 02:54:32 AM »
Beautiful, interesting, inspiring!

Offline Berman

  • Sr. Member
  • ****
  • Posts: 481
Re: Roden Fokker D.VI 1:32
« Reply #35 on: December 30, 2020, 04:38:17 AM »
 For those modelers who want to use the fuselage stitching technique shown on page two but do not have a milling machine. There is an alternative available in photoetch. Look at the photos on the Aviattic Decal website under 1/48th scale accessories. Here you will see six types of Fokker D.VII photoetch sets. The common fret has a strip, with angled slots, which can be used for embossing .005 inch  (.13mm) styrene or used as a mask with thick paint. A quicker method might be to lay a sheet of wax paper over the sheet styrene that is placed above the photoetched slotted strip. Then use a clothes iron to melt the plastic into the slots.
   The fret also contains another strip with raised angled stitching.

Bughunter

  • Guest
Re: Roden Fokker D.VI 1:32
« Reply #36 on: December 30, 2020, 07:31:19 AM »
In the meantime I glued de fuselage and I'm prepping everything for some black paint. I want everything painted black ( this sounds somewhat familiar  :D) before decalling because I think it's less noticable when a decal isn't 100% perfect.
A little warning:Do you plan to use Aviattic decals? Most of them are transparent and will not work on black!

At first I have a pic of the seat in the cockpit to show the seatbelts. I think they are in a nice natural way. If not, please say so.


Hmm, I think the thin alu of the seat would not hold the pilot, so the belts should come from the frame behind the seat? May be the belts are mounted on the middle strut, can't see it.

Just my 2 cents.

Cheers,
Frank

Offline Fvdm

  • Sr. Member
  • ****
  • Posts: 326
Re: Roden Fokker D.VI 1:32
« Reply #37 on: December 30, 2020, 11:10:53 PM »
Nice progress, Ferry. Modifications look good and clean.

Best,
Tim

Thanks Tim

Motoring right along nicely  :)


Alexis

Thank you Alexis

Coming along very nicely! I am certainly inspired by your work and must do a DVI someday!
RAGIII

Thanks RAGIII

Beautiful, interesting, inspiring!

Thank you

For those modelers who want to use the fuselage stitching technique shown on page two but do not have a milling machine. There is an alternative available in photoetch. Look at the photos on the Aviattic Decal website under 1/48th scale accessories. Here you will see six types of Fokker D.VII photoetch sets. The common fret has a strip, with angled slots, which can be used for embossing .005 inch  (.13mm) styrene or used as a mask with thick paint. A quicker method might be to lay a sheet of wax paper over the sheet styrene that is placed above the photoetched slotted strip. Then use a clothes iron to melt the plastic into the slots.
   The fret also contains another strip with raised angled stitching.

There are different ways to achieve the same result. I like the alternative you mentioned but that stitching is 1:48 scale. I can't see 1:32 scale.
In the meantime I glued de fuselage and I'm prepping everything for some black paint. I want everything painted black ( this sounds somewhat familiar  :D) before decalling because I think it's less noticable when a decal isn't 100% perfect.
A little warning:Do you plan to use Aviattic decals? Most of them are transparent and will not work on black!

At first I have a pic of the seat in the cockpit to show the seatbelts. I think they are in a nice natural way. If not, please say so.


Hmm, I think the thin alu of the seat would not hold the pilot, so the belts should come from the frame behind the seat? May be the belts are mounted on the middle strut, can't see it.

Just my 2 cents.

Cheers,
Frank

I will be using the kit decals for this build Frank. The belts are indeed mounted on the middle strut. Thanks for the input.

Offline Monty

  • Hero Member
  • *****
  • Posts: 1643
Re: Roden Fokker D.VI 1:32
« Reply #38 on: December 31, 2020, 02:42:33 AM »
Lovely progress, Ferry! Some great colour combinations and neat modelling... Great details too... Regards, Marc.

Offline Fvdm

  • Sr. Member
  • ****
  • Posts: 326
Re: Roden Fokker D.VI 1:32
« Reply #39 on: December 31, 2020, 10:04:28 PM »
Thanks Marc.

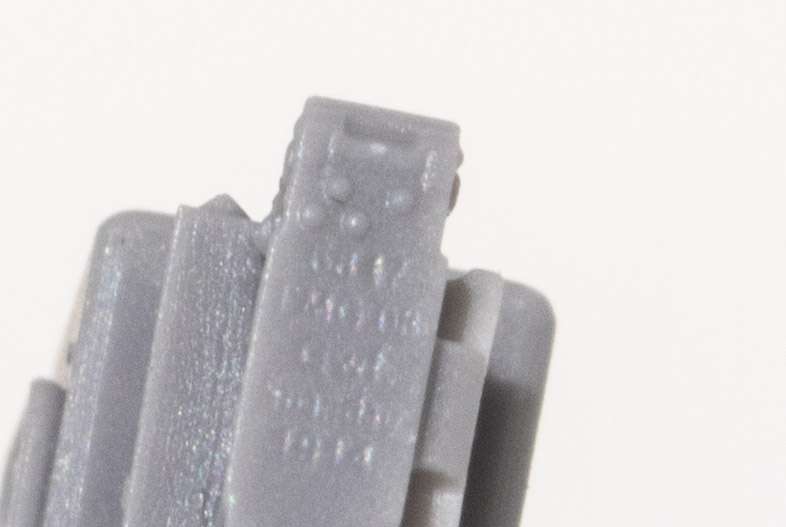
After spraying black it was time to assemble the MG's. After a carefull look I saw on top of the MG some text. Hardly readable but the piece is almost 2mm wide.


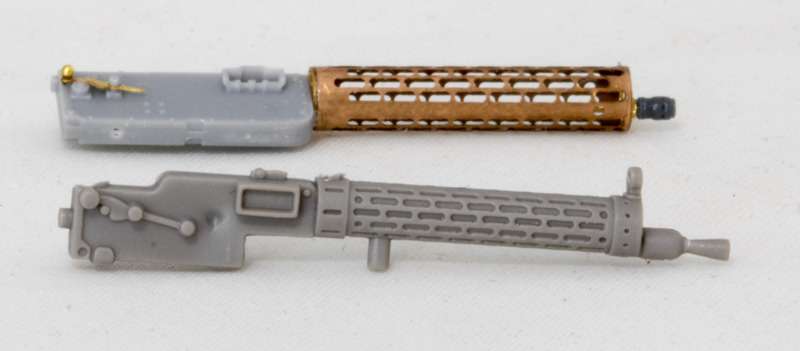
After a lot patience, a total white background (to see the parts when they jump out of the tweezers, and a fully secured workarea this is the result.


And in comparison with the kit one


Now I have some questions for you guys/girls. The visor of the MG is out of centre, see pic below.


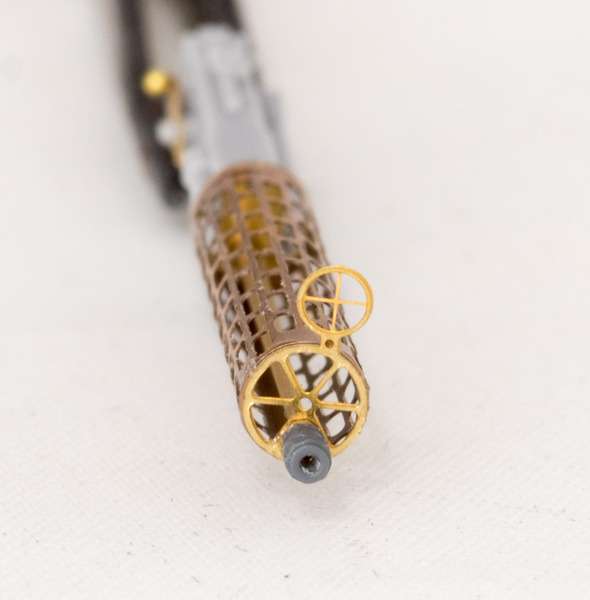
This brings the following questions to my mind
1) Is there a visor on each MG?
2) If so, are the visors on the outside, the inside, left or right?
3) If there is one MG with a visor, on wich side is the visor?

Thanks for watching and be carefull with the fireworks tonight.

Ferry

Offline fredjocko

  • Sr. Member
  • ****
  • Posts: 436
Re: Roden Fokker D.VI 1:32
« Reply #40 on: January 01, 2021, 12:46:48 AM »
Very nice!!!

Offline Borsos

  • Hero Member
  • *****
  • Posts: 3321
Re: Roden Fokker D.VI 1:32
« Reply #41 on: January 01, 2021, 12:54:53 AM »
Hello!
Please note that your aftermarket MGs are 08 while the kit’s MGs are 08/15. Contrary to the first look (“15”), they were available from the beginning of 1917 onwards. The German Fliegertruppe also used 08 until the end of the war, but check reference photos first if you care to use the correct Machine Guns for your model.
Best regards,
Andreas
"Deux armées aux prises, c'est une grande armée qui se suicide."
Barbusse.
"Ein Berg in Deutschland kann doch einen Berg in Frankreich nicht beleidigen. Oder ein Fluß oder ein Wald oder ein Weizenfeld."
Remarque.

Bughunter

  • Guest
Re: Roden Fokker D.VI 1:32
« Reply #42 on: January 01, 2021, 01:02:45 AM »
Very nice work on the Spandau!
The problem is, that this is a very early one called LMG 08 and will more match on an earlier Fokker Eindecker E.II/III, Pfalz and so on.
The cooling jacket, barrel and back part on the later ones LMG 08/15 looks more different, see this set from Master:
http://www.master-model.pl/product/am-32-023.html
So this set will more look like your Roden one.

Sorry for the bad news!

Cheers,
Frank
PS: Oops, Andreas was faster!

Offline Fvdm

  • Sr. Member
  • ****
  • Posts: 326
Re: Roden Fokker D.VI 1:32
« Reply #43 on: January 01, 2021, 08:53:31 PM »
Oops, I thought I had bought the correct ones. I think it's important to use the correct ones so I just ordered the correct ones. Thanks for the tips.

Offline macsporran

  • Hero Member
  • *****
  • Posts: 1670
Re: Roden Fokker D.VI 1:32
« Reply #44 on: January 01, 2021, 09:56:28 PM »
Shot down by an anachronistic gun!