Author Topic: OEFFAG D.III "2" & "5" - 7th Kosciuszko Sqn M. Cooper & E. Corsi | Lukgraph 1/32  (Read 14456 times)

Offline Boch

  • Full Member
  • ***
  • Posts: 163
Superb work! And great research, well done for getting in contact with Craftlab, you will be able to produce a really accurate representation of the original aircraft.

Thank you :)


Workshop - Cockpit Fitting and Engine Preparation


As I've mentioned before, this is my first fully resin model. So before painting, I needed to make sure that the fuselage, with all the modifications and kit parts, fits together properly and that I can close it without major issues.

In this model, the cockpit is not a separate module that gets enclosed within the fuselage. The fuselage walls serve as load-bearing structures, which makes this step crucial.


Cockpit Test Fit


I used Maskol to temporarily install the key cockpit components. Some elements are still missing, including:

  • some instruments on the instrument panel,
  • the throttle and fuel mixture control mechanisms,
  • the compass, wiring, and control cables.

Of course, all the elements will still need to be sanded and the edges, shapes and overall aesthetics will need to be refined. Some of the imperfections will definitely come out after the primer is applied, so I'm not particularly concerned about that at the moment.


In the following pictures, you can see a schematic layout of the wiring on both fuselage sides and throttle and fuel mixture control mechanisms. Control cables are not marked yet.


Instrument Panel Modifications

I decided to modify the panel above the fuel tank on the left fuselage side:

  • Most of the original details were sanded off,
  • I prepared the surface for new gauges and switches.


Engine Test Fit

As I mentioned earlier, I also plan to test-fit the engine, as well as:

  • the engine mounting frame,
  • all supporting structures,
  • and ensure that everything fits together with no surprises.


The engine itself looks very promising, as you can see. On the second base, you'll find various engine components - intake and exhaust manifolds, as well as different piping.

Building this engine is definitely going to be a lot of fun!

That's it for today - more updates coming soon!

Best regards,

Lukasz
« Last Edit: April 06, 2025, 02:35:19 AM by Boch »

Offline Richtrad

  • Full Member
  • ***
  • Posts: 150
Ingenious use of Maskol when dry fitting! I've been looking for something like this. Thanks for the tip.

Warren Q
"Wheels might look complicated to the likes of you..." - Philomena Cunk

Offline NigelR

  • Hero Member
  • *****
  • Posts: 2706
More lovely work, and thanks for sharing your information and approach, this will be very helpful for others (like me) who have this one in the stash.

Offline Boch

  • Full Member
  • ***
  • Posts: 163
Ingenious use of Maskol when dry fitting! I've been looking for something like this. Thanks for the tip.

For me it's a multi-purpose tool and I can't imagine my workshop without it. I'm glad I could help.

More lovely work, and thanks for sharing your information and approach, this will be very helpful for others (like me) who have this one in the stash.

We Golden Age modelers have to help each other :) I'm glad that the information I'm posting is helpful. I'll be eagerly awaiting your Oeffag D.III

Regards
Lukasz

Offline RAGIII

  • Hero Member
  • *****
  • Posts: 19957
Outstanding start on the modification and test fitting of the interior. Your work looks as though it will be very impressive!
RAGIII
"A man has to know his limitations": Harry Callahan

"Don't slop it on" Lynda Geisler

Offline Boch

  • Full Member
  • ***
  • Posts: 163
Outstanding start on the modification and test fitting of the interior. Your work looks as though it will be very impressive!

Thank you very much for your support. I hope I can put everything together according to plan.

Regards
Lukasz

Offline Boch

  • Full Member
  • ***
  • Posts: 163
Oeffag D.III - Workshop Update

Dear fellow modellers,

I'd like to share a quick update on my current Oeffag D.III project. The past few days brought some progress as I continue to assemble key sections of the model, testing the fit and thinking ahead to avoid any post-painting surprises. It's also a good time to plan a few improvements and small additions.


HGW Seatbelts
I?ve received the HGW seatbelts ? in my humble opinion, the best option currently available for WWI German and Austro-Hungarian aircraft. This will be my third time using them, and I find the final effect always worth the investment.


Armament - Gaspatch vs. Lukgraph
I also ordered some Gaspatch Schwarzlose machine guns. They were intended for a different project, but I wanted to compare them with the kit parts provided by Lukgraph. I cut off the handles and added leather padding where the grips will be visible in the cockpit. In the second Oeffag I?m building, I'll use bare Gaspatch grips while keeping the kit gun bodies.


Cockpit Detailing - Throttle and Lamp
The kit throttle was upgraded with an additional lever - possibly a fuel mixture control - and a small scale visible in some reference photos. The whole thing is made from PE parts and fine brass tubing.


I also noticed a cockpit lamp in one archival photo. Since pilots from the 7th Squadron often flew in poor lighting conditions, I thought this would be an interesting and realistic detail to include. I built a small prototype first to test the idea, and what you now see in the photos is the final version (still missing the bulb and protective wire cage). The wire parts are only dry-fitted for now and will be glued in after painting.


Austro-Daimler Engine
The heart of the aircraft: the Austro-Daimler 23000 engine, producing 225 hp. I've removed it from the casting block and I'm very happy with the quality - after painting and weathering it should look superb. I've added the intake manifolds and prepared the engine mount. It required a minor correction to properly align the engine with the fuselage axis. The engine is temporarily fixed in place using Maskol to check fit.


I won't go into engine detailing just yet - I plan to add some extras, but more on that later. Right now I need to see how much space remains for wiring and accessories once the fuselage is closed.


The Iconic Oeffag Cowling
I've installed the engine cowling - the distinctive blunt nose that makes the Oeffag D.III so recognizable. Fit is good, and with most key components in place, the fuselage can be considered structurally tested.


Wings and Internal Reinforcements
Lukgraph has included a smart solution to avoid wing droop - metal reinforcement rods. I started with the lower wing, which attaches via two rods inserted about 5 mm deep into the fuselage. Each wing half also has channels for two longer rods running almost the entire span.

To increase durability, I drilled matching holes in the fuselage so one long rod can pass through both wings and the fuselage in a single piece. This approach should ensure excellent rigidity. The drilling wasn't easy - I lost three drill bits and damaged one wing, but I got it to work in the end. I'll cover the rod exit points with thin polystyrene strips to keep things neat.


The upper wing follows the same concept - though it connects via the radiator section instead of the fuselage - and I made similar modifications.


That's all for now. Thank you for your attention, and I look forward to sharing more progress in the next update!

Warm regards,
Łukasz

Offline NigelR

  • Hero Member
  • *****
  • Posts: 2706
Excellent work, it looks like you are making good progress. A couple of questions - what do you plan to do about the raised intake detail on the bottom of the nose cowling? I think these should be slots. Also, do you plan to replace the exhaust pipes? They seem to be an odd flattened shape which I can't find in any photographs. They usually seem to be round at the end (but maybe I haven't seen all the relevant photos....).

Offline Boch

  • Full Member
  • ***
  • Posts: 163
Excellent work, it looks like you are making good progress. A couple of questions - what do you plan to do about the raised intake detail on the bottom of the nose cowling? I think these should be slots. Also, do you plan to replace the exhaust pipes? They seem to be an odd flattened shape which I can't find in any photographs. They usually seem to be round at the end (but maybe I haven't seen all the relevant photos....).

Thank you. I'm not sure I fully understand the issue of the cover. Can you explain which place you mean? As for the exhausts, I haven't analyzed the subject yet.

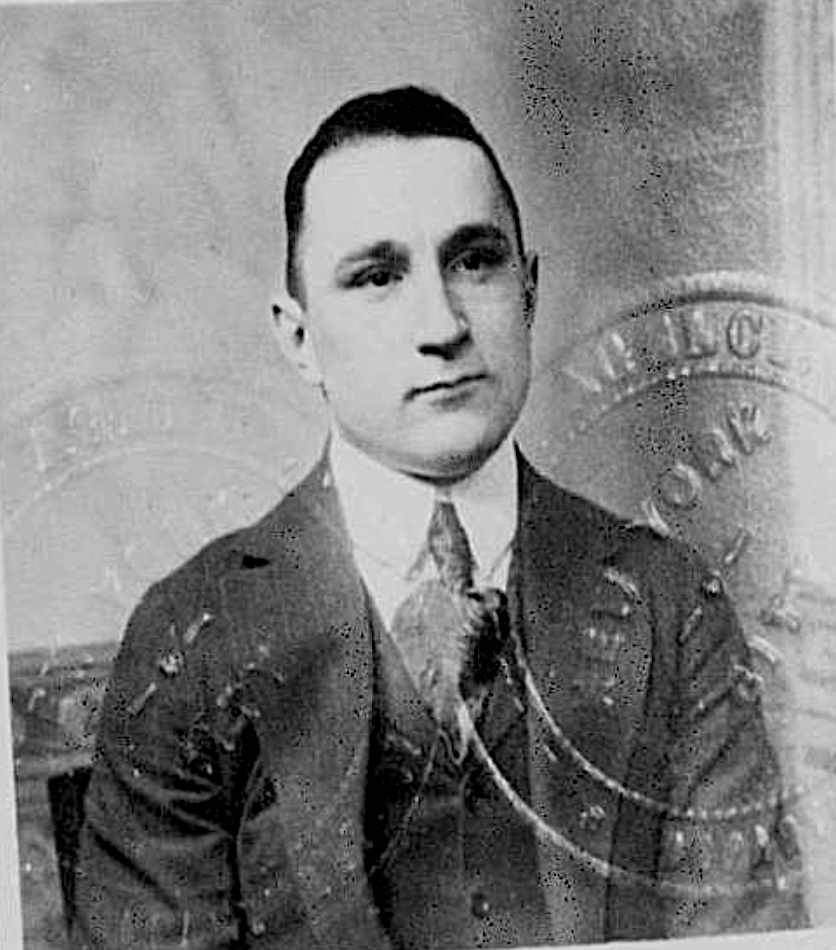
Merian C. Cooper - A Testament of Bravery

In a previous post, I introduced Lt. Merian C. Cooper and his service up to the end of WWI on the Western Front. Today, I'd like to share a remarkable and lesser-known account of his courage'an original, handwritten report by 1st Lt. Edmund C. Leonrad, documenting a dramatic episode on September 26th, 1918, when Cooper nearly lost his life saving his wounded observer - the author of these words.


📝 Original report (transcription):

First Lieut. Merian C. Cooper
For extraordinary heroism in action in the Argonne on the 26th September, 1918.
Lieut. Cooper, pilot, with Lieut. Leonard, observer, was flying one of a bombing formation of eight DH4 Liberty's, when they were attacked by 12 Fokkers after the bombs had been dropped. A bullet grazed Lieut. Cooper's head, Lieut. Leonard was wounded and the motor caught on fire.
Lieut. Cooper put the plane into a spin in an unsuccessful attempt to extinguish the fire. It was so painful that he (Lieut. Cooper) unfastened his safety belt and was in the act of jumping out to escape the agony of the flames when he remembered Lieut. Leonard in the rear seat and not knowing whether Lieut. Leonard was alive or dead, he stayed in the plane.
Lieut. Cooper suffered untold torture for the sake of another rather than end his own pain at the expense of a comrade. Lieut. Cooper succeeded in extinguishing the flames in the air and bringing the plane safely to the ground, at La Monnerie in German territory. Both Lt. Cooper and Lt. Leonard were prisoners in Germany until after the armistice was signed.
- Edmund C. Leonrad, 1st Lt. 95th Aero Squadron, U.S.A.

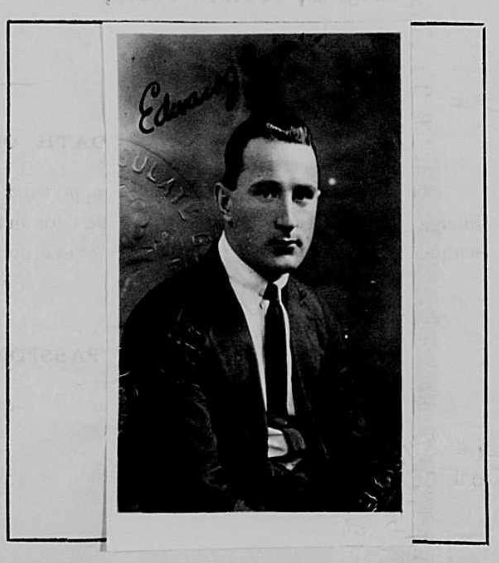
Edward J. Corsi - The Forgotten Hero of the Kościuszko Squadron

While the story of the Kościuszko Squadron often highlights the legendary Merian C. Cooper and Cedric Fauntleroy, there's another name that deserves our attention - Edward J. Corsi, a pilot whose contributions were just as significant, though less widely remembered. It's time to bring his story back to light.


Born in Brooklyn, New York, Corsi volunteered for service in 1916 with the American Red Cross and served as an ambulance driver on the Western Front. Seeking more active duty, he joined the French Foreign Legion and later trained as a pilot at the Bl'riot school in Avord, France.

By his own account, Corsi was not a natural aviator - he had to work hard to earn his wings. After earning his brevet, he continued training at Pau, Cazaux, and G.D.E. He gained a reputation for being a methodical and brave pilot, even serving briefly as an instructor before being posted to the front.


On May 30, 1918, he was assigned to SPAD Squadron 77 and flew numerous combat missions until the end of the war. He was wounded in action, but made a full recovery in a French hospital. For his service, Corsi was awarded the Croix de Guerre with palm and star, recognizing his exceptional bravery. At the end of the war, he held the rank of sergeant.


Instead of returning home, Corsi remained in Europe with the American occupation forces in Germersheim, Germany. It was likely there that he heard of Cooper's plan to form a squadron of American volunteers to aid the newly reborn Polish Republic in its struggle against the Bolsheviks.


He arrived in Poland in 1919 and became one of the very few Kościuszko Squadron pilots to serve from the earliest operations in Ukraine through the Dnieper offensive, and finally the dramatic defense of Lw?w (Lviv) against Budyonny's Cavalry Army.

Always ready to fly, to fight, and to support his comrades - that was Edward Corsi.

More on his service in Poland to come in future posts.

Cheers,
Lukasz
« Last Edit: April 06, 2025, 06:40:14 AM by Boch »

Offline AngryJazz

  • Hero Member
  • *****
  • Posts: 611
    • @AngryJazz_Models
Lovely work on the Oeffag! Thanks for the updates  ;D
//Ben - @AngryJazz_Models

Offline Boch

  • Full Member
  • ***
  • Posts: 163
Lovely work on the Oeffag! Thanks for the updates  ;D

Thank you  ;)

Regards
Lukasz

Offline Jorgo

  • Hero Member
  • *****
  • Posts: 523
Excellent work and great tutorial, thank you !

Joerg

Offline Boch

  • Full Member
  • ***
  • Posts: 163
Excellent work and great tutorial, thank you !

Joerg

Im glad that you like itd. Thank you for you attention.

Regards
Lukasz

Offline NigelR

  • Hero Member
  • *****
  • Posts: 2706
Regarding the cowling, LukGraph have  added four raised lines at the bottom of the nose cowling (see first photo). From what I can see these should be cooling slots, they are not raised. So they will have to be sanded off and maybe drilled out or represented by decals.

The kit exhausts have a rectangular cross section at the end. Every photo I have seen shows the exhausts had a round cross section at the end, but maybe there are some photos I have missed? I've attached a photo of Navratil's machine that shows the round exhausts.


Offline Boch

  • Full Member
  • ***
  • Posts: 163
Regarding the cowling, LukGraph have  added four raised lines at the bottom of the nose cowling (see first photo). From what I can see these should be cooling slots, they are not raised. So they will have to be sanded off and maybe drilled out or represented by decals.

The kit exhausts have a rectangular cross section at the end. Every photo I have seen shows the exhausts had a round cross section at the end, but maybe there are some photos I have missed? I've attached a photo of Navratil's machine that shows the round exhausts.


Thank you for your message and pointing it out. There really should be holes there. As for the exhaust pipes, I also looked through the materials and came to the same conclusion. I discovered something else. The upper part of the front engine cover is the wrong shape. So these three things definitely need to be improved. I already have an idea :)

Regards
Lukasz