Author Topic: 1:32nd scale Bristol Scout C  (Read 11060 times)

Offline Mike Norris

  • Hero Member
  • *****
  • Posts: 2214
  • RAF Old and Bold
    • Mikes WW1 Aircraft Models
1:32nd scale Bristol Scout C
« on: April 16, 2023, 06:21:33 AM »
Hi all,
As my build of the Hannover Cl.II is drawing to a close, I'm starting research for my next build.
This will be the 'Copper State Models' Bristol Scout C.
The aircraft I intend to build is Scout serial number 1260 (not a kit scheme).

Bristol Scout C, serial number 1260 was one of a batch of 24 aircraft built under contract CP 67209/14 (serials 1243 to 1266).
This aircraft was delivered to Eastchurch on the 4th of July 1915 and was officially accepted a week later.
It was at St Pol for a few days before joining No.5 Wing at Dover on the 13th of August for Home Defence.
On the 24th of January 1916 and the 9th of February, it was flown by Flt. Sub. Lt. R.F.S Leslie to defend against enemy seaplanes that were attacking Folkstone, Dover, Broadstairs and Ramsgate.
The aircraft required repairs after it overturned on the 29th of June, but was damaged beyond repair on the 10th of August and written off on the 4th of September 1916.
The Bristol Scouts had various armament fitted, which included Lewis machine guns mounted obliquely on one or both sides of the fuselage.
Also forward facing on the top forward fuselage decking or forward facing on the upper wing.
During one period, 1260 had a Lewis machine gun fitted on the top forward fuselage decking.
It seems strange therefore that this aircraft was not fitted with any form of synchronising mechanism to stop fired rounds hitting the rotating propeller.
Evidence of this can be seen on similar period Scouts with this armament fitted, by wrappings around the propeller blades that were aligned with the muzzle of the machine gun.

Mike


« Last Edit: April 18, 2023, 04:38:05 AM by Mike Norris »


Retired - 27 years RAF service then 20 years Military Aerospace Technical Author/editor.

Offline RichieW

  • Hero Member
  • *****
  • Posts: 1966
Re: 1:32nd scale Bristol Scout C
« Reply #1 on: April 16, 2023, 06:51:14 AM »
I'm very much looking forward to seeing this one Mike. Have fun with i, I know you will  do 'Bunny' Bremner proud.

Richie

Offline Mike Norris

  • Hero Member
  • *****
  • Posts: 2214
  • RAF Old and Bold
    • Mikes WW1 Aircraft Models
Re: 1:32nd scale Bristol Scout C
« Reply #2 on: April 16, 2023, 09:58:36 AM »
I'm very much looking forward to seeing this one Mike. Have fun with i, I know you will  do 'Bunny' Bremner proud.

Richie
Hi Richie,
The 'Bunny' Bremner build will be after this one.
This one is for me and to check it out for the 'Bunny' build,

Mike


Retired - 27 years RAF service then 20 years Military Aerospace Technical Author/editor.

Offline FAf

  • Hero Member
  • *****
  • Posts: 1075
Re: 1:32nd scale Bristol Scout C
« Reply #3 on: April 16, 2023, 04:39:43 PM »
I'm really looking forward to this! This is a kit I really want, but haven't gotten yet. Maybe you will 'force' me to buy one?! 🙂

/Fredrik

Offline pepperman42

  • Hero Member
  • *****
  • Posts: 4437
  • Sergeant, my brown pants.......
Re: 1:32nd scale Bristol Scout C
« Reply #4 on: April 16, 2023, 10:56:28 PM »
Will watch closely.

Steve

Offline RichieW

  • Hero Member
  • *****
  • Posts: 1966
Re: 1:32nd scale Bristol Scout C
« Reply #5 on: April 16, 2023, 10:59:24 PM »
I'm very much looking forward to seeing this one Mike. Have fun with i, I know you will  do 'Bunny' Bremner proud.

Richie
Hi Richie,
The 'Bunny' Bremner build will be after this one.
This one is for me and to check it out for the 'Bunny' build,

Mike

Double the fun then! :)

Richie

Offline Edgar

  • Full Member
  • ***
  • Posts: 136
Re: 1:32nd scale Bristol Scout C
« Reply #6 on: April 16, 2023, 11:39:37 PM »
Hi Mike
If you will need any help with additional parts please do let me know
Will try to help

Edgar

Offline Mike Norris

  • Hero Member
  • *****
  • Posts: 2214
  • RAF Old and Bold
    • Mikes WW1 Aircraft Models
Re: 1:32nd scale Bristol Scout C
« Reply #7 on: April 17, 2023, 04:18:32 AM »
Hi Mike
If you will need any help with additional parts please do let me know
Will try to help

Edgar

Hi Edgar,
Thanks.
After my build I'll be building the Scout 1264 for Theo Willford in David Bremners team,

Mike


Retired - 27 years RAF service then 20 years Military Aerospace Technical Author/editor.

Offline Mike Norris

  • Hero Member
  • *****
  • Posts: 2214
  • RAF Old and Bold
    • Mikes WW1 Aircraft Models
Re: 1:32nd scale Bristol Scout C
« Reply #8 on: April 18, 2023, 04:32:40 AM »
Hi all,
I think this model will be up there with 'Wingnut Wings' kits, as expected now from 'Copper State Models'
I've been researching information for my model build of the Scout and in particular the rigging.
However, I've found a few points that I think need clarifying for anyone making the Scout.

The kit comes with both the Gnome Lambda and the optional Le Rhone 9C engine for scheme 1264.
The initial engine fit for the Scout was the Gnome Lambda engine and it seems it was preferred by the Royal Naval Air Service as being more reliable than the Le Rhone 9C.
However some Scout C aircraft were fitted with the Le Rhone 9C as a development towards the Scout type D.
Kit scheme for Serial No.1264 on page 18 of the instruction manual possibly indicates that the Le Rhone 9C can be fitted and with engine cowl part B5.

The twin flying wires are highlighted red for required rigging at step 38 in the instruction manual, but nowhere else in the manual.
The upper and lower drag wires are also illustrated in the manual, but not highlighted red as required rigging.
The internal rigging for the cockpit frames does not include the cross bracing wires at the frame behind the pilots seat.
The internal rigging for the cockpit has no information for the aileron control cables, although there does appear to be a control lever at the front of the aileron torsion bar.
Instruction manual steps 57 and 59 illustrations have associated misleading text (incidence wire, not flying wires).
The upper elevator control cables are attached to the bottom of the control column, which protrudes from the underside of the fuselage. These are highlighted red at step 10 only as required rigging.

These minor observations in no way detract from what is a great kit.
I just wanted to point out what I think are points needing clarification,

Mike
« Last Edit: April 25, 2023, 08:23:26 PM by Mike Norris »


Retired - 27 years RAF service then 20 years Military Aerospace Technical Author/editor.

Offline Mike Norris

  • Hero Member
  • *****
  • Posts: 2214
  • RAF Old and Bold
    • Mikes WW1 Aircraft Models
Re: 1:32nd scale Bristol Scout C
« Reply #9 on: April 19, 2023, 08:25:31 AM »
Hi all
A quick update.
The supplied pilots seat and cushion parts are of good quality.
However, I chose to replace them with a seat from the 3D printed ‘Gaspatch’ British wicker seat/cushion (22-32249) set.
This seat fits exactly onto the kit seat base, which just needed the seat cushion sanding away.
The 'Gaspatch' seat was then simply secured onto the modified kit base, using thin CA adhesive,

Mike


« Last Edit: April 19, 2023, 10:36:40 AM by Mike Norris »


Retired - 27 years RAF service then 20 years Military Aerospace Technical Author/editor.

Offline pepperman42

  • Hero Member
  • *****
  • Posts: 4437
  • Sergeant, my brown pants.......
Re: 1:32nd scale Bristol Scout C
« Reply #10 on: April 19, 2023, 10:45:00 PM »
Thanks for noting the minor tweaks and nice start!

Steve

Offline Mike Norris

  • Hero Member
  • *****
  • Posts: 2214
  • RAF Old and Bold
    • Mikes WW1 Aircraft Models
Re: 1:32nd scale Bristol Scout C
« Reply #11 on: April 20, 2023, 04:36:50 AM »
Hi all,
The Scout had at the forward sides of the fuselage, an access panel that was used to gain access into the forward cockpit from both sides of the fuselage.
These panels opened upwards with two separate hinges on the top edge and were secured closed with two latches at the bottom edge.
The kit fuselage halves have these detailed panels pre-moulded.
Unfortunately, the panels cover all of the cockpit internal detail.
Therefore, I chose to modify the panel on the port side of the fuselage in the open position, allowing visibility of the cockpit detail.

The opening panel was cut from the fuselage half then filed to shape.
The panel was made from 0.2 mm thick plastic card.
The top hinges and latches are represented by 0.3 mm diameter tube and plastic card.
The panel stay rod will be added later in the build.

Mike


Retired - 27 years RAF service then 20 years Military Aerospace Technical Author/editor.

Offline pepperman42

  • Hero Member
  • *****
  • Posts: 4437
  • Sergeant, my brown pants.......
Re: 1:32nd scale Bristol Scout C
« Reply #12 on: April 21, 2023, 03:37:33 AM »
Nice touch!

Steve

Online Borsos

  • Hero Member
  • *****
  • Posts: 3322
Re: 1:32nd scale Bristol Scout C
« Reply #13 on: April 21, 2023, 04:19:10 AM »
Looks great from here!
Andreas
"Deux armées aux prises, c'est une grande armée qui se suicide."
Barbusse.
"Ein Berg in Deutschland kann doch einen Berg in Frankreich nicht beleidigen. Oder ein Fluß oder ein Wald oder ein Weizenfeld."
Remarque.

Offline Mike Norris

  • Hero Member
  • *****
  • Posts: 2214
  • RAF Old and Bold
    • Mikes WW1 Aircraft Models
Re: 1:32nd scale Bristol Scout C
« Reply #14 on: April 23, 2023, 08:24:48 PM »
Hi all,
During its service life the Scout had various weapons fitted and in different locations on the aircraft.
From rifles, Lewis machine guns and even duck guns fitted to the fuselage side, to machine guns fitted on the fuselage decking in front of the pilot or over wing mounted guns.
Different type of over wing gun mountings were used and either fixed or movable.

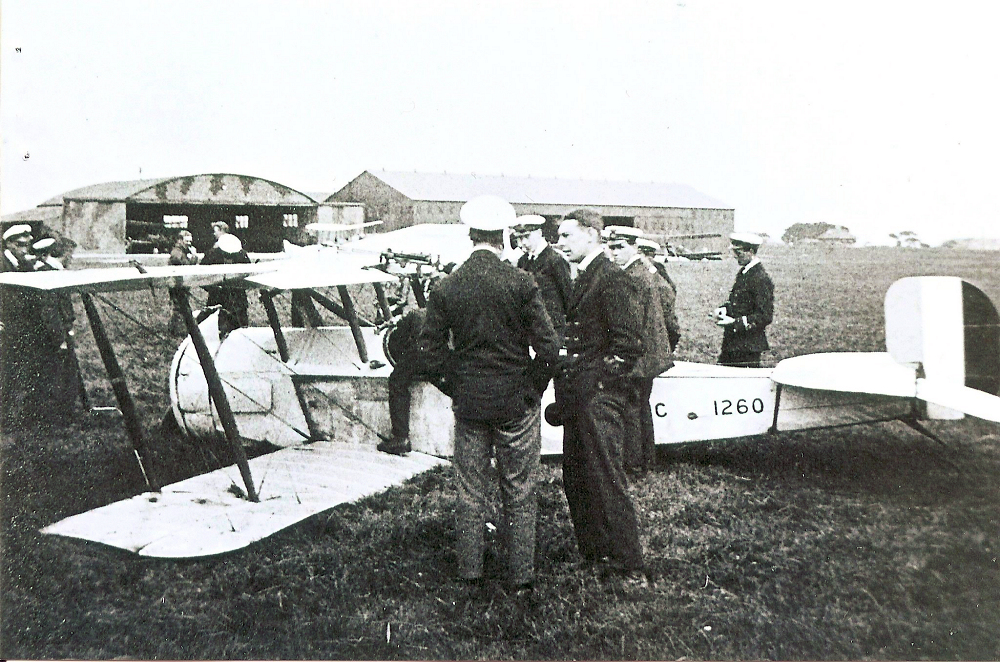
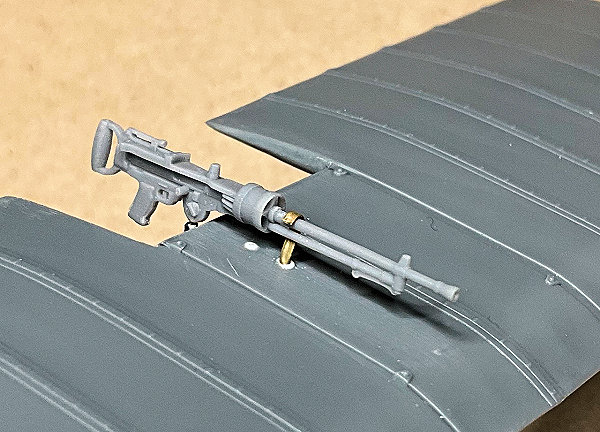
In the following photograph of 1260, it can be seen that it’s over wing gun mount was possible the Bristol Scout Lewis No.5 mounting Type1 - ’Christy pattern’ dated March 1916.
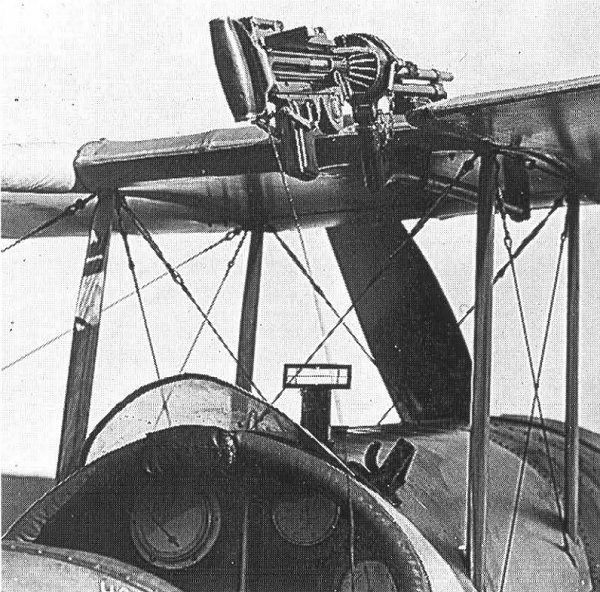
This mounting allowed the weapon to be fired over the rotating arc of the propeller or fired vertically upward.
It also allowed for the ammunition drum to be replaced, unlike the fixed mount version.
The mounting was basically a single metal tube attached to the underside of the upper wing centre section, which was cut back to the wing rear spar (to allow the weapon to pivot over the cockpit).
The gun and its mounting were off-set to the starboard side of the centre section.
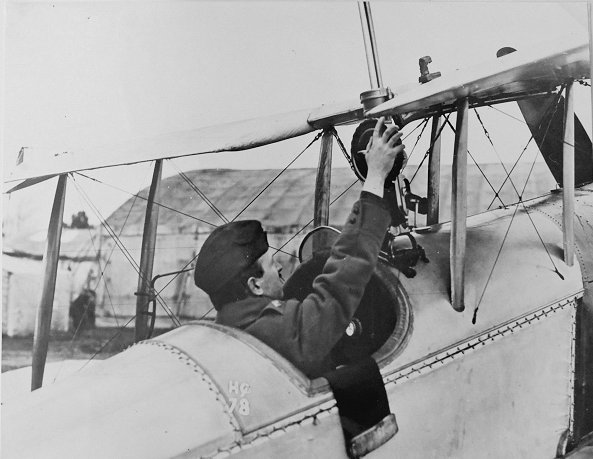
At the cockpit end of the tube was a pivot mounting in the upturned top of the tube.
When fired over the rotating propeller the gun was locked in the horizontal position, but when fired vertically the hand grip of the machine gun was simply clipped into a fitting on the starboard side of the cockpit decking panel.
The horizontally positioned weapon was fired using a pull cable from the gun down into the cockpit.
When fired vertically it’s probable the pilot could operate the trigger by hand.


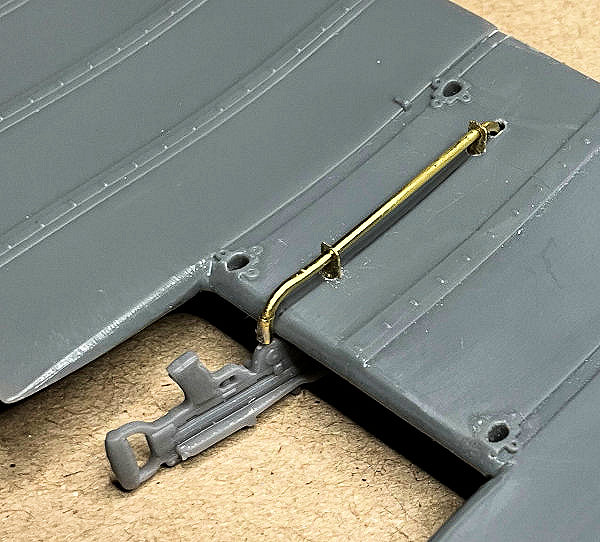
To represent this weapon fit I used a ‘Gaspatch’ 1:32nd scale Lewis Mk.1 half stripped heatsinks (13-32052).
Also 'Albion Alloy's' Brass tubing and rods.
The trailing edge of the upper wing required cutting back to the rear spar to allow the Lewis gun to be pivoted to to cockpit for reloading or firing vertically.


The fuselage clip fitting still needs to be made as well as a magneto starter switch (mounted on the post side of the fuselage near the cockpit,

Mike


Retired - 27 years RAF service then 20 years Military Aerospace Technical Author/editor.