Author Topic: 1:32nd scale Bristol Scout C  (Read 11064 times)

Offline pepperman42

  • Hero Member
  • *****
  • Posts: 4437
  • Sergeant, my brown pants.......
Re: 1:32nd scale Bristol Scout C
« Reply #15 on: April 23, 2023, 08:47:22 PM »
Very fine additions.

Steve

Offline Gisbod

  • Hero Member
  • *****
  • Posts: 2438
Re: 1:32nd scale Bristol Scout C
« Reply #16 on: April 23, 2023, 08:53:31 PM »
Lovely Mike,

That was a brave cut!

Guy
“Oh! I have slipped the surly bonds of Earth -
Put out my hand, and touched the face of God.”

P.O. John Gillespie Magee 1941

Offline Tim Mixon

  • Hero Member
  • *****
  • Posts: 837
  • Main focus is 1/72 WWI
Re: 1:32nd scale Bristol Scout C
« Reply #17 on: April 25, 2023, 12:30:11 AM »
Lovely additions to detail Mike. This is going to be a real treat to watch you build. 

All the best,
Tim

Offline RichieW

  • Hero Member
  • *****
  • Posts: 1966
Re: 1:32nd scale Bristol Scout C
« Reply #18 on: April 25, 2023, 07:37:00 AM »
As Gisbod said, that's a brave cut perfectly executed. Opening that inspection hatch will be a lovely touch. I'm looking forward to the next installment.

RE the engine,I think I'm right in saying the standard fitting was the Gnome monosoupape but some pilots (Bunny Bremner included) had a Le Rhone fitted. Despite the numbers suggesting the Gnome was more powerful many felt the Le Rhone in practice had more HP. I'll check through my reference books and see if I can dig out where I got that from. I get a little confused and forgetful at times so probably best not to take my word for it until I can confirm.

Richie

Offline Mike Norris

  • Hero Member
  • *****
  • Posts: 2214
  • RAF Old and Bold
    • Mikes WW1 Aircraft Models
Re: 1:32nd scale Bristol Scout C
« Reply #19 on: April 25, 2023, 10:02:57 AM »
As Gisbod said, that's a brave cut perfectly executed. Opening that inspection hatch will be a lovely touch. I'm looking forward to the next installment.

RE the engine,I think I'm right in saying the standard fitting was the Gnome monosoupape but some pilots (Bunny Bremner included) had a Le Rhone fitted. Despite the numbers suggesting the Gnome was more powerful many felt the Le Rhone in practice had more HP. I'll check through my reference books and see if I can dig out where I got that from. I get a little confused and forgetful at times so probably best not to take my word for it until I can confirm.

Richie

Hi Richie,
Yes you are correct.
The initial and early Scouts were fitted with the Gnome Lambda 80hp seven cylinder rotary engine.
'Bunnie' Bremner had the Le Rhone 9C nine cylinder engine fitted to 1264 when flying with the RNAS from the island of Thassos, Greece.
Although more powerful than the Gnome engine, the RNAS considered it less reliable and initially stuck with the Gnome.
Trials of other rotary engines started around March 1916, including the 80 hp Le Rhône and Clerget, the 100 hp Monosoupape-Gnome, and the 110 hp Clerget or Le Rhône rotaries.
Later Scout type D's had the 100 hp Gnóme Monosoupape B2 rotary engine fitted as standard.

Mike
« Last Edit: April 25, 2023, 10:07:10 AM by Mike Norris »


Retired - 27 years RAF service then 20 years Military Aerospace Technical Author/editor.

Offline Mike Norris

  • Hero Member
  • *****
  • Posts: 2214
  • RAF Old and Bold
    • Mikes WW1 Aircraft Models
Re: 1:32nd scale Bristol Scout C
« Reply #20 on: April 25, 2023, 11:58:11 PM »
Hi all,
Cockpit parts painted.
They'll be weathered eventually.
The hollow engine crankshaft has been drilled out at the carburettor air intake cone.
Also I've added the engine fuel and oil supply pipes.
I still have to add the oil supply pipe from the cockpit port side frame and the supply and return oil pipes to the cockpit located Pulsometer.
I also need to add the fuel tank and associated pipework.
I'm waiting for information on those.

So for now it's onto rigging before assembly,

Mike


Retired - 27 years RAF service then 20 years Military Aerospace Technical Author/editor.

Offline Borsos

  • Hero Member
  • *****
  • Posts: 3324
Re: 1:32nd scale Bristol Scout C
« Reply #21 on: April 26, 2023, 04:26:25 AM »
Really a great start on the Bristol Scout!
Andreas
"Deux armées aux prises, c'est une grande armée qui se suicide."
Barbusse.
"Ein Berg in Deutschland kann doch einen Berg in Frankreich nicht beleidigen. Oder ein Fluß oder ein Wald oder ein Weizenfeld."
Remarque.

Offline KiwiZac

  • Global Moderator
  • Hero Member
  • *****
  • Posts: 2631
    • My Linktree
Re: 1:32nd scale Bristol Scout C
« Reply #22 on: April 26, 2023, 06:39:02 AM »
Another promising start Mike, the cockpit parts look like 1/1 components laid out for a photoshoot!
Zac in NZ

Offline RichieW

  • Hero Member
  • *****
  • Posts: 1966
Re: 1:32nd scale Bristol Scout C
« Reply #23 on: April 26, 2023, 08:11:10 AM »
Truly underway now Mike, being an engineer must be a great help with getting all the mechanical details correct. The kit parts look superb.

Richie

Offline Rookie

  • Hero Member
  • *****
  • Posts: 927
  • No guts, no glory...
Re: 1:32nd scale Bristol Scout C
« Reply #24 on: April 26, 2023, 06:42:35 PM »
Meticulous research and execution as always Mike.
 
I like your solution for the access panel to the engine compartment.

Willem

Offline Mike Norris

  • Hero Member
  • *****
  • Posts: 2214
  • RAF Old and Bold
    • Mikes WW1 Aircraft Models
Re: 1:32nd scale Bristol Scout C
« Reply #25 on: April 26, 2023, 10:58:55 PM »
Hi all,
The cockpit rigging is underway.
'Proper Plane' 1:32nd scale resin turnbuckles, 0.04 mm diameter tube and 0.08 mm diameter mono-filament.
The rudder, elevator and aileron lines are just tube as the cockpit space is a bit restricted to fit turnbuckles.
I still need to add fuel tank and oil supply modifications, but won't have that information until next week.
So in the meantime I'll make a start on the figures,

Mike


Retired - 27 years RAF service then 20 years Military Aerospace Technical Author/editor.

Offline jeroen_R90S

  • Hero Member
  • *****
  • Posts: 1060
Re: 1:32nd scale Bristol Scout C
« Reply #26 on: April 27, 2023, 05:25:49 AM »
Thansk for leading the way, Mike! I have that massive Intruder to finish but this one is quite near the top of my "plan-to" pile :)

Offline RAGIII

  • Hero Member
  • *****
  • Posts: 18847
Re: 1:32nd scale Bristol Scout C
« Reply #27 on: April 29, 2023, 02:51:47 AM »
Outstanding added details Mike. Your mods are certainly making a great kit even better!
RAGIII
"A man has to know his limitations": Harry Callahan

"Don't slop it on" Lynda Geisler

Offline pepperman42

  • Hero Member
  • *****
  • Posts: 4437
  • Sergeant, my brown pants.......
Re: 1:32nd scale Bristol Scout C
« Reply #28 on: April 29, 2023, 06:34:38 AM »
A great build log!

Steve

Offline Mike Norris

  • Hero Member
  • *****
  • Posts: 2214
  • RAF Old and Bold
    • Mikes WW1 Aircraft Models
Re: 1:32nd scale Bristol Scout C
« Reply #29 on: May 01, 2023, 09:15:42 AM »
Hi all,
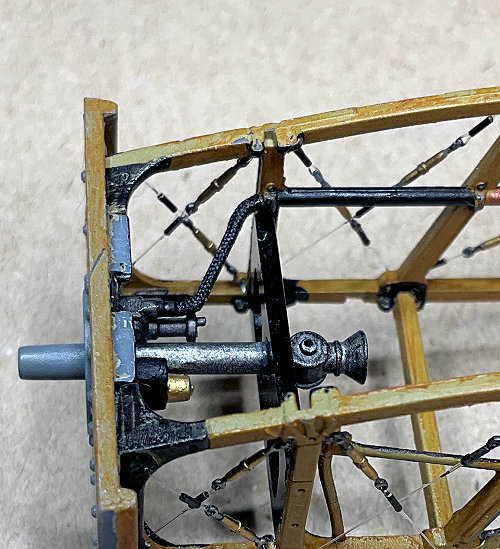
I've made a start on adding oil and fuel pipe details into the forward area of the fuselage.
The kit fuselage halves have access panels into this area of the fuselage, but they are moulded as part of the fuselage.
Therefore the kit does not supply any of these details as if built as supplied, this area of the fuselage is not visible.
However, I'm having at least one of these access panels open, so the inside of the fuselage will be seen.
First to be tackled are the oil pipes for engine lubrication.

I believe the oil system was as follows:

On earlier Bristol Scouts, the oil tank was located in the fuselage at the rear of the pilots cockpit.
A supply pipe from the tank was routed along the cockpit left side frame to the near the rear of the engine bulkhead.
A pipe connected the oil supply to the oil pump reservoir.
It seems the engine provided drive to the oil pump which I believe had a centrifugal type impeller which pumped the oil out of the pump.
The oil was pumped back through a pipe to the oil Pulsometer, located in the cockpit.
The glass bowl on the Pulsometer gave the pilot a visual indication of engine lubrication.
From the Pulsometer the oil returned through another pipe and was connected to the engine crankshaft, which was partially hollow.
The oil mixed with fuel from the simple carburettor, located on the rear of the crankshaft.
The fuel/oil mixture was drawn through the engine crankshaft into the rotating engine to provide ignition and lubrication.
The used fuel/oil was vented out to atmosphere through the cylinder exhaust valves.
Hence why rotary engine heavily stained the fuselage, landing gear and wing roots so much.

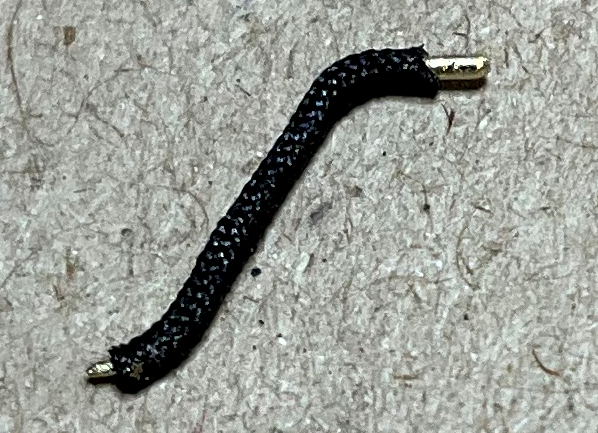
The first pipe created is the connecting pipe between the side frame supply pipe and the oil pump.
This was made using 0.3 mm diameter Brass rod and 0.5 mm diameter Brass tube.
The rod/tube was bent to locate into holes drilled into the supply pipe and oil pump.
It was the covered with braided black tube (‘ANYZ’ 0.5mm black braided line (AN011), then sealed at each end with thin CA adhesive.
The excess was cut way to reveal the brass ens of the tube/rod.
It was then secured in position using thin CA adhesive.

Next up are the pipes connecting the pump outlet to the Pulsometer and the return pipe to the engine crankshaft,

Mike


Retired - 27 years RAF service then 20 years Military Aerospace Technical Author/editor.