Author Topic: 1/32 BE2c  (Read 30345 times)

Offline hrcoleman66

  • Sr. Member
  • ****
  • Posts: 275
Re: 1/32 BE2c
« Reply #45 on: September 10, 2021, 08:17:17 AM »
Following this one closely.
I've always loved the BE series...  But If I was to scratch one, I'd probably go even bigger and build it at 1/24.

Cheers,

Hugh

Offline RichieW

  • Hero Member
  • *****
  • Posts: 1966
Re: 1/32 BE2c
« Reply #46 on: September 13, 2021, 02:11:29 AM »
Thanks so much for your interest and encouragement Dave, Monty, Alexis and Hugh. I think 1/24 would be a great scale for this aircraft too but it would be massive. I was shocked by how big the BE2c was when I got the plans enlarged to 1/32.

I have not updated this for a while because very little has been done due entirely to life getting in the way, not in bad way though! Last time I was whooping with delight after Willem kindly sent me an engine sprue I could use the cylinders from. After assembling and painting the cylinders I started to fit them but realised that the engine cover will need to be mounted to the engine before mounting to the frame. This would need to match the fuselage shape. I decided the best way ahead for me would be to finish the fuselage cell by cell so

IMG-20210911-WA0000 by Richard Williams, on Flickr

I made the next beam and struts along from laminated styrene then sprayed all the 'wood' with Hycote filler/primer. I have grown to love this stuff.It coats very smoothly straight from the rattle can but best of all it's a great base colour for wooden structures.

Yesterday I made a start on the instrument panel, the shape was cut from styrene to which I then added a layer of wood veneer. The wood was given a coat of clear orange then sealed with extra thin CA glue.

I decided that rather than using my Airscale bezels (which are excellent) that I would try to make the instruments myself. I started by punching a disc from aluminium sheet, 3mm alu tube was then reamed out to make the wall thinner before cutting a slice with my scalpel.

Starting instrument panel by Richard Williams, on Flickr

Rivets were then added using my cutting matt to help keep the alignment within reasonble limits

Starting instrument panel by Richard Williams, on Flickr

The centre was then filled with black paint

Starting instrument panel by Richard Williams, on Flickr

A few more hours and this is where I left it today;

20210912_161853 by Richard Williams, on Flickr

I ended up resorting to using a couple of Airscale decals (they are excellent!) after failing miserably to make a realistic enough instrument faces.

The last photo shows the finished woodwork. I don't think I really needed to add studs to the pilots back support, I can't see them even with my glasses on but it was fun to do. :)

BE2c 'woodwork' progress by Richard Williams, on Flickr

Many thanks for reading, I hope you are all well.

Richie

Offline kensar

  • Hero Member
  • *****
  • Posts: 2505
  • Reshaping the world - one piece at a time.
Re: 1/32 BE2c
« Reply #47 on: September 13, 2021, 03:10:28 AM »
Nice progress and very good work on the IP so far.
The primer is a good color base for woodgrain.

Offline lone modeller

  • Hero Member
  • *****
  • Posts: 5322
Re: 1/32 BE2c
« Reply #48 on: September 13, 2021, 05:00:13 AM »
Suprb detail Richie. Your instrument bezel is certainly better than the AM offerings. Frank will no doubt be taking notes and will be producing his own in future...!

Stephen.

Bughunter

  • Guest
Re: 1/32 BE2c
« Reply #49 on: September 13, 2021, 06:06:52 AM »
A little piece by little piece into the direction of a full scratched BE2c! Nice work!
@Stephen in 1/48 I'm satified with my PE by HGW, Part and Eduard. Enough is enough  ;)

Cheers,
Frank

Offline William Adair

  • Sr. Member
  • ****
  • Posts: 271
Re: 1/32 BE2c
« Reply #50 on: September 13, 2021, 10:03:56 AM »
That is fantastic progress.  I love the instrument panel.  That made my day!  ;D

Offline Borsos

  • Hero Member
  • *****
  • Posts: 3324
Re: 1/32 BE2c
« Reply #51 on: September 13, 2021, 04:06:05 PM »
Fantastic work! It’s getting better and better! This instrument panel is a piece of art.
Andreas
"Deux armées aux prises, c'est une grande armée qui se suicide."
Barbusse.
"Ein Berg in Deutschland kann doch einen Berg in Frankreich nicht beleidigen. Oder ein Fluß oder ein Wald oder ein Weizenfeld."
Remarque.

Offline RichieW

  • Hero Member
  • *****
  • Posts: 1966
Re: 1/32 BE2c
« Reply #52 on: September 14, 2021, 03:43:10 AM »
Suprb detail Richie. Your instrument bezel is certainly better than the AM offerings. Frank will no doubt be taking notes and will be producing his own in future...!

Stephen.

Many Thanks Stephen, there is however only one Bughunter! ;)

A little piece by little piece into the direction of a full scratched BE2c! Nice work!
@Stephen in 1/48 I'm satified with my PE by HGW, Part and Eduard. Enough is enough  ;)

Cheers,
Frank

Thanks Frank, I'm having fun so far. I don't think I would be if I tried making the instruments in 1/48th though!  ;)

That is fantastic progress.  I love the instrument panel.  That made my day!  ;D

Thank you so much William, that kind comment has made my day too! :) I still think you're a mad genius though! :)

Fantastic work! It’s getting better and better! This instrument panel is a piece of art.
Andreas

Hey Andreas, thanks so much for the encouragement. I don't feel quite so terrified by scratch building now, mistakes are much cheaper to make than when I mucked up the WNW Camel last year!

Well I finally had an entire day free for the firs time in ages and cracked on with the instrument panel. Here is one of James Fahey's brilliant photographs of the real thing;

TVAL BE2c instrument panel, PHOTO BY JAMES FAHEY. by Richard Williams, on Flickr


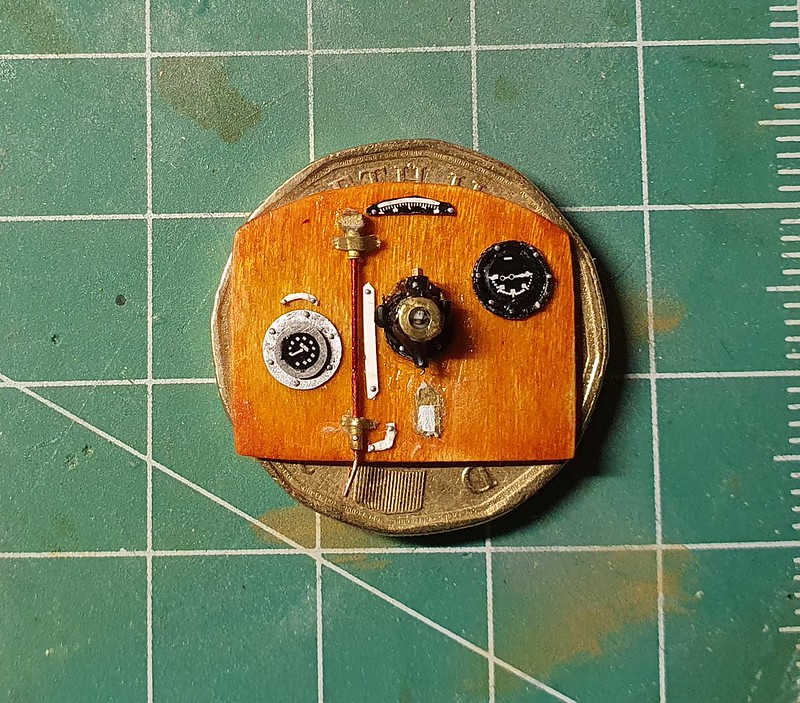
I made the compass next from bits of styrene rod and brass tube. It was a fiddly business but nothing complicated, the compass face is just a miniature brass washer.

Scratch built BE2c Instrument panel by Richard Williams, on Flickr

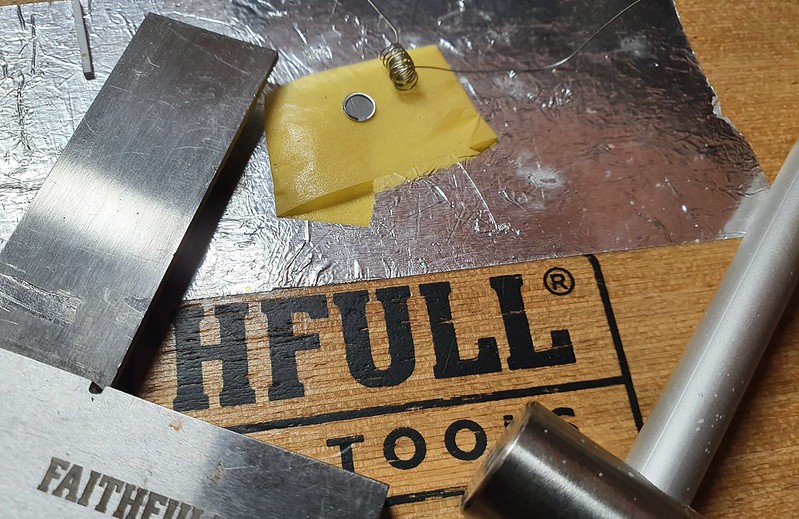
The last two bezels were made differently from the first. This time I made wire rings by winding 0.25mm tinned copper wire round a 3mm tube and cut them off with a scalpel. One of the rings had to be flattened so I used my engineers square as an anvil and bashed it with the hammer from my punch and die set. The rings were then stuck down with Future Floor Wax so I had time to position them correctly. The instruments were then finished off with black paint, an Airscale decal and 0.25mm rivets.

Airscale instrument decals and other after market parts are great and I have nothing against them but I want to do a 100% scratch build one day so will need to print my own from now on.

Scratch built BE2c Instrument panel by Richard Williams, on Flickr

The original has a beautiful dark stain by the fuel gauge but after spending a few days on making this I just can't bring myself to make it look filthy.  :)

Scratch built BE2c Instrument panel by Richard Williams, on Flickr

I am really chuffed with it, it's close enough to the original but most importantly I think I had more fun with this part of the build than anything I have done before. Next I need to make the pilot's seat, thankfully it isn't wicker, the observer's seat is though. Looks like I might be using another aftermarket part then...

Many thanks for stopping by and reading. If anybody has ever scratched a wicker seat before I would love some tips please!

Richie


Offline lone modeller

  • Hero Member
  • *****
  • Posts: 5322
Re: 1/32 BE2c
« Reply #53 on: September 14, 2021, 04:10:43 AM »
I have never scratched a wicker seat Richie - life is just too short for that - but your IP is really the dog's b.....cks! This is going to be a super scratch build - cannot wait to see it when finihsed.

Stephen.

Bughunter

  • Guest
Re: 1/32 BE2c
« Reply #54 on: September 14, 2021, 04:56:35 AM »
If anybody has ever scratched a wicker seat before I would love some tips please!
Not me Richie, but here are some links.

Ken Foran (scroll down)
http://wwi-models.org/Images/Foran/Camel/index.html

http://theaerodrome.com/forum/showpost.php?p=358467&postcount=17

http://ratomodeling.com.br/articles/wicker_seats/

Hope it helps,
Frank

Offline RichieW

  • Hero Member
  • *****
  • Posts: 1966
Re: 1/32 BE2c
« Reply #55 on: September 14, 2021, 05:05:06 AM »
I have never scratched a wicker seat Richie - life is just too short for that - but your IP is really the dog's b.....cks! This is going to be a super scratch build - cannot wait to see it when finihsed.

Stephen.

Thanks Stephen, I glad it's the "dog's" and not just b*ll*cos! Don't hold your breath waiting to see it finished though. I think this project will become trench warfare very shortly!
.
If anybody has ever scratched a wicker seat before I would love some tips please!
Not me Richie, but here are some links.

Ken Foran (scroll down)
http://wwi-models.org/Images/Foran/Camel/index.html

http://theaerodrome.com/forum/showpost.php?p=358467&postcount=17

http://ratomodeling.com.br/articles/wicker_seats/

Hope it helps,
Frank

Thank you Frank! I will have a good read of those. I have a resin Wicker seat if it all goes horribly wrong but I will have a go.

Richie

Bughunter

  • Guest
Re: 1/32 BE2c
« Reply #56 on: September 14, 2021, 05:40:59 AM »
Richie, you mentioned a new book about brass and models? I think the link to the Camel is of the author of the book?!
I'm also busy with browsing through his models and pictures - wonderful!

Cheers,
Frank

Offline RichieW

  • Hero Member
  • *****
  • Posts: 1966
Re: 1/32 BE2c
« Reply #57 on: September 14, 2021, 05:50:13 AM »
Ah, I thought I recognised the name! Yes it's the same genius modeller. I think you would absolutely love the book. I've only read a few pages but looked at all of the photos. His work is jaw dropping!

Richie

Offline Rookie

  • Hero Member
  • *****
  • Posts: 927
  • No guts, no glory...
Re: 1/32 BE2c
« Reply #58 on: September 14, 2021, 06:42:38 AM »
Richie,

You have done an incredible job. I am awed by all you are showing here, and I admire your persistence in scratching everything, even the bezels for the cockpit instruments. I think the woodgrain simulation is very realistic. It is good to hear you are planning ahead to avoid problems with the parts assembly later on.

The detailing of the fuselage and the frames, the turtleback, the instrument panel: I am gobsmacked. And now you are going to scratch the wicker seat as well??!!

You sure know how to build up the tension before showing us your engine.....  ;)


Willem
« Last Edit: September 14, 2021, 04:17:46 PM by Rookie »

Offline Jamo

  • Hero Member
  • *****
  • Posts: 1115
  • Wellington, NZ
    • My Smugmug album
Re: 1/32 BE2c
« Reply #59 on: September 14, 2021, 04:01:12 PM »
Hi Ritchie
I have a had a few goes at weaving my own wicker seat in 1/32 scale, to go into a WNW Bristol F2b. I using the kit seat as a pattern, thin copper wire for the wicker and brass rod for the seat frame. It is a bit overscale but not unacceptably to my eye.  I applied some epoxy putty for the leather padding and the cushion


Hope this helps
Cheers
James
Happy Modelling
James Fahey

Check out my massive photo collection here: https://jamesfahey.smugmug.com/