Author Topic: 1/32 Avro 504 scratchbuild #4  (Read 21565 times)

Bughunter

  • Guest
Re: 1/32 Avro 504 scratchbuild #4
« Reply #120 on: December 23, 2020, 04:35:55 AM »
So, amid all the confusion
Ken, now I'm really confused?!
I think you mix here some terms ???

Once you talk about "RAF wires", which are the streamlined flat steel rods with threads on the end. This is the opposite to steel cable with turnbuckles.

Then you talk about "flying wires", which I know as wires from the upper wing outside to lower fuselage (carry the weight during flight).
The opposite is here "landing wire" which runs form upper fuselage to outside lower wings to hold negative loads (especially happens during landing).
See this description of a Camel rigging:


So flying and landing wires (describing a function) could be done as RAF wires or steel ropes with turnbuckles (technical realization description).

That explains, why I so confused about your little article ;)

Cheers,
Frank

Offline kensar

  • Hero Member
  • *****
  • Posts: 2503
  • Reshaping the world - one piece at a time.
Re: 1/32 Avro 504 scratchbuild #4
« Reply #121 on: December 23, 2020, 06:45:25 AM »
I understand your confusion.  Sorry about that.
When I mentioned flying wires, I was referring to the streamlined steel rods made by the Brunton or RAF factory, not the function that the wires perform in their application.  In my research, the streamlined steel rods made by the RAF factory were frequently called RAF flying wires, so I used the terms interchangeably here.

So, on my model, the flying and landing wires will be represented as RAF wires, and not turnbuckles/cables (wire ropes).

Hope this is clearer.  Thanks for asking the question.  Others were probably confused also.

Offline Alexis

  • Hero Member
  • *****
  • Posts: 7947
  • Love the self
Re: 1/32 Avro 504 scratchbuild #4
« Reply #122 on: December 23, 2020, 01:15:52 PM »
Progressing wonderful so far Ken , I really like how the fire wall turned out  :)


Terri
Hurra ! , Ich Leben Noch
Body and life is a vessel we use to travel the planet . Femininity is the gift , The miracle comes from what we do with it .

Offline kensar

  • Hero Member
  • *****
  • Posts: 2503
  • Reshaping the world - one piece at a time.
Re: 1/32 Avro 504 scratchbuild #4
« Reply #123 on: December 28, 2020, 09:57:41 AM »
Thanks Terri.  Most of it will be hidden behind the cowling, but the process has been learned for next time.

A short update.
Waiting for more paint to arrive.  I have been using Model Master light ivory enamel for the CDL, but I haven't been able to find any recently.  I have decided to change my paint type again and have ordered several AK Interactive lacquers.  However, for CDL color, I will be changing to Tamiya racing white lacquer in a spray can.  I'll decant it for use in the airbrush when needed.  It's the same color as the light ivory, but a shade lighter, so I'll use it for a base color and use the rest of my remaining enamel light ivory on top of it to stretch what I have left.
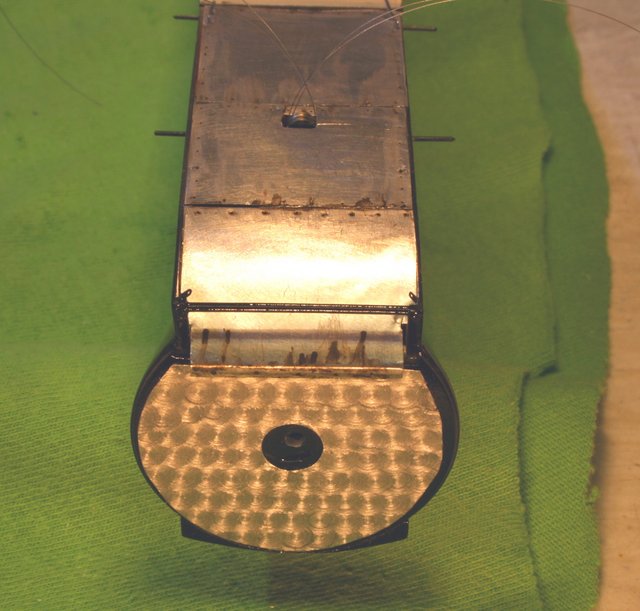
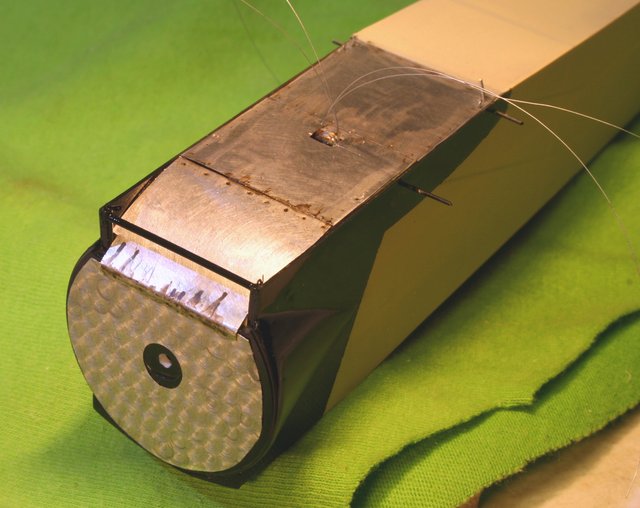
Here, I've added the bottom aluminum panels and done some weathering.  The aileron cables are protruding from the pulley on the bottom and now I need the bottom wings for alignments, so that will be done next when the paint arrives.


So, I've gone on to the wing struts and cabanes.  Made from wood and will be stained.  This time I'm going with brass ferrules for the ends of the struts, which will be painted black.


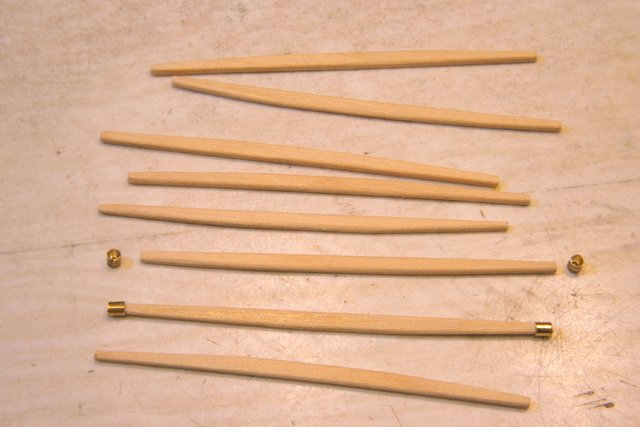
This 504 model has skinny struts, where later ones have much wider struts.

As always, comments are welcome.  Thanks for looking in on this project.

Offline William Adair

  • Sr. Member
  • ****
  • Posts: 271
Re: 1/32 Avro 504 scratchbuild #4
« Reply #124 on: December 28, 2020, 10:52:52 AM »
Wow that looks perfect!

Offline Radarman

  • Hero Member
  • *****
  • Posts: 687
Re: 1/32 Avro 504 scratchbuild #4
« Reply #125 on: December 28, 2020, 12:54:23 PM »
Looking great, Ken.
The oil and grime on the aluminum is just right.

                                                      Kevin
We are all victims of history!

Offline lone modeller

  • Hero Member
  • *****
  • Posts: 5300
Re: 1/32 Avro 504 scratchbuild #4
« Reply #126 on: December 29, 2020, 07:03:25 AM »
Those sytruts look very interesting. Which wood di you use? And where did you find/make the brass ferrules?

Stephen.

Offline kensar

  • Hero Member
  • *****
  • Posts: 2503
  • Reshaping the world - one piece at a time.
Re: 1/32 Avro 504 scratchbuild #4
« Reply #127 on: December 30, 2020, 12:27:36 AM »
Thanks for commenting William, Kevin, and Stephen.

I honestly don't know what kind of wood the struts are made from.  They are made from coffee stirring sticks I found at the office.  They have a very tight grain.  I have used them on all my scratchbuilds.  Individually, they are a little too flexible, so I laminated two together with aliphatic glue and sanded them to the right dimensions with the seam going down the middle, which makes them suitably stiff.  The brass ferrules are 0.062" brass tubing that I drilled out one end to 0.051" and cut to length with a jeweller's saw.  I wanted to use the ferrules so that the wood struts don't split when I drill into them to glue in the mounting wires.

Offline RAGIII

  • Hero Member
  • *****
  • Posts: 18793
Re: 1/32 Avro 504 scratchbuild #4
« Reply #128 on: January 01, 2021, 07:12:29 AM »
Superb work on the struts and fittings Ken! Your usual magic!!
RAGIII
"A man has to know his limitations": Harry Callahan

"Don't slop it on" Lynda Geisler

Offline Alexis

  • Hero Member
  • *****
  • Posts: 7947
  • Love the self
Re: 1/32 Avro 504 scratchbuild #4
« Reply #129 on: January 07, 2021, 11:38:59 PM »
Excellent out come on shaping the struts Ken  :)


Alexis
Hurra ! , Ich Leben Noch
Body and life is a vessel we use to travel the planet . Femininity is the gift , The miracle comes from what we do with it .

Offline PrzemoL

  • Hero Member
  • *****
  • Posts: 4853
  • There was Eru... and he made first the Ainur...
    • Przemysław Litewka
Re: 1/32 Avro 504 scratchbuild #4
« Reply #130 on: January 12, 2021, 08:15:54 PM »
You continue with amazing work and spectacular results. Tis is a great thread to follow. Looking forward to more :-)
Ash nazg durbatuluk, ash nazg gimbatul,
Ash nazg thrakatuluk, agh burzum-ishi krimpatul.

Offline kensar

  • Hero Member
  • *****
  • Posts: 2503
  • Reshaping the world - one piece at a time.
Re: 1/32 Avro 504 scratchbuild #4
« Reply #131 on: January 16, 2021, 11:03:05 AM »
Thank you for the kind comments, friends. 

Now finally, a small update.  I now have more paint, so work can continue, but first, a detail - the cockpit coaming.

First heat some styrene and bend to a curve.


Add the rear strip.


A little paint and some sewing thread.


A look at the result.


Now, on to the wings.

Offline Alexis

  • Hero Member
  • *****
  • Posts: 7947
  • Love the self
Re: 1/32 Avro 504 scratchbuild #4
« Reply #132 on: January 16, 2021, 11:53:39 AM »
Excellent results on the combing Ken  :)

Alexis
Hurra ! , Ich Leben Noch
Body and life is a vessel we use to travel the planet . Femininity is the gift , The miracle comes from what we do with it .

Offline kensar

  • Hero Member
  • *****
  • Posts: 2503
  • Reshaping the world - one piece at a time.
Re: 1/32 Avro 504 scratchbuild #4
« Reply #133 on: January 17, 2021, 01:48:46 AM »
Thank you for your encouraging comments and for following this build, Alexis.  I do appreciate it.

Offline Gisbod

  • Hero Member
  • *****
  • Posts: 2438
Re: 1/32 Avro 504 scratchbuild #4
« Reply #134 on: January 17, 2021, 06:21:44 AM »
Hello Ken,

I have been looking in on this, and I have to say some excellent techniques on display and she’s turning out beautifully! Hays off to you for doing this from scratch - I couldn’t do it!

Guy
“Oh! I have slipped the surly bonds of Earth -
Put out my hand, and touched the face of God.”

P.O. John Gillespie Magee 1941