Author Topic: 1/32 Avro 504 scratchbuild #4  (Read 21571 times)

Offline Dave W

  • Administrator
  • Hero Member
  • ******
  • Posts: 1608
Re: 1/32 Avro 504 scratchbuild #4
« Reply #90 on: November 18, 2020, 11:30:25 AM »
Great news.  I'll have to get a SPAD.
Guess they are waiting to see how high I set the bar on my 504?  ;D

Hi Ken... following your light hearted remark about setting the bar height for a Roden Avro 504K, I actually sent a link for your build to Vladimir, the President of Roden, who is now following your build!

Vladimir says "The work of Avro 504K of Mr. Kensar is very interesting. When we start the designing of this model we will have some questions that we can discuss"

No pressure but now they are watching to see how high you set the bar on your 504K! :)

cheers

Dave Wilson
Gold Coast
Australia

Owner and Administrator of ww1aircraftmodels.com and forum.ww1aircraftmodels.com

Offline William Adair

  • Sr. Member
  • ****
  • Posts: 271
Re: 1/32 Avro 504 scratchbuild #4
« Reply #91 on: November 18, 2020, 08:25:53 PM »
Whoa!  No pressure!!

Offline kensar

  • Hero Member
  • *****
  • Posts: 2503
  • Reshaping the world - one piece at a time.
Re: 1/32 Avro 504 scratchbuild #4
« Reply #92 on: November 19, 2020, 10:41:06 PM »
I hope I can help answer any questions that come up, but I am far from a subject matter expert on Avro 504 aircraft.  The 504K would be easier to model than the 504 due to the cowling design.  Because of that, my 504 will not be exactly accurate (maybe I should have done the 504K).
In the meantime, I'll just keep on doing what I do.

Offline kensar

  • Hero Member
  • *****
  • Posts: 2503
  • Reshaping the world - one piece at a time.
Re: 1/32 Avro 504 scratchbuild #4
« Reply #93 on: December 02, 2020, 12:12:33 AM »
I haven't updated on my usual schedule due to being sidetracked with 'honey - do' projects, but here's a small update.

Still working on the fuse.  Focusing on the front currently.

Added the bulges on the fuse sides.  This is where the model will not be accurate.  On the actual plane, the bulges are tapered on the cowling, which makes the rear of the cowling smaller than the middle.  I don't know if the engine still fit through the smaller opening, or if the cowling had to be twisted to get it over the engine, but it would not work on the model.  Later 504's did not have this issue, as the cowling design was different.
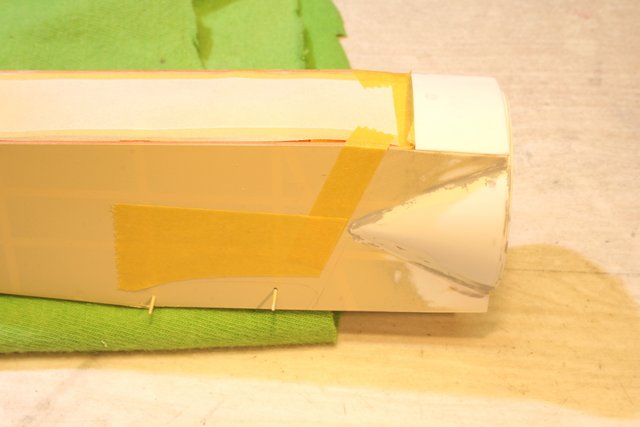

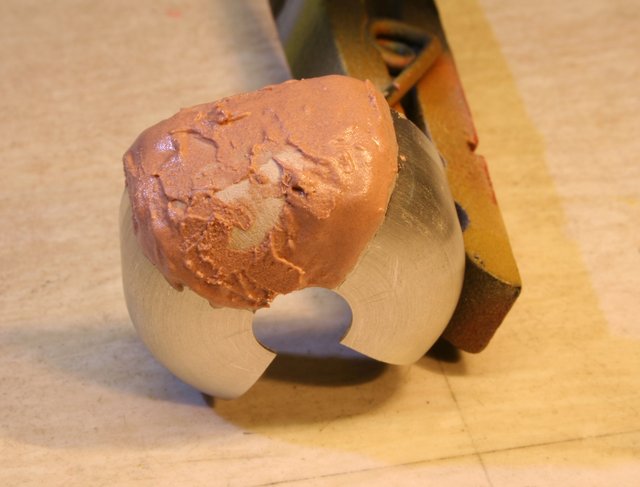
Putting on the top part of the cowling.  Tried to form a sheet of copper to the right shape, but I didn't like where that was going, so I went to plan B with polyester automobile body filler (Bondo putty).

Started on the landing gear.  The brass rectangles will have some thread wrapped on the ends as bungie cords, then the whole thing will be covered with another sheet with the bottom open to view the bungies.
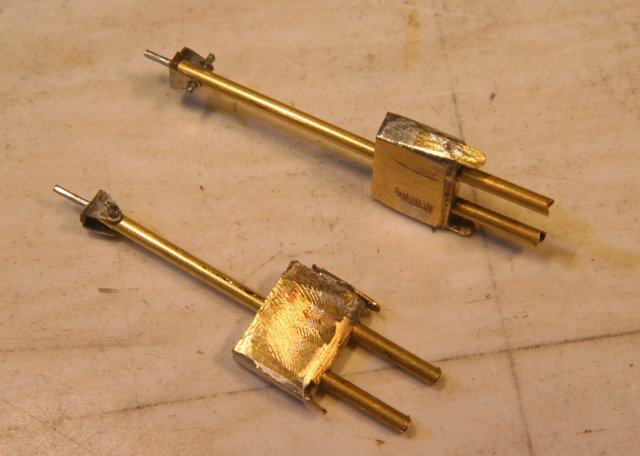

There's a lot of tedious details around the landing gear.  Also got the toothpick made. Pictures on the next update.

Bughunter

  • Guest
Re: 1/32 Avro 504 scratchbuild #4
« Reply #94 on: December 02, 2020, 06:46:48 AM »
Wow Ken, splendid! I love brass ;)
The issue with the cowling I have not understand, but I will wait patiently for the next updates. Time will tell.

Cheers,
Frank

Offline Alexis

  • Hero Member
  • *****
  • Posts: 7947
  • Love the self
Re: 1/32 Avro 504 scratchbuild #4
« Reply #95 on: December 02, 2020, 12:43:37 PM »
Interesting , looking forward on how the cowl turns out .


Terri
Hurra ! , Ich Leben Noch
Body and life is a vessel we use to travel the planet . Femininity is the gift , The miracle comes from what we do with it .

Offline lone modeller

  • Hero Member
  • *****
  • Posts: 5300
Re: 1/32 Avro 504 scratchbuild #4
« Reply #96 on: December 04, 2020, 02:09:31 AM »
Superbly detailed undercarriage.

Stephen.

Offline kensar

  • Hero Member
  • *****
  • Posts: 2503
  • Reshaping the world - one piece at a time.
Re: 1/32 Avro 504 scratchbuild #4
« Reply #97 on: December 06, 2020, 01:40:54 AM »
I appreciate you following along and looking in, Frank, Terri, and Stephen.

I will try to explain the difficulty with the cowling.  In the diagram below, the cowling bulges on the sides start tapering before they reach the fuselage.  This reduces the size of the back of the cowling and the engine which barely fits in the forward part of the cowling will not clear the back of the cowling when it is taken off.


I have made my cowling to be the same size from front to back, as is usually done.  The 504K had this type of cowling, but the 504 did not.

A few more pictures of the cowling.


Now to clean up and prep the cowling for painting.

And the 'toothpick' for the landing gear.


As usual, I'm skipping around in this build.

Offline lone modeller

  • Hero Member
  • *****
  • Posts: 5300
Re: 1/32 Avro 504 scratchbuild #4
« Reply #98 on: December 06, 2020, 03:40:28 AM »
The cowlings on the early 504's were a very difficult shape to model even in 1/72 scale. You have achieved a minr miracle to do so in this giant scale. Congratulations.

Stephen.

Offline RAGIII

  • Hero Member
  • *****
  • Posts: 18793
Re: 1/32 Avro 504 scratchbuild #4
« Reply #99 on: December 06, 2020, 08:37:42 AM »
Incredible engineering Ken! I am sure it will be perfect when you are done!
RAGIII
"A man has to know his limitations": Harry Callahan

"Don't slop it on" Lynda Geisler

Offline William Adair

  • Sr. Member
  • ****
  • Posts: 271
Re: 1/32 Avro 504 scratchbuild #4
« Reply #100 on: December 06, 2020, 01:11:04 PM »
Very nicely done.  Great work with the car bog too, I'm a big fan of that stuff.

Offline Alexis

  • Hero Member
  • *****
  • Posts: 7947
  • Love the self
Re: 1/32 Avro 504 scratchbuild #4
« Reply #101 on: December 06, 2020, 01:24:47 PM »
That is a weird shape to make , but your pulling it off brillant !

Terri
Hurra ! , Ich Leben Noch
Body and life is a vessel we use to travel the planet . Femininity is the gift , The miracle comes from what we do with it .

Offline kensar

  • Hero Member
  • *****
  • Posts: 2503
  • Reshaping the world - one piece at a time.
Re: 1/32 Avro 504 scratchbuild #4
« Reply #102 on: December 07, 2020, 10:55:38 PM »
Thanks for the kind comments, everyone.
This is easily the most complicated cowling shape I've done.
Working with the Bondo putty is fairly easy.  It can be carved with a hobby knife and sanded after hardening, which makes shaping it easy.
I'm working on the landing gear and toothpick mounting presently.  These are two separate and delicate structures tied together with rigging wire.  Not suprising that many landing crashes took out the landing gear.

Bughunter

  • Guest
Re: 1/32 Avro 504 scratchbuild #4
« Reply #103 on: December 08, 2020, 12:52:21 AM »
With your second cowling posting I have now understand that problem, thanks for explanation!
I had to look into the Blue Max kit to see, how they solved this: that is a 504K, with a round white metal cowling, just a cutout on lower side.

Cheers,
Frank

Offline Rookie

  • Hero Member
  • *****
  • Posts: 925
  • No guts, no glory...
Re: 1/32 Avro 504 scratchbuild #4
« Reply #104 on: December 13, 2020, 08:36:11 PM »
That cowling is looking extremely complicated to build, but you did an excellent job Ken!