Author Topic: Special Hobby 1/48 SPAD VII  (Read 18197 times)

Offline andonio64

  • Hero Member
  • *****
  • Posts: 1687
  • There's no hurry
Re: Special Hobby 1/48 SPAD VII
« Reply #60 on: November 09, 2012, 06:23:33 PM »
Thanks guys,
I don't use an airbrush so normally I proceed to paint "sub-assemblys" while they are completed, often when I join the other parts it is impossible to reach the surface with the brush, especially if there is some rigging...

As per the clear gloss, that's a good idea in principle, I will see if I can apply to some of the panels: the small acetate squares are glued in a not so resistant fashion on the frame, so if they detach while painting them it would be an hard task to glue them back.
I'll check this next time for sure.

I have some new progresses to show, I will see if I can work a bit on it during the WE and show something new early next week...

Thanks for your attention, I apologize for being so slow in updating!

 ::)

Offline andonio64

  • Hero Member
  • *****
  • Posts: 1687
  • There's no hurry
Re: Special Hobby 1/48 SPAD VII
« Reply #61 on: November 11, 2012, 02:10:10 AM »
Next step has been to study the struts and the way to attach the rigging cables...


I decided to create some small plaques to be placed over the already existing holes for the struts on the wings.
A big hole to let the strut go through and a small hole to anchor the cablei: I used a plastruct stripe 2 mm wide and 0.3mm thin:


Here are a couple of hem, I made 14 the n the eyes started rolling on their own...

The plaques are shown here laying on a wing, but not in the correct position just to give an idea...


Primer and preshading as usual on the wings


wings ready to be worked on


Now I am working on the struts, these arte the four outer struts and at the moment I am making the inner couples bound with a transversal bar.


Antonio
« Last Edit: November 11, 2012, 02:12:48 AM by andonio64 »

Offline andonio64

  • Hero Member
  • *****
  • Posts: 1687
  • There's no hurry
Re: Special Hobby 1/48 SPAD VII
« Reply #62 on: November 12, 2012, 04:17:32 AM »
Hallo...
Houston we have a problem...

This morning I preparared the inner coupled struts, using the strust from the kit and joining them by a plasticard rod diameter 0.5 mm

While waiting the CA Gel glue to dry completely (I know it's an instant glue but I always prefer to wait... ) I prepared some sprue on a candlelight to make the 2 "X" rigging on the struts
(you can see it in the foreground of this pic)


But when I took the struts set with my tweezers they broke so the t one strut detached from the transversal rod
I wonder how to strengthen this joint, I'm afraid about when I'll need to handle it to put the sprue-rigging and to set them in place on the wings...

Any idea????

I decided to go on painting the pieces separately, in the meantime no idea came to my mind...


:-(

Offline andonio64

  • Hero Member
  • *****
  • Posts: 1687
  • There's no hurry
Re: Special Hobby 1/48 SPAD VII
« Reply #63 on: November 18, 2012, 09:49:27 PM »
Hallo!
here is my solution to the horizontal bar between the inner couple of struts:

following the idea I got from a friend on Swanny's, I decided to "fishmouth" the horizontal bar.
So I tried to keep the 0.5 mm plasticard but it was too small, so I took a 0.8 mm and using a lancet and a file with a triangular  cross-section here is my new pieces duly "fishmouthed"...


Here is the fish bting the struts...


Then I used stretched sprue for the internal X rigging... it was not easy, I have not a good feeling with this material...


Hopefully there will be more updates tonight

Ciao

AnDonio

Offline Whiteknuckles

  • Hero Member
  • *****
  • Posts: 1334
Re: Special Hobby 1/48 SPAD VII
« Reply #64 on: November 23, 2012, 02:30:56 PM »
Some good solid work there Antonio, well done.
The 'fishmouth' solution looks very effective as do the plaques, very nice work ;)

Andrew
Eternal Apprentice

Offline andonio64

  • Hero Member
  • *****
  • Posts: 1687
  • There's no hurry
Re: Special Hobby 1/48 SPAD VII
« Reply #65 on: November 23, 2012, 05:54:50 PM »
Thanks Andrew, I plan to finish my work on the lower wings tonight, some new pictures could be online during the weekend...

Stay Tuned!!!!

 8)


 ;D ;D ;D

Offline GAJouette

  • Hero Member
  • *****
  • Posts: 3579
  • " Beware of the Spanish Inquisition"
Re: Special Hobby 1/48 SPAD VII
« Reply #66 on: November 24, 2012, 02:50:21 PM »
  Antonio,
Simply put Outstanding my old friend.
Highest Regards,
Gregory Jouette
" What Me Worry"

Offline pepperman42

  • Hero Member
  • *****
  • Posts: 4473
  • Sergeant, my brown pants.......
Re: Special Hobby 1/48 SPAD VII
« Reply #67 on: November 25, 2012, 02:16:59 AM »
Spads make me crazy. Nice work on a difficult problem!!!

Steve

Offline andonio64

  • Hero Member
  • *****
  • Posts: 1687
  • There's no hurry
Re: Special Hobby 1/48 SPAD VII
« Reply #68 on: November 25, 2012, 07:58:08 AM »
Hallo everybody, here are some tiny steps from saturday evening (just after our fierce resistance against the Wallabies!!!):

Lower wings painted and finished:

Lower surfaces with the "tricolore" and some little details enhanced

Upper surfaces:

Here I rebuilt the framework of the ailerons manoeuver cables with plasticard and some thin brass sheet


Here are the scratch built pieces qith the cables already in place...

The following picture is meant just to explain where the pieces should go, for those not familiar with the SPADs:


Hopefully tomorrow some more advance!

Ciao

Antonio

Offline pepperman42

  • Hero Member
  • *****
  • Posts: 4473
  • Sergeant, my brown pants.......
Re: Special Hobby 1/48 SPAD VII
« Reply #69 on: November 25, 2012, 08:56:39 AM »
Love the colours on this one. Your detail work is fun to watch too!!

Steve

Offline andonio64

  • Hero Member
  • *****
  • Posts: 1687
  • There's no hurry
Re: Special Hobby 1/48 SPAD VII
« Reply #70 on: November 26, 2012, 05:00:14 AM »


Decals on: the black moon and the "levez ici" were made by me with the inkjet, the cockades were taken from the Blue Rider "Italian squadriglia markings" decals sheet, I have purchased 2 sheets so I had four cockades available, one of them broke down in pieces, the two I was able to use had some minor damage just while I was sliding them on the fuselage, I am not satisfied at all with those decals.

I will try in the next days to fill in the dents on the outer circle.

OK I think it's all for today, I went on in finishing the upper wing, but there is no intresting picture to show

Ciao!

Antonio
« Last Edit: November 27, 2012, 04:38:25 PM by andonio64 »

Offline pepperman42

  • Hero Member
  • *****
  • Posts: 4473
  • Sergeant, my brown pants.......
Re: Special Hobby 1/48 SPAD VII
« Reply #71 on: November 26, 2012, 11:47:39 AM »
Looks good. Shame about the nicks in the roundels. Are you going to touch up with paint or decal patches?

Steve

Offline andonio64

  • Hero Member
  • *****
  • Posts: 1687
  • There's no hurry
Re: Special Hobby 1/48 SPAD VII
« Reply #72 on: November 26, 2012, 06:49:02 PM »
Looks good. Shame about the nicks in the roundels. Are you going to touch up with paint or decal patches?

Steve

Thank you Steve,
I plan to touch up with some paint + wheathering...

I am a bit afraid for the roundels on top of the upper wing, I have to take them from the same Blue Rider sheet.

It's the first time I use Blue Rider stuff, has anybody ever experienced those products?


Offline andonio64

  • Hero Member
  • *****
  • Posts: 1687
  • There's no hurry
Re: Special Hobby 1/48 SPAD VII
« Reply #73 on: December 02, 2012, 07:54:09 AM »
Here is the results of today's activity:


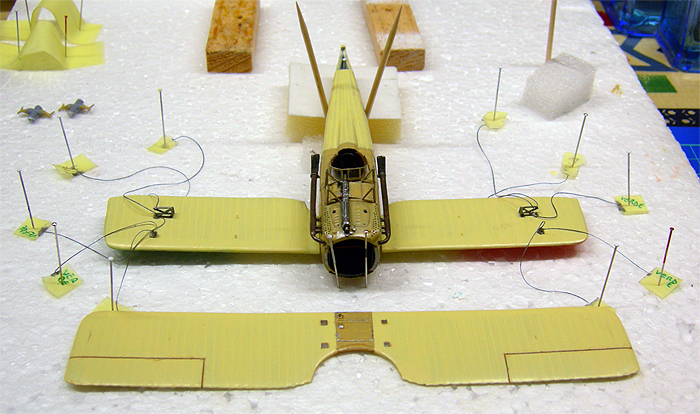
- exhaust tubes glued in place
- lower wings glued to the fuselage, they need some putty to fill the seams
- While checking the slight dihedral, fair enough, I realized the cabane struts to the right of the pilot were lower than the left ones. THose struts were attacked by our cat (suspected to be a Luftstreitkräfte secret agent). SO I detached them with pain and fear and put them in place again, now they look a bit better...
- I worked on the upper wing, although there are some details missing in particular the anchor points for the rigging coming from the lower wing, it is nearly done. Will try to bend the ailerons without cutting them apart from the wing (will cut the short side and I already have deep carved the long side).


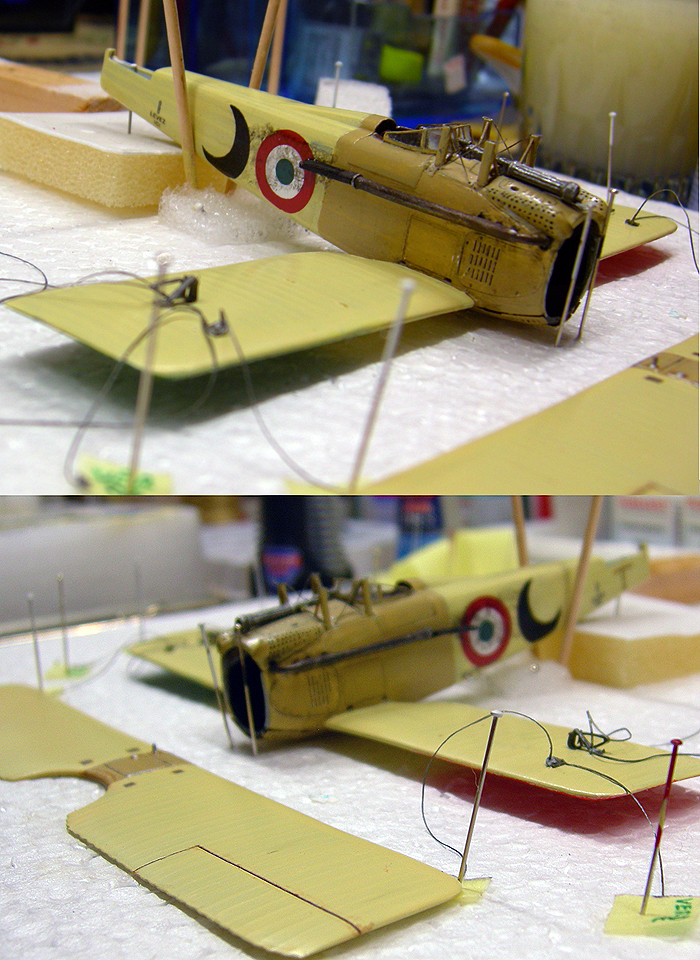
Side views (sorry for the port side out of focus), I tried to simulate some exhaust smoke but am not satisfied at all, I used Tamiya smoke at different thinning but I'm not satisfied, will try the pastels method. Any better idea????


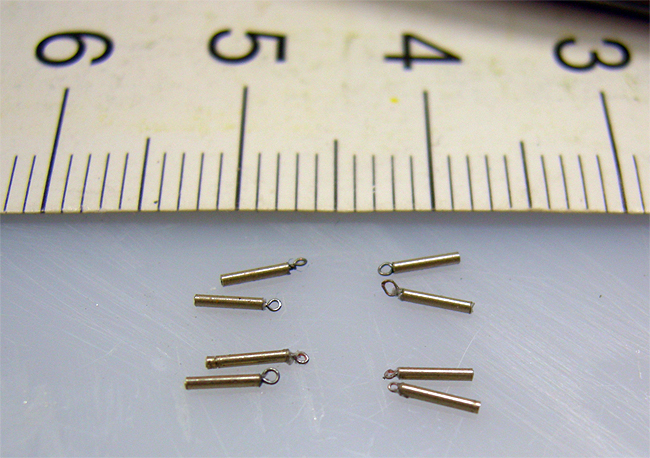
I started to prepare the turnbuckles to hook the rigging cables coming from the fuselage, those double wires which go to the top of the outer struts.
I used some nickel tube (inner diam  0.4 mm / outer diam 0.6 mm) cut in 3mm chunks and with an eyelet in one side and  a short piece of line on the other.


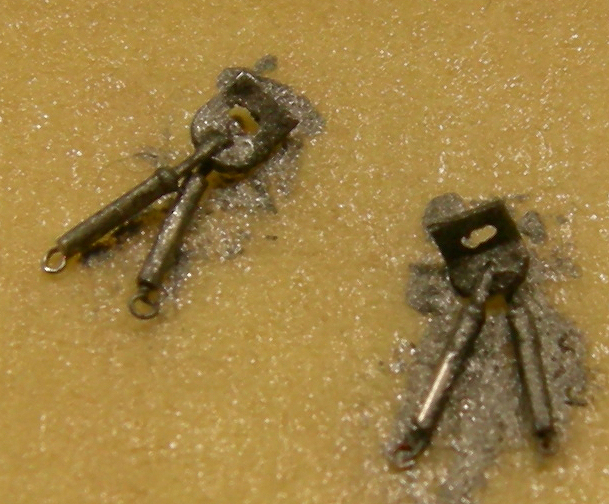
The 4 pairs of turnbuckles will be fixed to the "ceiling" of the top wings on top of the outer struts.

I just made 2 because my eyes were spinning and I was a bit tired...

Ciao

AnDonio

Offline pepperman42

  • Hero Member
  • *****
  • Posts: 4473
  • Sergeant, my brown pants.......
Re: Special Hobby 1/48 SPAD VII
« Reply #74 on: December 02, 2012, 08:18:24 AM »
Good work. The turnbuckle work is waaay too small for me. Wonder why your eyes were spinning?....

Steve