Author Topic: Albatros D-V (Roden 1/72)  (Read 20407 times)

Offline IFF1418

  • Hero Member
  • *****
  • Posts: 1541
Re: Albatros D-V (Roden 1/72)
« Reply #15 on: April 15, 2014, 02:55:53 AM »
Terrific engine Vincent, can't help repeating how I admire those small scale modelers. Well done!

Kind regards
Patrick

Offline mgunns

  • Hero Member
  • *****
  • Posts: 2255
Re: Albatros D-V (Roden 1/72)
« Reply #16 on: April 15, 2014, 05:40:36 AM »
Hello Vincent:

Great start to this kit.  Like Bo Mentioned:  Valve springs in 1/72nd!  Outstanding workmanship.  I always liked the Loerzer markings and look forward to following your build log.

Best

Mark
Mark

We few, we happy few.....

Offline vincentm

  • Sr. Member
  • ****
  • Posts: 411
Re: Albatros D-V (Roden 1/72)
« Reply #17 on: April 17, 2014, 09:32:19 AM »
Thanks all.

And thanks for your advices, Ian. As for the upper wing, one more problem is the fact that the radiator will be very close to the seam with the right wing...
Quote
You will need to thin the underside of the centresection wing stub as it is too thick. Also the inspection panels that Roden moulded onto it shouldn't be there (Take a look at the DVa walkaround pics on the TVAL site).
OK, I was wondering about this rounded panel as the Windsock plan doesn't show this area. It is hidden by the wheel axle fairing. Yes I've noticed I'll have to thin up the center wing portion. And I will have to manage to add metal rods on each side to secure the lower wing assembly.

Quote
The final major issue I found was that the cabane (fuselage mounted) struts need to be adjusted in length to fit in the correct locations. You may want to check that before attempting to mount the upper wing!
OK I hadn't noticed that. Are they too long or too short??

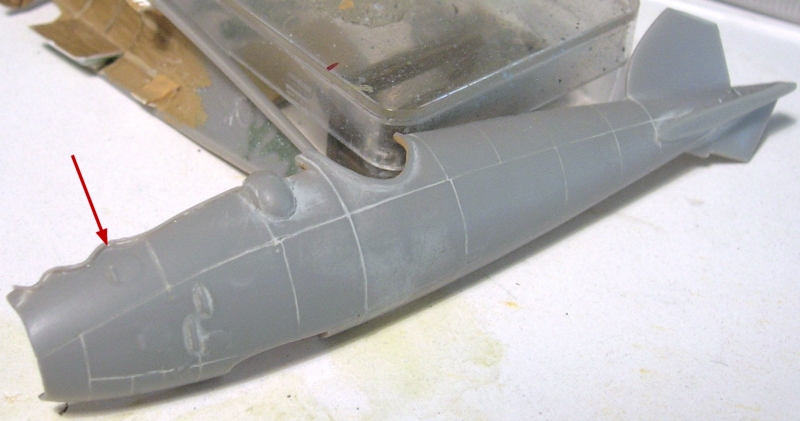
I've added the small "lips" to the engine cowling aperture using stretched sprue fixed with CA:

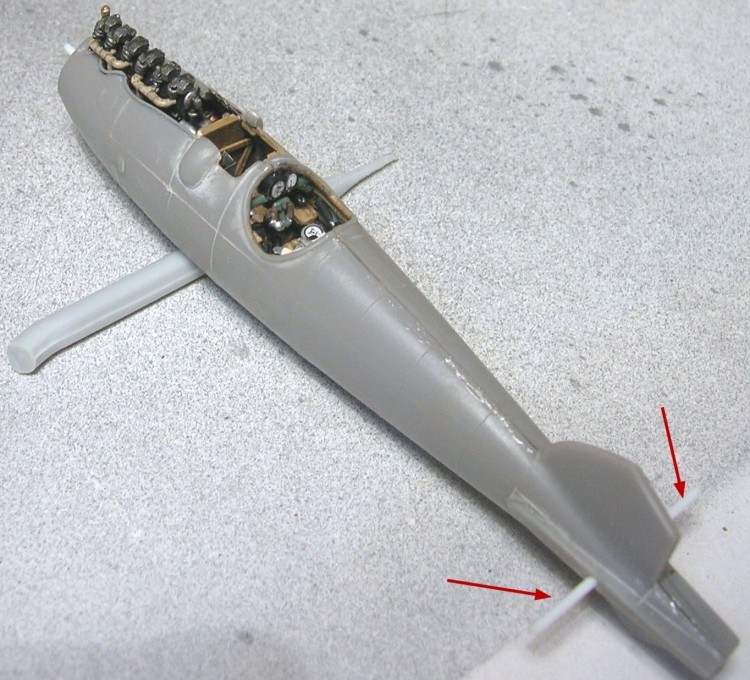
I first added the wooden parts to the pit, that is the engine/pit wall, the partial floor and half dashboard on the right side. As well as the small copper oil tank. The empty shell recovery box was roughly made from folded aluminum, it won't be much visible. I made one more attempt at painting the prop with masking tape, this time it doesn't look too bad, I may use it like this.


I've collected material and pics of preserved printed fabric to draw this sample in a paint program, adding a faded and fabric effect. Then I've printed that on a clear decal sheet.


I used my own home made lozenges for the rear cockpit wall, and may also use them for the upper wings. I've also built the main tank in front of the wooden wall, then added the seat with it's tubular stand, stick, rudder pedals and remaining instruments on their holding tube. I used FCM decals for the instruments.


After that, I could stick the fuselage halves onto each-other but it hasn't been easy to house everything. Some inner parts are oversized for the scale, but I had to cope with the size of the decal gauges and Roden parts like seat and stick.
After that, I drilled a hole through the elevator roots to put a strengthening rod. Now it's time for usual sanding of the joints and rescribing, then I'll have to drill the holes for rigs and control wires.
« Last Edit: April 17, 2014, 09:36:44 AM by vincentm »

Online uncletony

  • Hero Member
  • *****
  • Posts: 4396
    • Aircraft In Pixels
Re: Albatros D-V (Roden 1/72)
« Reply #18 on: April 17, 2014, 06:57:15 PM »
I like what you are doing Vincent!

Offline Des

  • Administrator
  • Hero Member
  • ******
  • Posts: 9325
    • ww1aircraftmodels.com
Re: Albatros D-V (Roden 1/72)
« Reply #19 on: April 17, 2014, 07:57:53 PM »
The cockpit and engine look superb Vincent, and I like your home printed lozenge, you are achieving remarkable results in 1:72 scale, amazing workmanship.

Des.
Late Founder of ww1aircraftmodels.com and forum.ww1aircraftmodels.com

Offline IFF1418

  • Hero Member
  • *****
  • Posts: 1541
Re: Albatros D-V (Roden 1/72)
« Reply #20 on: April 17, 2014, 08:46:29 PM »
Magnificent Vincent, your cockpit is awesome. Great modeling.

Kind regards
Patrick

Offline Adam

  • Hero Member
  • *****
  • Posts: 647
Re: Albatros D-V (Roden 1/72)
« Reply #21 on: April 17, 2014, 09:42:23 PM »
The engine and cockpit look wonderful.

Adam.

Offline Ernie

  • Hero Member
  • *****
  • Posts: 3961
  • "Once more into the breach"
Re: Albatros D-V (Roden 1/72)
« Reply #22 on: April 17, 2014, 10:19:24 PM »
Excellent work in such a small scale, Vincent.  The engine and cockpit look
terrific.  I really like the instruments, as well as the scratch-building.  Really nicely done.

Cheers,
Ernie :)
The new old guy, take two...

Offline lcarroll

  • Administrator
  • Hero Member
  • ******
  • Posts: 8660
Re: Albatros D-V (Roden 1/72)
« Reply #23 on: April 17, 2014, 10:30:30 PM »
   What you've accomplished in such a tiny subject is very impressive Vincent. This level of detail is hard to produce in any scale; this is great work, well researched and well executed!
Cheers,
Lance

Offline vincentm

  • Sr. Member
  • ****
  • Posts: 411
Re: Albatros D-V (Roden 1/72)
« Reply #24 on: April 18, 2014, 02:04:27 AM »
Thanks. Yes I realize that these aircraft are pretty small in 1/72nd. I had a hard time trying to drill holes in the wing roots to put strengthening rods. The wings are barely more than one millimeter thick...
It's going to be even worse with the struts. As Ian suggested, I'm considering scratching them or giving up the idea of adding pins.

Offline Epeeman

  • Hero Member
  • *****
  • Posts: 1419
Re: Albatros D-V (Roden 1/72)
« Reply #25 on: April 18, 2014, 07:42:55 AM »
I'm totally in awe of your work in this scale, Vincent -

Absolutely amazing work so far.

Regards

Dave
As we say in fencing, what's the point?

Offline IanB

  • Hero Member
  • *****
  • Posts: 2496
Re: Albatros D-V (Roden 1/72)
« Reply #26 on: April 18, 2014, 11:05:26 AM »
Hi Vincent, you should be fine with the kit wings, just a little adjustment as previously mentioned, strengthening shouldn't be an issue as the wings aren't heavy. The front lower end of the cabane struts is a fraction too long. Trial fitting and adjustment is needed here.

Ian

Offline RAGIII

  • Hero Member
  • *****
  • Posts: 19694
Re: Albatros D-V (Roden 1/72)
« Reply #27 on: April 18, 2014, 11:05:59 AM »
A lot of modelers put less work into 1/48th cockpits. I am impressed with what you are doing in 1/72nd!
RAGIII
"A man has to know his limitations": Harry Callahan

"Don't slop it on" Lynda Geisler

Offline vincentm

  • Sr. Member
  • ****
  • Posts: 411
Re: Albatros D-V (Roden 1/72)
« Reply #28 on: April 18, 2014, 11:16:54 AM »
Ok thanks for the info Ian. Shortening struts is always easier than lengthening them (which usually ends up in scratching them...). For my previous late 30s biplanes, I used templates attached to the lower wings to hold the upper wing in place while putting the struts. Think I'll do the same here.

I've made a print of my latest lozenge sample and it's definitely too light, specially the blue and purplish-violet. So I think my previous attempt (the lozenges that were applied to the aft cockpit wall) seems the best I made and I'm going to prepare a ready-for-application print. I mean, rather than cutting slices you need to apply at 90° on the wings, I will build-up the full pattern for each wing in the paint program, and apply only one big lozenge decal on each, in order to reduce the count of decal seams. Is that a good idea or is it more difficult to apply wing-size decals?

I was looking for something else, and found evidence of the additionnal hatch that Roden has molded under the lower wing central section. Unfortunately it will be sanded away when the part is attached, to match the fuselage underside, so I'll have to rebuild it from adhesive aluminum sheet. Of interest is the gap between the right lower wing and it's root. Something we would find unacceptable on a model...


Offline vincentm

  • Sr. Member
  • ****
  • Posts: 411
Re: Albatros D-V (Roden 1/72)
« Reply #29 on: April 29, 2014, 11:47:17 AM »
Here's some news. Firstly, I strengthened the lower wing attachment, as nothing was really provided for that. When I got a correct fit, I put the wings apart as they will be painted and covered with lozenges before assembly.


I did the same on the upper wing. I also filled up the gap around the aileron controls, the kit being definitely a D-Va. I added the small plate which covers the aileron pulley on D-V's:


After that, I noticed that the elevator had become too narrow after I glued the stabilizer separately, so it required to be widened by adding a piece of plastic that was sanded in place. The control horns were rebuilt, being one-piece (up and down) on each side:


Then, the lower wing central section was attached to the lower fuselage, followed by the rear control surfaces. Control cables were added as well as aluminum hinges:


The first sub-assembly is done, that is the fuselage and tail, that will have to be painted before going any further. I applied paint undercoats: medium brown for wooden parts, aluminum for the cowling and gun fairing, and tan for control surfaces.  I painted wood veins on the fin only, as the wood will remain visible around the serial number. Besides this, I assembled the upper wing and scratchbuilt the control horns and fairings that are typical to a D-V:


I tested several samples of home printed lozenges to check what they looked like and what should be the correct undercoat color. The grey undercoat makes definitely too dark lozenges. Colors look a little too bright IMO on a white undercoat, so I think light tan is the best option. The version marked 1 has a too dark shade of purplish-grey that looks rather wine-red (although there is a Fokker D-VII replica that has lozenges almost this color). As a conclusion, I still hesitate between 2 and 3, but it looks like the polygons are a little too big in "3", so "2" is likely to become the definitive option.
« Last Edit: April 29, 2014, 11:14:37 PM by vincentm »