Author Topic: Hand Carved Wooden Props  (Read 44950 times)

Offline lcarroll

  • Administrator
  • Hero Member
  • ******
  • Posts: 8547
Hand Carved Wooden Props
« on: May 11, 2012, 01:21:23 AM »
Friends,   

   I commited to providing a "How To" thread on this topic last week. I started yesterday, spent over an hour composing the bulk of the article and then lost it all when the "Web Page Expired" monster struck. Thus I'll try again however will submit it in smaller parts;  let's see how that works!?
GENERAL:
    I started using this technique 10 or more years ago to add realism to my projects, my hand painted versions didn't measure up and I was not aware of the Art Pencil or oil wood graining techniques others have perfected. The examples I've seen here are stunning to say the least, particularly the pencilled versions and that technique is one I intend to experiment with in future.
   I've used hand carved propellers in both 1:48 and 1:32 Scales, I believe 1:72 Scale would work as well as long as the thickness of the layers is adjusted to fit the Scale Effect.
   The technique I use is mostly sanding vs. carving; I keep carving to a minimum as the object is small and easily ruined by an inadvertant deep cut or split.

TOOLS:
   An oscillating drum sander works well for the initial work followed by miniature sanding drums and shaper bits in a Dremel type of hand tool. The Dremel will work fine if you don't have or don't want to invest in a small drum sander. You'll need a small vice however "C" Clamps and a couple of bits of scrap wood to distribute pressure over your laminated piece for one of the two stock options will work fine. A drill (or drill bit in your Dremel), sanding sticks and papers, basic hobby knife with #11 blades, small saw for intial rough cutting, and small files are all the additional tools you will need. Most if not all are part of the average modellers' tool kit.
   My drum sander is very basic; I use a wood block to provide a non-slip working surface and eliminate the danger of getting the stock or a finger (!?!)  into the drum opening in the sander table.

   Close up of the wood base clamped to the sander:

    I have both the standard electrical and mini battery powered Dremels. The cordless model is used constantly in my builds, it's a very versitile tool and a great time saver when carefully used.

   Some of the Dremel accesories I use:

    The basic hand tools "staged" while making a prop for my Roden DR1.

   Next to follow Material options and methods and the first steps in the process.
Cheers,
Lance


Offline GAJouette

  • Hero Member
  • *****
  • Posts: 3579
  • " Beware of the Spanish Inquisition"
Re: Hand Carved Wooden Props
« Reply #1 on: May 11, 2012, 01:38:00 AM »
  Lance,
Excellent my old friend. I'll be on pins and needles until the next installment arrives. I noticed the package of wood sheets in the last photo,where do you get you supply?
Highest Regards,
Gregory Jouette
" What Me Worry"

Offline lcarroll

  • Administrator
  • Hero Member
  • ******
  • Posts: 8547
Re: Hand Carved Wooden Props
« Reply #2 on: May 11, 2012, 02:14:18 AM »
    It worked! So here's a Part 2........................
MATERIALS:
    I use two types of raw materials in building my props, mini-plywood and wood veneers.
    The plywood stock I use is available in most Hobby Shops and is used by the Flying Model builders for engine and control mounts etc. My sheets are made by a company called Midwest, come in birch or poplar, and are in 8X12 Inch sheets and 1/8 inch in thickness. I have 3,4,5, and 6 layered sheets. Prices ranged from $3 to $6 per sheet (5-6 years ago) If I need more thickness I glue (Laminate) two thicknesses together and sand the rough stock to the dimension I want.
   The second material option (now my preference) is to make my own laminated stock using assorted wood veneers.
I found a veneer sample pack at Lee Valley Tools for approximately $30 and it has enough stock for 40-50 props in my estimation.
   First, the plywood version, rough cut stock "Blanks" as I call them. The only potential downside of the ply version is that some sheets have a very pronounced grain in the reversed alternate layers which when stained looks a little "off". Note the different number of laminations; you need to check your references carefully to match the number of layers or laminations.


    Below is the Veneer sample pack followed by a 5 layer Blank of Light/dark veneers:


   For the veneer option I use woodworking white glue, (Cabinet Workers quality preferred) to glue together the layers.
   Once your prop is shaped and sanded you'll need some basic wood stain, I use oil based in the middle color ranges (Oak, Maple, or "Colonial") and then darken as required at the end with Tamiya Clear Yellow or Orange. The stain can be bought in the smallest size and will provide enough for a lifetime. Last, I apply a coat or three of clear urethene or clear model enamel sanding between coats until a smooth finish results, then the clear Tamiya product.
   That concludes the material considerations, next the build process.
   As an aside, don't be deterred by what appears to be a long complicated process. It's dead easy and not counting drying time for the finish I have completed a prop in approximately one and one-half hours. As the saying goes, "it ain't rocket science"!
Cheers,
Lance
   

Offline GAJouette

  • Hero Member
  • *****
  • Posts: 3579
  • " Beware of the Spanish Inquisition"
Re: Hand Carved Wooden Props
« Reply #3 on: May 11, 2012, 02:21:27 AM »
  Lance ,
Thank you very much for this tutorial my friend. I'm thinking it's time for another LHS run today in search of plywood and veneer.  They'll be wondering just what the Mad Modeler is up to now.
Highest Regards,
Gregory Jouette
" What Me Worry"

Offline lcarroll

  • Administrator
  • Hero Member
  • ******
  • Posts: 8547
Re: Hand Carved Wooden Props
« Reply #4 on: May 11, 2012, 02:29:48 AM »
Greg (et al)
   To answer your question the Veneer Pack I have was from Lee Valley Tools as just mentioned in Part 2. To elaborate a bit they are a North American Vendor and purchases can be made on-line. Just Google or search Lee Valley Tools. You don't want the heat activated "iron on" veneeers used commonly by woodworkers, raw veneer is what you need. I suspect any woodworking tool and supply specialty store would have similar products. There are a few samples included that are unsuitable (can't say I've ever seen bright green laminations on a prop!) however 90% of your purchase is suitable.
   If there are any questions out there don't hesitate to ask; I'm no expert at this but have done enough things wrong in the learning process to at least provide an informed opinion!
Cheers,
Lance

Offline bobs_buckles

  • Hero Member
  • *****
  • Posts: 3720
  • Freedom isn't free.
    • Bobs Buckles
Re: Hand Carved Wooden Props
« Reply #5 on: May 11, 2012, 02:40:17 AM »
Lance,
 Thanks for the tutorial.
I look forward to seeing more updates.

Cheers,
Bob


https://www.bobsbuckles.co.uk/

Last Minute Man Of Faith

Offline Pete Nottingham

  • Hero Member
  • *****
  • Posts: 906
  • I chose the wrong week to stop sniffing glue
Re: Hand Carved Wooden Props
« Reply #6 on: May 11, 2012, 03:40:18 AM »
Thanks for the tutorial Lance, it looks most interesting, I just wish that I was better at this type of detailing.

Cheers

Pete.

Offline phs Paddy

  • Sr. Member
  • ****
  • Posts: 325
Re: Hand Carved Wooden Props
« Reply #7 on: May 11, 2012, 04:28:41 AM »
Thanks very much Lance for taking the time. Much appreciated.

Paddy
In mathematics you don't understand things, you just get use to them. Johann von Neumann 1903-1957

Offline lcarroll

  • Administrator
  • Hero Member
  • ******
  • Posts: 8547
Re: Hand Carved Wooden Props
« Reply #8 on: May 11, 2012, 05:29:23 AM »
   I'll add a short Part 3 today; initial carving/sanding.
Now that you have your Blanks ready it's time for step 1 in the shaping process.the rough shaping of your prop. The first step is to outline your props one dimensional front profile on the Blank(s) using the kit prop as a guide/template. Start by marking the exact center of the blank (which you have cleverly cut slightly larger then what you need). Drill out the center hole being careful to use a drill no larger then the prop shaft. You then center the prop on that centered hole and pencil the shape on. I find that doing one blade, then the other with constant checks on alignment works; you just need to keep checking to ensure the prop/template continues in alignment with the already outlined shape. Also outline the prop boss mounting area (Flat portion) which helps immensely when you start the dimensional shaping. As mentioned before I do at least three. To date I've not had to use the spares however they can be kept for future use, even for different prop types, by simply erasing or sanding off the outline.
   Here's four Blanks with the outlines in pencil completed. These were for an Axial prop for the Albatross DIII in 1:32 Scale. You'll notice that the center circles are a little rough however in this case that portion is covered by the spinner so no problems.

   Now the fun begins. Use your drum sander to shape to the outline or a Dremel with sanding drum if that's all you have. I start with the drum sander and then do the last finer bit with the Dremel. If you trust your carving skills do the course shaping that way followed by fine work with the Dremel and/or sandpaper and round file.
   Here's the stages from Blank to one profile done, the kit prop included, followed by the side view of the result.


    And now your half done. Next the shaping of the other dimension to get to the rough finish stage. It will be a day or so, I don't have any stashed photos for this part so I'll make a Neindorf Prop for my DV in progress and photograph as I go along through this next stage. This is a curved prop so it's a first for me as well.
Cheers,
Lance

Offline pepperman42

  • Hero Member
  • *****
  • Posts: 4431
  • Sergeant, my brown pants.......
Re: Hand Carved Wooden Props
« Reply #9 on: May 11, 2012, 05:55:00 AM »
Thanks for the step by step!!

Steve

Offline Edo

  • Hero Member
  • *****
  • Posts: 702
Re: Hand Carved Wooden Props
« Reply #10 on: May 11, 2012, 11:22:04 PM »
very interesting stuff!
makes me want to give it a try... or it is you that make it seems so easy???  ;)
can't wait to sww the carving...
ciao
Edo

Offline lcarroll

  • Administrator
  • Hero Member
  • ******
  • Posts: 8547
Re: Hand Carved Wooden Props
« Reply #11 on: May 13, 2012, 12:35:14 PM »
    Time for Part 4, the shaping of the remaining two dimensions of your prop. Keep your kit prop (If that's your reference as opposed to drawings) real close, and as you step along through the next several steps compare the kit prop to your wooden one often. Believe it or not I once "trashed" one by applying the pitch on one face, reversing it, and sanding off the pitch on the wrong edge; makes for a far  too narrow airscrew and really gets your nerves quivering.
     So you've got your Blanks prepared with the single (front) dimension applied and shaped. To aid in illustrating my technique I'm going to make a Neindorf Prop for my WNW Albatross DV presently in progress; here are the three Blanks I prepared and shaped the single dimension on. Rough shaping as mentioned before done with the Oscillating drum sander. It could be done with a Dremel with sanding drum as well. 
 Note that the outline leaves margin for error all round. It can be reduced to the final dimension(s)  in the final stages with hand sanding.

   I've prepared three different laminations, a five with three light layers sandwiched between two very dark layers, an eight laminations plywood one, and a five layer plywood example.
   Last, note the pencilled shading on the faces; these are the areas to be sanded off to produce the face side pitch dimension.
On this prop I'll attempt to do that part with the Dremel and "hand held" as opposed to using the big Oscillating  Sander.
   Before we start "ripping and tearing" it's important to note (and include) the side profile dimension. The following photo says it all, and that shaping should be done first. Again, I prefer the Dremel with a small Medium Grit sanding drum followed by touch up with hand sanding . Be careful to stop short of your final desired shape as hand sanding will ensure (more or less!) that you don't over do it and have to start over again. The secret is slow passes with light pressure followed by "sweeping" passes down the work face to smooth out your "cuts".

   Once you've matched the side profile start removing the stock on the first pitch face. Go slow, use light pressure, and I use the Dremel's lowest speed setting. Pay particular attention to the portion at the hub: that's where the shape is most abrubt and also where a mistake or assymetric shape will stand out the most. In this case we have a spinner covering the area which makes the task easier however ENSURE the fit of the spinner (in the final stages)  to your prop before calling it "done". Keep going back to the kit prop or your drawings and include the spinner mounting plate in your calculations on spinner fitment.
   Here's a few shots taken as the "carving with a sander" progresses. I missed taking a shot of the first step, sanding down the side profile. You'll note that the lamination "lines" are crooked and wavy due to the rough finish at this stage. Once the surface is smoothed out they'll be straight.

 
   Note in the preceeding photos the "bite" I've taken out adjacent to the hub. That's where your circle outline really comes in handy. On configs without spinners this needs all of your attention as it really stands out if not proper and symetrical.
   And now the reason we do several Blanks. My brilliant idea to use several layers of really light veneer with two outsides of very dark proved a disaster with the first couple of passes of the Dremel. I did the pitch cut first on this one as I was pretty sure it would "bomb", and it did! This one's for the kindling box for next winter. Light - dark - light etc. works much better.
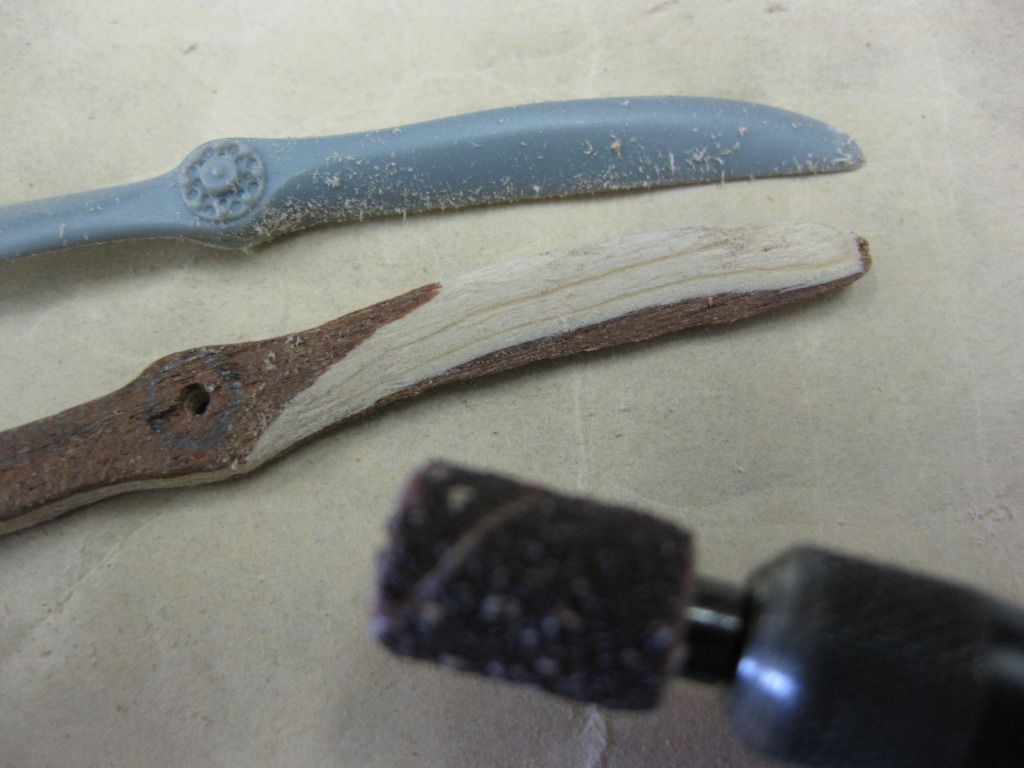
   At this point I move from the Garage/Shop back to the Model Desk for hand sanding. This step is best done by hand sanding, at this point I use 150 Grit and get the props almost reduced to final shape and dimensions paying particular attension to smoothing out the "hills and valleys " on the flat surfaces. So here they are at the end of the second to last construction phase. Note the laminated effect and appropriate shapes and lines of the "Lams".

   So now we have two props in the rough finished stage; next installment the final finishing touches before staining, sealing, and varnishing. Were almost there!
Cheers,
Lance :)

Offline Des

  • Administrator
  • Hero Member
  • ******
  • Posts: 9325
    • ww1aircraftmodels.com
Re: Hand Carved Wooden Props
« Reply #12 on: May 13, 2012, 01:26:36 PM »
Thanks very much Lance for posting this step by step tutorial, it is going to be so beneficial for anyone wanting to make their own wooden propellers, I'm sure we will be seeing a lot more authentic looking wooden propellers on models in the near future. I have set the topic as sticky so it will remain at the top and will be readily available to the members for a quick reference.

Des.
Late Founder of ww1aircraftmodels.com and forum.ww1aircraftmodels.com

Offline kornbeef

  • Hero Member
  • *****
  • Posts: 961
  • U.K. Carpet monster genocide squad leader.
Re: Hand Carved Wooden Props
« Reply #13 on: May 13, 2012, 05:06:30 PM »
An excellent insight to a dark art.. TY for sharing your knowledge Lance.

Keith
Never too old to learn sumfink noo

Offline pepperman42

  • Hero Member
  • *****
  • Posts: 4431
  • Sergeant, my brown pants.......
Re: Hand Carved Wooden Props
« Reply #14 on: May 14, 2012, 02:56:27 AM »
You make it look easy. I might give it a try..though I make things difficult.....