Author Topic: Sopwith Type 806 Gunbus  (Read 6788 times)

Offline lone modeller

  • Hero Member
  • *****
  • Posts: 5322
Sopwith Type 806 Gunbus
« on: October 30, 2013, 09:51:40 AM »
Evening All,
   Once again I am presenting a thread which I regard as a conversion rather than a true scratch build, but as everyone seems to be happy with conversions going into this forum I will stick with previous practice. My apologies to any who are getting bored with pushers, but as they formed an important (and generally neglected by model manufacturers and therefore modellers), part of RFC equipment in the early years of WW1, I have taken a perverse delight in trying to build some of them. This means of course that I have to convert them from other kits, as I have already demonstrated with other models posted on this site. This little conversion concerns an aeroplane which is not particularly well known and has proved a bit of a problem to research in any detail, so there will be some aspects of my model which will involve a little imagination but not I hope, too many errors.

 Like many other early aircraft types in general, and pushers in particular, there is no kit of this aircraft produced in 1/72 scale, although card kits in 1/48 and 1/50 scales are available. The inspiration to build this model came from an article by G. Scarborough published in Airfix Magazine Annual No 5 in 1975. G. Scarborough did not build a full aircraft as his was part of a small diorama where the aeroplane was partly dismantled and towed on a trailer, as illustrated in a series of photographs of Robey built machines being taken from the factory in Lincoln to a nearby testing field. I have chosen to represent the entire aircraft and omit the vehicles. There are two (possibly more) kits that could be used as starting points: the Airfix Avro 504 (as in my case), or the Airfix DH 4, both of which could provide wings, wheels, struts, etc, but either way you will need two kits unless you are prepared to make part of the wings from plastic card as the span of the Sopwith Gunbus was considerably greater than either the Avro 504 or the DH 4. I used G. Scarborough's method of increasing the chord of the Avro 504 wings and kept the fuselages for later use to correct the errors in that kit when I come make different variants of that famous type. The engines and propellors also proved useful for the conversions of Vickers Gunbuses from D H 4's: it is surprising how much of a kit can be used in different conversions/scratchbuilds.


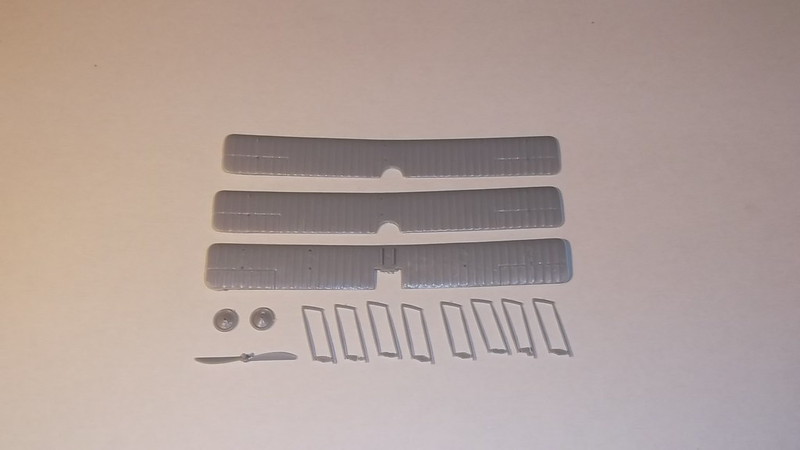
These are the parts which I intend to use from the Airfix kits: the remainder of what is needed will be made from plastic card or rod.

     I started with the wings on this model. I needed sets from two Airfix Avro 504 kits although I only used three wing units. I started by cutting a length 8.4 cm from the port (left) side of both upper wings: this extends past the centre section cut-out almost to the point where the wing anhedral starts on the starboard (right) side.


   I scored the underside of both wings and removed the anhedral by carefully bending the wing until it was flat and secured the new shape by running liquid cement along the score lines and pressed the wing flat until they were dry.

   I cut off a piece 4.9 cm long from the port (left) side of a lower wing and a similar length from the starboard(right) side of the same wing. These will form the centre sections of the new wings. Finally I cut two lengths 1.1 cm long from what was left of the outer sections of the lower wing.


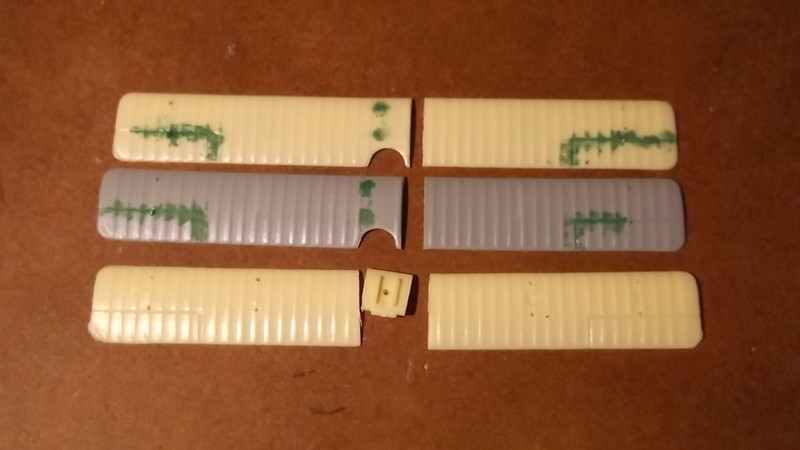
These are the wing sections prior to assembly, showing how the different pieces of three wings are joined together to make two new ones.


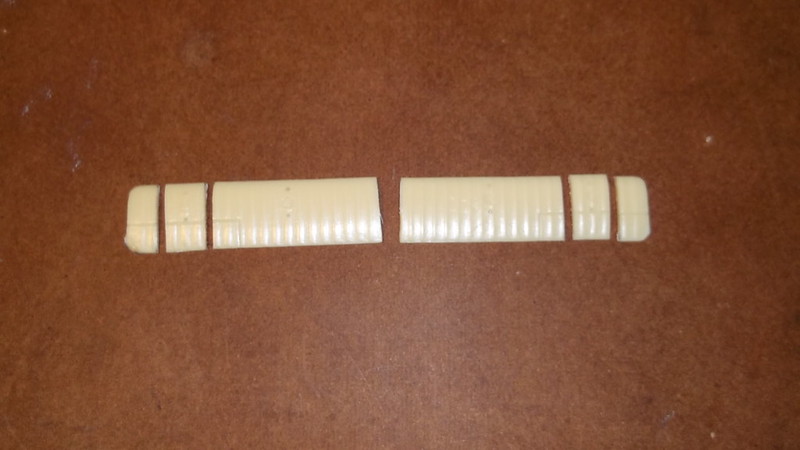
   To assemble the new wings I cemented the two 1.1cm pieces to the starboard (right) sections of the upper wing parts: these were butted at 90 degrees and allowed to dry thoroughly. When they were completely dry the edges of the centre section pieces (the ones 4.9 cm long) and the edges of the outer wing panels were filed so that when they were butted together the correct dihedral angle (3.5 degrees) was achieved.

    I cut out the top wing indent for the booms by cutting two slots 6mm deep x 5 mm wide where the anhedral starts and then joined the wing sections making sure that I got the correct dihedral angle on both sides. With the bottom wing the centre section chord needs to be 1.6 cm, so I reduced the chord to this dimension before I glued the wing sections together by removing a piece from the trailing edge. Then I assembled the lower wing sections but in this case I allowed the wing centre section leading edge to extend 2mm ahead of the outer wing sections because later I will only need to put some rod on the outer wing sections when I extend the chord of the wings later.

    When the new wings were completely dry I glued a length of 60 thou diameter rod along the entire leading edge of the upper wing and the outer panels of the lower wing and allowed it to dry. I then filled the gap between the rod and the top and bottom surfaces of the wings with filler, and at the same time filled the strut location holes and grooves, the old aileron grooves and the joints of the wing sections. I also filled the cutouts of the 504 wing centre sections with card and filled the joints. When all the filler was being rubbed down I removed the ribs of the 504, and shaped the tips of the wings. I drilled the new strut location holes on both wings, and on the lower wing holes for the undercarriage under the centre section, and wing skids under the outer struts. Last of all I cut and filed shallow grooves on the top of the trailing edges of the wings where the booms will be joined later. Strictly this is not accurate as the booms were inserted into the rear of the wings but this is not really practical on this model as the wings are so thin that the resulting joint would be very weak.


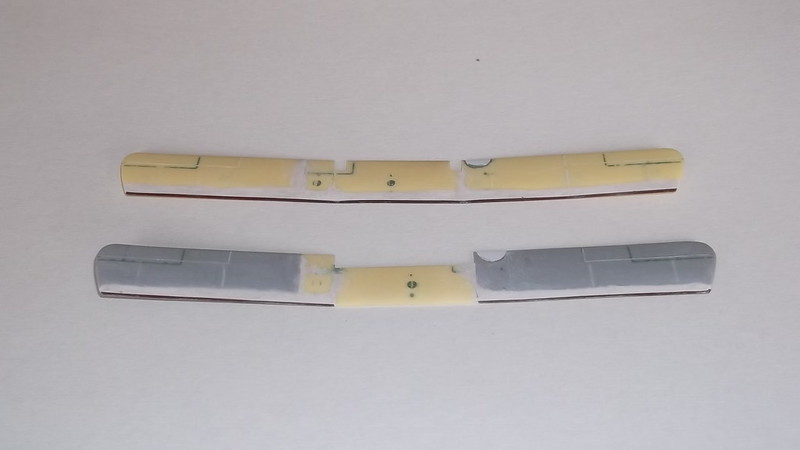
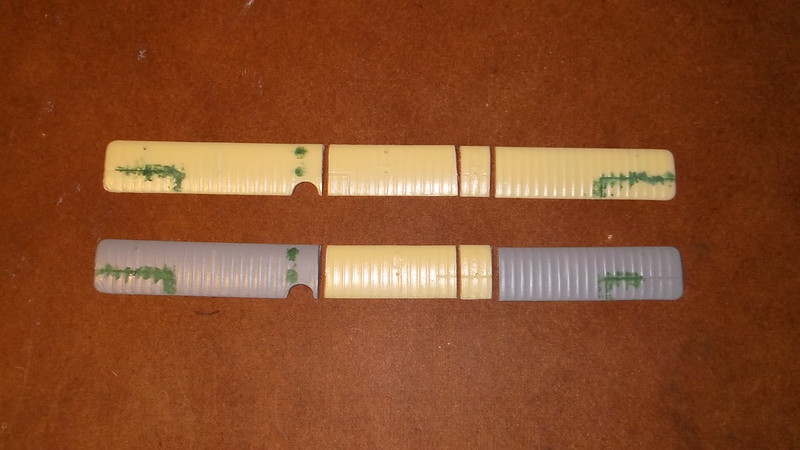
These are the completed wings (upper wing top), viewed from the front showing how the plastic rod and filler has been used to extend the chord. The indents in the rear of the upper wing can also be seen as can the cut-out on the lower wing. Note that the lower wing chord has only had to be increased on the outer sections.

Thanks for looking.
« Last Edit: July 04, 2017, 08:02:17 AM by lone modeller »

Offline Des

  • Administrator
  • Hero Member
  • ******
  • Posts: 9325
    • ww1aircraftmodels.com
Re: Sopwith Type 806 Gunbus
« Reply #1 on: October 30, 2013, 10:14:44 AM »
You have made an excellent start on your Gunbus LM, the wing conversions have been very well done and should look the part perfectly.

Des.
Late Founder of ww1aircraftmodels.com and forum.ww1aircraftmodels.com

Offline Zabu

  • Hero Member
  • *****
  • Posts: 681
Re: Sopwith Type 806 Gunbus
« Reply #2 on: October 30, 2013, 11:08:28 AM »
Hi LM.

You made quite a job in those wings. Awesome start indeed.

Cheers

Offline IanB

  • Hero Member
  • *****
  • Posts: 2441
Re: Sopwith Type 806 Gunbus
« Reply #3 on: October 30, 2013, 11:44:46 AM »
Nice start, this should be an interesting thread!

Ian

Offline rhallinger

  • Hero Member
  • *****
  • Posts: 1976
Re: Sopwith Type 806 Gunbus
« Reply #4 on: October 30, 2013, 11:50:16 AM »
Impressive work LM.  I truly appreciate the adventurous spirit to create something from basic stock, essentially.  This will be a learning experience for many of us.  Thanks for sharing your work in such helpful detail.  ;D

Regards,

Bob

Offline GAJouette

  • Hero Member
  • *****
  • Posts: 3579
  • " Beware of the Spanish Inquisition"
Re: Sopwith Type 806 Gunbus
« Reply #5 on: October 31, 2013, 02:04:56 AM »
  Lone Modeller,
Wow what an awesome project my friend. Love those kit bash / scratchbuilt projects. Outstanding progress to date! This thread is one of those I'll be following with the greatest of interest.
Highest Regards,
Gregory Jouette
" What Me Worry"

Offline lone modeller

  • Hero Member
  • *****
  • Posts: 5322
Re: Sopwith Type 806 Gunbus
« Reply #6 on: November 17, 2013, 08:01:12 AM »
Evening All,

Thanks to those who have written such encouraging comments - they really are appreciated. Progress has been a bit slow as I have been distracted a bit by life's events, but I have managed to get a little further with this one. One of the bigger problems has been finding reliable information - this was not an aircraft that was well documented, photographically or otherwise so I have had to be a little creative in places, but I suspect (hope) that nobody will notice.

The fuselage nacelle was built from 20 thou card sides and floor with three bulkheads, one at the point where the top decking starts to curve at the nose end, one between the cockpits and one at the rear. I made a three sided box with the sides, floor and bulkheads and added seats, and a control column, rudder bar, etc in the front cockpit. Instruments were pretty basic and as I have no specific details I indicated a couple on the sides of the cockpit and added a simple throttle on the right side. The top decking was made from 20 thou card bent over the curved tops of the bulkheads and glued into place with liquid cement. I cut a slot  in the top decking behind the rear cockpit to take the radiator which was made from card with the surfaces scored to represent the radiator grill. The nose of the nacelle was built up with scrap plastic and then covered with filler and sanded to shape. The coamings around the cockpits were made from thin rod. The engine bearers were of rod inserted into holes drilled into the rear of the nacelle, and the rear support for the engine was cut from card.


     The engine was difficult to make as I could not find any good quality photos or drawings: the drawings provided in the AM Annual were poor and not very accurate but were all I could find, so they had to do. The cylinder blocks and engine block/sump were made from laminated card. The exhaust pipes were short pieces of rod bent to a curve and I put some very thin rod on the sides of the block to represent pipes, but I did not add much in the centre of the engine where I suspect there were pipes and wiring because I just do not have any evidence to go on. In any event nothing much will be seen when the model is finished as it will be largely hidden under the top wing. The assembly was painted light grey with a little silver mixed in to give a metallic finish.

This image shows the best that I could do with the engine - much of it will be concealed when it is mounted on the rear of the nacelle so the lack of specific detail will not be too large a problem I hope. I suspect that many more pipes and wires should be present but the question is, where can I find the details?


Thanks for looking.
« Last Edit: July 04, 2017, 06:30:02 PM by lone modeller »

Offline IFF1418

  • Hero Member
  • *****
  • Posts: 1541
Re: Sopwith Type 806 Gunbus
« Reply #7 on: November 17, 2013, 07:24:48 PM »
Hello LM, I am amazed how you do this in this tiny scale. Wished I would be able to do that, but I seems far away from my possibilities of handyness and my poor eyes. Congrats!

Kind regards
Patrick

Offline Ernie

  • Hero Member
  • *****
  • Posts: 3961
  • "Once more into the breach"
Re: Sopwith Type 806 Gunbus
« Reply #8 on: November 17, 2013, 07:59:15 PM »
Amazing work, LM.  I am really in awe of your talents.  My eyes get sore
just imagining working on such teeny bits.  I look forward to more updates.

Cheers,
Ernie :)
The new old guy, take two...

Offline Zabu

  • Hero Member
  • *****
  • Posts: 681
Re: Sopwith Type 806 Gunbus
« Reply #9 on: November 19, 2013, 12:20:52 PM »
Great work from you LM.

I do know how hard those details are to make, but such a skilled modeler like you knows no bounds. Well done.

Cheers

Offline uncletony

  • Hero Member
  • *****
  • Posts: 4349
    • Aircraft In Pixels
Re: Sopwith Type 806 Gunbus
« Reply #10 on: November 19, 2013, 01:21:36 PM »
Weren't most of these powered by the 110 or 150hp Sunbeam V8  "crusader" ?

From what I can work out this is a mislabeled example, I could be wrong... Note pusher config:

Offline uncletony

  • Hero Member
  • *****
  • Posts: 4349
    • Aircraft In Pixels
Re: Sopwith Type 806 Gunbus
« Reply #11 on: November 19, 2013, 03:15:08 PM »
150 hp Sunbeam V8 shown here... :

Offline lone modeller

  • Hero Member
  • *****
  • Posts: 5322
Re: Sopwith Type 806 Gunbus
« Reply #12 on: November 20, 2013, 07:49:08 AM »
Evening All,
 Gentlemen: many thanks for your compliments - I am not sure that they are wholly deserved as I consider that these efforts are rather amatuerish compared with some of the work seen on this site. Nevertheless I am genuinely grateful for the comments as they inspire me to carry on and to continue posting.

Offline lone modeller

  • Hero Member
  • *****
  • Posts: 5322
Re: Sopwith Type 806 Gunbus
« Reply #13 on: November 20, 2013, 07:59:35 AM »
Bo,
Many thanks indeed for posting those photos. You are right in assuming that the engines used in the Sopwith Gunbus were 150hp Sunbeam Napiers. I have read a source somewhere that said that these engines were also used for naval airships which may be why they were used in the Gunbuses too as these were built for the RNAS. The picture of the 8 cylinder engine in the advert is the type used in the Gunbus complete with the overhead pipes leading to the radiator. In the case of the engine configured as a pusher the pipes would have been taken to the front end in the Gunbus as I hope my model will eventually demonstrate. I have trawled the net looking for pictures of one of these and have simply found nothing....and then you come along with two excellent pictures! I have learned a lesson here - next time I will post a question on this site - clearly there are some very well informed people out there - you being among them.

Thank you again for the information.

Offline uncletony

  • Hero Member
  • *****
  • Posts: 4349
    • Aircraft In Pixels
Re: Sopwith Type 806 Gunbus
« Reply #14 on: November 20, 2013, 09:02:24 AM »
LM,

Glad these pics are of some use to you! Actually I am not particularly knowledgeable about these engines but it is a fascinating subject to me, and I am fairly handy with a search engine:)

The top photo does appear to be a Crusader although the museum caption has it as an Arab. The Arab is quite different looking, it resembles an Hispano Suiza V-8 and I believe it is OHC whereas these "Crusader" type V-8s would appear to be side valve jobs. The motor is apparently in a museum in Belgium; perhaps somebody here knows more.

Cheers,