Author Topic: Sopwith Type 806 Gunbus  (Read 6769 times)

Offline lone modeller

  • Hero Member
  • *****
  • Posts: 5316
Re: Sopwith Type 806 Gunbus
« Reply #15 on: December 01, 2013, 07:07:18 AM »
Evening All,
      I made the boom struts from florist's wire and put in the small horizontal bracing struts on each boom. This makes the structure stronger when I come to start putting the wings together with the struts. I have also cut the tail surfaces from card and painted the wings with white to show up any holes or gaps in the joints and filler. The image shows the components at that stage of proceedings:


I have painted the wings and started the roundels. The upper surfaces are in PC 8 which was a coloured dope used by the RNAS in 1915 prior to PC 10 becoming standard in 1916. The roundels have the white centres painted but I have still to add the red rings.  The method that I use to paint roundels is simple. First paint the background colour. Now use a pair of dividers to score the outer circle into the paint surface and then paint the white of the roundel up to the scored line. The paint will just run into the scored groove and give a clean sharp line if you are careful and use a fine brush and thin paint. Now score the edges of the red and blue circles into the white paint and paint the remaining colours - again using thin paint and a fine brush. I use an eye loupe to see the grooves and rest the model and my painting hand on the desk while I am painting to stop any shaking. So far this method has worked well - just occasionally I have to touch some colour in. The boom has not been glued the wing in this image - it was glued into place after the photo was taken.


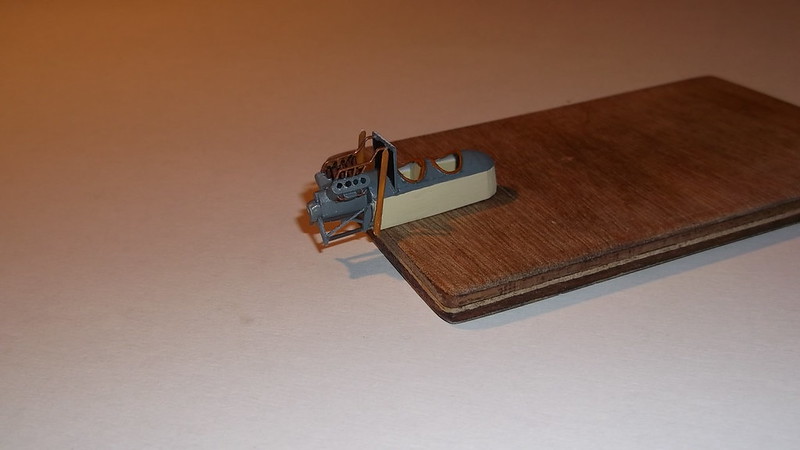
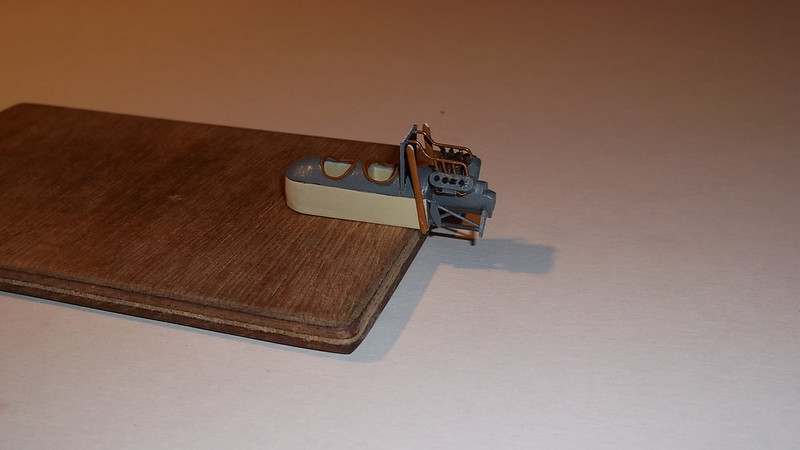
The fuselage nacelle and under-wings were finished in CDL: the top of the fuselage was light grey as this seems to have been the colour of the original machines according to my sources. The propellor blades were wide and I had to make new ones from card: these were glued to the boss of an old camel(?) which I found in the bottom of my spares box: I removed the original blades. The propellor was painted dark wood with a grey boss.


I cemented the radiator to the nacelle and the engine to the bearers, and then added the water pipes from the cylinders to the radiator: these were from rod bent into shape. The pipes were painted copper with some brown mixed in to take off the sheen. The exhaust pipes were rust. I am not going to try to add any more detail to the engine as it is just too small and anyway it will hardly be visible under the top wing when the model is finished. However on reflection I should have tried to add some grime to the engine but in my hurry I forgot. I also find weathering with a paint brush very difficult to get right - either I add too much or not enough!


The above image shows the state of play at the moment. The next stage will be to finish the roundels and tail markings. The roundels will be of the RNAS 1915 style - a red outer ring with a white interior, and then I can put the nacelle on to the lower wing and the upper wing on to the struts. This will be different to the other pushers that I have made as the wing and vertical boom struts are all staggered forwards, and in addition the nacelle does not rest on the lower wing - it is suspended in the gap between the wings. I have still got to work out how to get the angles and positions right - I think that I know what to do, but only time and experience will tell me if I am correct.

Thanks for looking.
« Last Edit: July 04, 2017, 06:43:39 PM by lone modeller »

Offline IanB

  • Hero Member
  • *****
  • Posts: 2439
Re: Sopwith Type 806 Gunbus
« Reply #16 on: December 01, 2013, 12:03:41 PM »
Very nice so far, she's shaping up to be a little gem!

Ian

Offline Nigel Jackson

  • Hero Member
  • *****
  • Posts: 2608
Re: Sopwith Type 806 Gunbus
« Reply #17 on: December 01, 2013, 07:21:20 PM »
Hi LM

This is shaping up really nicely. It's one I'm certainly looking forward to seeing complete.

You mention the problem of getting the balance of weathering right and either adding too much or little. Does the photographic evidence suggest that Gunbuses in service were often seen in a particularly grimy state? I have to say that I have very little expertise in the field of weathering but have always thought that less is more.

Best wishes
Nigel

Offline lone modeller

  • Hero Member
  • *****
  • Posts: 5316
Re: Sopwith Type 806 Gunbus
« Reply #18 on: December 01, 2013, 10:43:34 PM »
Dear Nigel,
Photographs of the Sopwith Gunbus are not too numerous - they were used mainly for training in the early years of the war and so were not much photographed. Such pictures as I have been able to find are usually pretty grainy and not of the best quality. That said it is often the case that the photos were also taken from a distance, so detail is difficult to see. There is a set of photos of machines being taken by lorry from Robey's factory in Lincoln which are some of the better ones, but these were new machines being taken to a field for flight testing - even these do not show any engine detail. Of course the mechanics would have done their best to keep the engines clean - they would certainly not have been covered in oil and grime, but inevitably there would be some dirt and oil traces on parts of these engines and I would like to have the painting skills to simulate this. I note how some of the models on this site have excellent but subtle weathering effects - especially oil stains from rotaries (which were notorious for spilling oil as photos show) - but as you say, (and I wholeheartedly agree), less is best. However my engine looks just too clean, especially in the photos. Perhaps now it is mounted it is not so obvious, and when the wings are on it may not show at all. I suspect that it could be a case of me being over-supercritical of my own work - as usual.

Offline Nigel Jackson

  • Hero Member
  • *****
  • Posts: 2608
Re: Sopwith Type 806 Gunbus
« Reply #19 on: December 02, 2013, 01:06:38 AM »
Dear LM

I suspect that over-criticality of our own work is a personality trait of many of us share here; in your case it leads to some superlative work.

Like you, I searched for Gunbus photos and couldn't turn up much. One of the books I looked in was Volume 2 Fighters in J.M. Bruce's  War Planes of the First World War series. There are three small photos there: one of the earlier version with the Gnome engine and two of the later Sunbeam powered machines. Two of these aircraft (one of each engine) are shown larger and in better detail in the same author's The Sopwith Fighters in the Vintage Warbirds series, together with another of a Gunbus fitted with a bomb sight.

I'm sure you've seen them all, but what strikes me is the smartness of the ground crew and, in one case, the naval aircrew. Maybe these are just photos of machines hot off the production line like the Robey's one you mention, but there seems an evident pride in the machines which might suggest high standards maintenance and cleanliness. I also notice in the naval version what appears to be some protective covering for the engine - which would also keep out the grime. Perhaps too, in-line engines just threw out less oil?

All that said, I'm sure you're right to go for some representation of light dirt and oil traces. Others who are far more expert than me may be able to advise, but I would be tempted to apply some thinned down, dark brown oil paint sparingly  in likely places where build up might occur.

Best wishes, and do keep up he excellent work,
Nigel 

Offline Des

  • Administrator
  • Hero Member
  • ******
  • Posts: 9325
    • ww1aircraftmodels.com
Re: Sopwith Type 806 Gunbus
« Reply #20 on: December 02, 2013, 11:37:45 AM »
She is shaping up quite nicely LM, the engine looks great sitting in position along with the radiator.

Des.
Late Founder of ww1aircraftmodels.com and forum.ww1aircraftmodels.com

Offline lone modeller

  • Hero Member
  • *****
  • Posts: 5316
Re: Sopwith Type 806 Gunbus
« Reply #21 on: December 03, 2013, 03:05:42 AM »
Thank you for the compliments Nigel and Des: glad you think it looks good.

I agree with what you have written Nigel about most (all?) the people who post on this and other sites are also critical of what they do. You will recall that we have already mentioned the problems we have had with reference to posting our work. I need to learn to be less critical, especially when the comments made on this site are so positive (as you, Des and many others have been on this thread).

Thanks too for the hint concerning how to paint on the oil stains on the engine - I will definitely try that in the future (too late for the Gunbus). As you have indicated, the aircraft of the RNAS and the RFC (and other air forces of course), were kept in very good condition: after all, aircrew lives depended upon these machines performing at least as well as, if not better than the opposition, or if they were trainers, not failing in the air. What is remarkable is how well machines were maintained on the primitive grass airstrips and canvass hangers that were used on forward airfields. Those ground crews must have worked some very long hours indeed to maintain those very high standards.

Offline xmald

  • Hero Member
  • *****
  • Posts: 1093
Re: Sopwith Type 806 Gunbus
« Reply #22 on: December 05, 2013, 05:40:28 AM »
An ultra interesting build! I even haven`t heard about the plane  :-[
Keep up the good work!
Best regards
Filip

Offline lone modeller

  • Hero Member
  • *****
  • Posts: 5316
Re: Sopwith Type 806 Gunbus
« Reply #23 on: December 07, 2013, 09:19:01 AM »
Evening All,
Many thanks for the compliments Xmaid - this is not one of Sopwith's better known designs, nor was it one of his most successful, but it was the first to gain military orders for his company, and it helped the company to survive until orders for other designs came in. I just happen to like early aircraft that had lots of struts and wires and sometimes even primitive looking shapes, but they do present different challenges to the modeller compared with some of the later more streamlined aircraft. However these early machines do not appeal to enough modellers for them to become subjects for large scale manufacturers, so I am left with little option other than to make them myself.

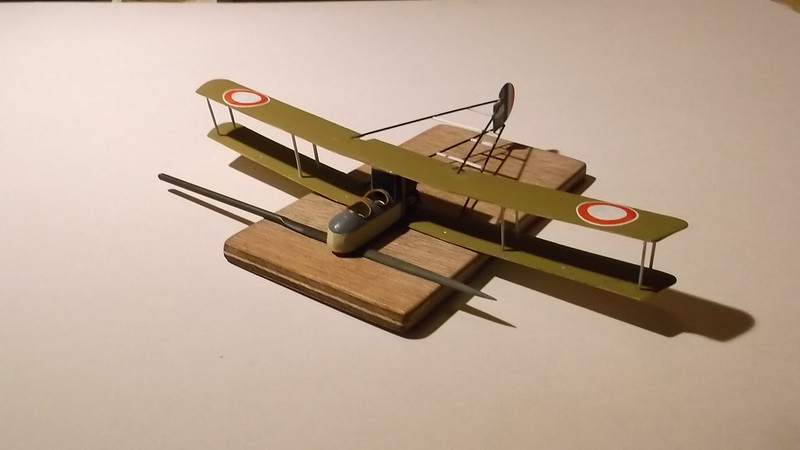
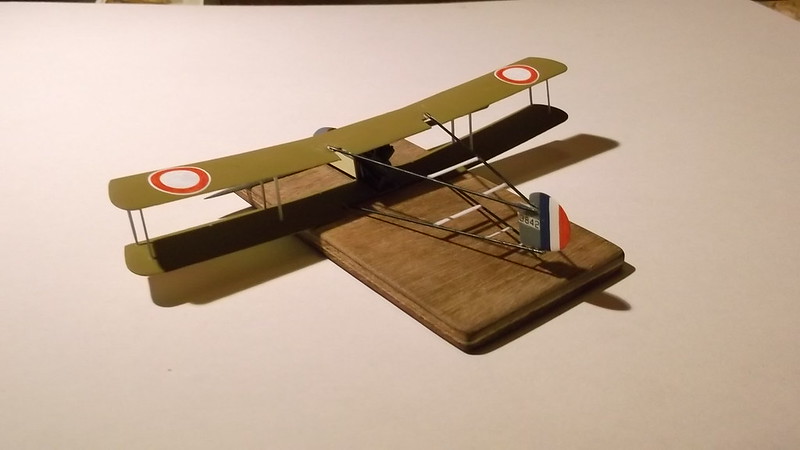
  I finished painting the wing roundels and touched in some of the other paint where necessary. The serial came from an old set of Almarks transfers, the rudder stripes were painted by hand. I cut and shaped some struts from card before tackling the nacelle and wing assembly as there are a lot of struts on a Sopwith Gunbus, so even with two sets from the Avro 504's I still had to make four more for the wings and six for the booms.
 
   Fitting the nacelle to the lower wing, and then the upper wing to the lower was a lot less difficult than I had feared it would be, even with the forward stagger of the struts and the fact that the nacelle was mounted between the wings. I measured the angle of stagger of the struts from the plans and then marked this on a small piece of card. The card was cut to a V-shape: by laying the nacelle on its side and holding one edge of the card so that it was lined with the radiator, I could put a small pencil line on each side of the nacelle, and then cemented the struts along the lines. The top of the radiator acted as a guide as to where the tops of the struts needed to go, but I had to allow for the struts to go into the holes in the wings.


When the fuselage struts were dry they were carefully lowered and glued into the holes in the lower wing and then drops of glue were put on to the tops and a little along the top of the radiator before I gently lowered the top wing so that the leading edge aligned with the edge of the radiator and the nacelle struts entered the holes on the underside of the wing. The fin was inserted between the V of the lower boom where it was glued with superglue to the cross strut, and the top was fixed to the V of the upper booms, also with superglue. This was a bit of a fiddle but not too difficult. Although this structure sounds and looks weak it is stronger than you might think! No jig was necessary because the nacelle struts and radiator were rigid enough to hold things in place while the superglue on the rudder dried. Once the latter was dry (2-3 minutes) there was enough rigidity in the sub-assembly to allow further gentle handling. First the rear nacelle struts were carefully inserted into the lower and upper wings and given a few minutes to dry. I then cemented two struts into the outer holes of both ends of the wings: because these also came from one of the 504's they were the correct length.This sub-assembly was now allowed to dry thoroughly while I went off and for a celebratory drink and relaxed as the most difficult part was over. Although this assembly would not stand rough handling, when dry it could be manipulated sufficiently for the remaining wing and the boom struts to be inserted with few problems. I inserted a second set of wing struts next in order to further strengthen the structure:


The remainder of the struts, including the boom struts, were inserted later, after the above images were taken, but I have not included pictures because my camera is not working properly at the moment, so I will post more when I have that problem solved.

 I have used this construction method for all of the pushers that I have made until now (this is number five), and it works really well. The secret is accurate measurement of the strut holes and getting the strut lengths right - if you are cutting them from card make them slightly over-long so that they can be trimmed to the exact size. In this case because they were kit parts, length was not a problem. The other part of the procedure is to attach the booms to the wings and horizontal tail units first as this makes assembly and alignment much more straightforward, and avoids the problem of trying to make pre-assembled boom structures align with and fit the wing assembly. Attaching the outer wing struts and the rudder gives a triangular structure which is much stronger and more stable than it might appear, and is actually relatively easy to assemble and align. The remaining wing and boom struts can then be added at will and everything should line up and fit properly, provided of course that you have drilled the holes in the correct locations! Even with the stagger on this model this system worked well - pushers are actually not so much more difficult to build than any other biplane, even in Braille Scale, (God's Own Scale).

Next step is to make and add the undercarriage.

Thanks for looking.
« Last Edit: July 04, 2017, 06:49:57 PM by lone modeller »

Offline Whiteknuckles

  • Hero Member
  • *****
  • Posts: 1334
Re: Sopwith Type 806 Gunbus
« Reply #24 on: December 07, 2013, 09:58:07 AM »
Looking good LM, the engine has a 'hot rod' feel to it.


Andrew
Eternal Apprentice

Offline Ernie

  • Hero Member
  • *****
  • Posts: 3961
  • "Once more into the breach"
Re: Sopwith Type 806 Gunbus
« Reply #25 on: December 07, 2013, 01:02:18 PM »
Great progress, LM.  Really interesting how you handled the strut
installation.  Well done, my friend!  I look forward to the next installment.

Cheers,
Ernie :)
The new old guy, take two...

Offline Nigel Jackson

  • Hero Member
  • *****
  • Posts: 2608
Re: Sopwith Type 806 Gunbus
« Reply #26 on: December 07, 2013, 06:53:49 PM »
It's a surprisingly big beast isn't it? The explanation as to how you approached things is both interesting and helpful. Thanks, LM.

Best wishes
Nigel

Offline Des

  • Administrator
  • Hero Member
  • ******
  • Posts: 9325
    • ww1aircraftmodels.com
Re: Sopwith Type 806 Gunbus
« Reply #27 on: December 07, 2013, 07:42:22 PM »
Looking really good with the wings and tail booms on, also the fin/rudder, looking forward to seeing the undercarriage fitted.

Des.
Late Founder of ww1aircraftmodels.com and forum.ww1aircraftmodels.com

Offline IanB

  • Hero Member
  • *****
  • Posts: 2439
Re: Sopwith Type 806 Gunbus
« Reply #28 on: December 08, 2013, 02:55:45 AM »
I'm looking forward to the next set of pics, she's coming along nicely! Thanks for the explainations too.

Ian

Offline Zabu

  • Hero Member
  • *****
  • Posts: 681
Re: Sopwith Type 806 Gunbus
« Reply #29 on: December 08, 2013, 04:28:51 AM »
Wow LM, you've come a long (and hard) way. Thank you for the explanations.

The DH9 it's coming along very good and it's looking nice. Great work from you once again.

Cheers