Author Topic: Royal Aircraft Factory FE 2b conversion 1/72 scale  (Read 9169 times)

Offline lone modeller

  • Hero Member
  • *****
  • Posts: 5317
Re: Royal Aircraft Factory FE 2b conversion 1/72 scale
« Reply #15 on: August 23, 2013, 05:58:59 AM »
Thank you all for the interest and encouraging remarks: I hope that I will not disappoint with the completed model. I will post more when I have completed something worth showing.

Offline PrzemoL

  • Hero Member
  • *****
  • Posts: 4882
  • There was Eru... and he made first the Ainur...
    • Przemysław Litewka
Re: Royal Aircraft Factory FE 2b conversion 1/72 scale
« Reply #16 on: August 23, 2013, 06:37:03 AM »
Well, well, well. It is going to be a modelling feast. Fee in my favourite scale!!!
My first question, maybe I am not clever enough, but how have you moulded these lovely looking nacelle halves?

You do not need to be clever to mould new parts in plastic, and you do not need to go to the expense of a vacuform machine either. The method that I used is variously called push/plunge/crash moulding and there is a good description of the method here:

http://airfixtributeforum.myfastforum.org/Making_push_or_plunge_moulds_about37829.html

All of the nacelles on my pushers were made in this way because of the curvature of the parts. This method can also be used to make other parts with curved shapes. Be prepared for some wastage as the method sometimes yields pieces which are not quite what you want: I had to mould two port sides for this FE before I could get what I wanted.

Many thanks, lone modeller, for the explanation. I know the method, theoretically. But I just could not believe, one might get such fantastic elements this way.  :o  Your Fee nacelle is a masterpiece!
Ash nazg durbatuluk, ash nazg gimbatul,
Ash nazg thrakatuluk, agh burzum-ishi krimpatul.

Offline Old Man

  • Hero Member
  • *****
  • Posts: 600
Re: Royal Aircraft Factory FE 2b conversion 1/72 scale
« Reply #17 on: August 25, 2013, 02:33:44 AM »
First rate start, Sir!

Looking forward to watching this one come together.

Wonderful project.

Offline ALBATROS1234

  • Hero Member
  • *****
  • Posts: 2657
Re: Royal Aircraft Factory FE 2b conversion 1/72 scale
« Reply #18 on: August 27, 2013, 02:40:17 PM »
nice one , ive seen several builds of this type on britmodeller.com where they take a doner kit in 1/72 and make it into a totally different plane. to me this qualifies as scratch built as ,like you say, there will be no likeness to the original you are basically only using the flying surfaces(heavily modified) and a few other bits. great project, looks like fun stuff.

Offline NinetythirdLiberator

  • Hero Member
  • *****
  • Posts: 1589
Re: Royal Aircraft Factory FE 2b conversion 1/72 scale
« Reply #19 on: August 29, 2013, 03:22:04 PM »
Nice start, LM!  I built one from scratch and it is a great little machine.  I'm so glad others like it too!  Watching with popcorn in hand...Dan

Offline lone modeller

  • Hero Member
  • *****
  • Posts: 5317
Re: Royal Aircraft Factory FE 2b conversion 1/72 scale
« Reply #20 on: September 01, 2013, 04:36:03 AM »
Evening All,

I saw your build thread Dan and was very impressed especially as your model was a complete scratch build, unlike this one where I am going to use some kit parts.
 
I have managed to make some progress with the nacelle but have been having problems with the camera so the interior shots that I took before closing the nacelle halves were out of focus when I wanted to use them. I will not comment further as the editor will not like the language!
I have added interior details to both cockpits including the rudder bar covers/Lewis drum magazine storage in the observer's cockpit, and control column, rudder bar, instrument panel, seat, compass, etc in the pilot's cockpit. I found some really good photos of the interior of WNW models on the Britmodeller site which were most helpful as the Datafile is a bit thin in this area. I used the radiator from an Airfix DH 4 which I sanded and filed to shape so that it fits in the front of the engine compartment. There is a gap at the bottom but this will not show when the engine is installed later. A little judicious use of filler was necessary in one or two places to conceal the joins of the bulkheads and radiator but when it is all cleaned up I am sure it will not show - getting an exact fit of very small parts is one of the problems of working in this scale. I used thin rod and stretched sprue to represent the interior bracing and ribbing of the nacelle and card for the floors. I have drilled a small hole just behind the pilot's cockpit and one on the port side below the engine compartment for the radiator and petrol filler caps which will be made from stretched sprue and glued on later. I will also add four small discs of card to the rear fuselage to represent access ports, and drill two small holes for a step for the pilot on the port side later. I have made two air intakes from 10 thou card bent to a curve, with small triangular pieces for the top and bottom, but these were not quite ready when I took the photographs.


I have also been working on the engine and hope to be able to put up some pictures of this shortly.

Thanks for looking.
« Last Edit: July 12, 2017, 06:59:42 PM by lone modeller »

Offline NinetythirdLiberator

  • Hero Member
  • *****
  • Posts: 1589
Re: Royal Aircraft Factory FE 2b conversion 1/72 scale
« Reply #21 on: September 01, 2013, 06:56:29 AM »
Man...that nacelle shot looks SOOOOO familiar!   ;)

Well done, LM.  Can't wait to see your engine as well...Dan

Offline lone modeller

  • Hero Member
  • *****
  • Posts: 5317
Re: Royal Aircraft Factory FE 2b conversion 1/72 scale
« Reply #22 on: September 07, 2013, 07:33:08 AM »
Evening All,

I have been working on the engine and have now almost finished it except for the final touches which will have to wait until it is installed in the nacelle.


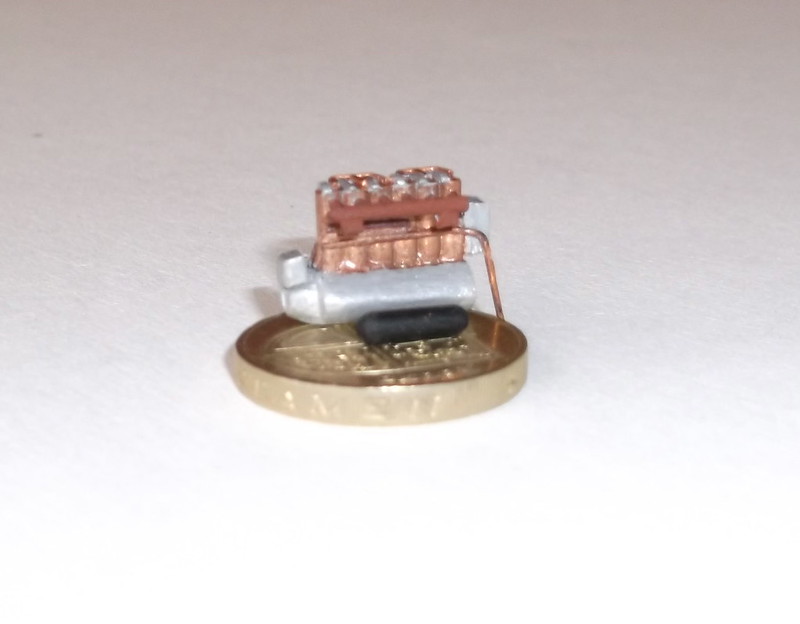
This is a view of the port side of my amateurish effort.

Before starting I looked closely at photos of models of the Beardmore engine from the Wingnut Wings kit which have been posted on other sites which provided lots of good detailed views. I also used photos of a real engine on a replica FE 2b in New Zealand shown in the Windsock DataFile no 147. In this scale it is often only possible to represent the larger details, smaller ones have to be suggested. The cylinders were made from small oblongs of two pieces of 60thou laminated card, which had the corners rounded off. The sump was made from two strips of 60 thou and one of 30 thou card, and was similarly shaped with a file and glass paper. I glued the cylinders to the sump and added the pipes on the sides of the cylinders before painting this sub-assembly. I then put on the push rod covers, vents for the sump and finally the fuel pipes and carburettors, all from rod and card. On the other side is the exhaust pipe which I made from a cocktail stick and small pieces of 10 thou card for the pipe and vents, and thin rod for the entry pipes. The rocker arms on the top were pieces of 15 thou card shaped and glued into place, and the magneto cover at the rear was a piece of shaped laminated card. I drilled a hole at the end of the sump for the propellor and finally make a tank for the port side from sprue: this will not be attached to the engine but sit alongside it on the starboard side of the engine bay. This little assembly was no push-over but I am relieved to know that not too many people will be able to take a close look at it because it will be partly hidden by the wings and nacelle. This was an interesting challenge as I have not attempted a scratch build of an entire engine before.


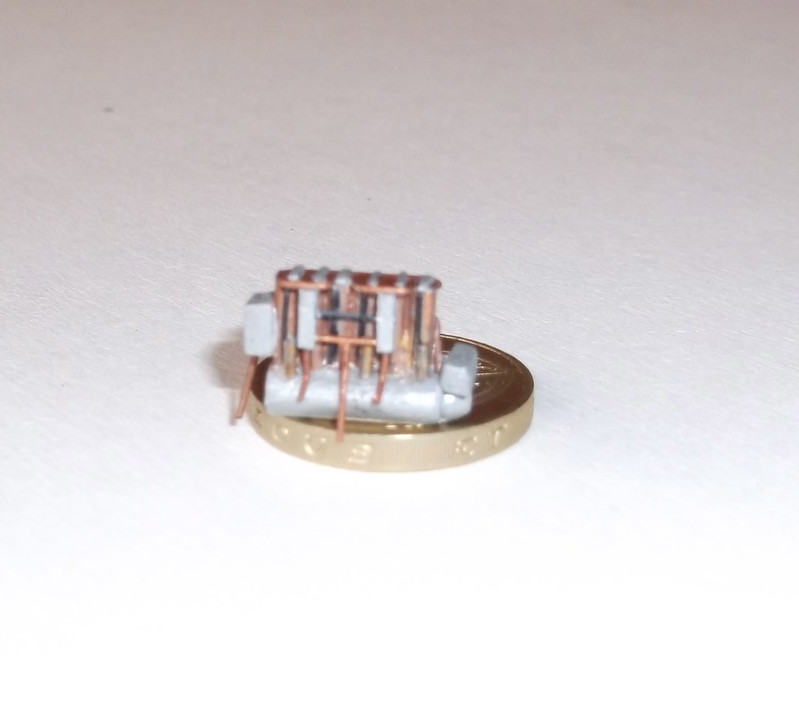
Another view of the port side showing the pipes, carburettors and other details.


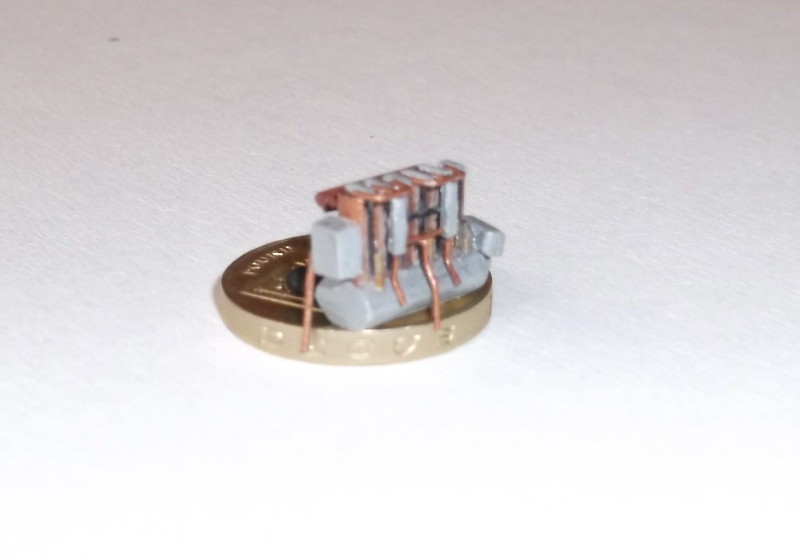
This is the starboard side with the tank in front. On the model the tank will be mounted below the exhaust pipe but above the side of the nacelle and held in place by two straps which will be made from thin rod.

The engine has been trial fitted in the nacelle and fits well but I will not glue it into place until I have fitted the lower wings to the nacelle and painted it all as this will require handling, and I do not want to damage it. When I do fit the engine I will use card pieces to ensure that it sits properly in the correct position - these have been cut and are now ready to fit.

The next stage is to tackle the wings and make the tail surfaces.

Thanks for looking.
« Last Edit: July 12, 2017, 07:10:19 PM by lone modeller »

Offline Zabu

  • Hero Member
  • *****
  • Posts: 681
Re: Royal Aircraft Factory FE 2b conversion 1/72 scale
« Reply #23 on: September 07, 2013, 07:49:29 AM »
Hi LM.

Your engine looks great with all that detail in such a small scale... or maybe my eyes are fooling me and that's giant coin. :P

Cheers

Offline coyotemagic

  • Hero Member
  • *****
  • Posts: 7710
  • "Here's to not buggering it up." -Winston Chuchill
    • My Models
Re: Royal Aircraft Factory FE 2b conversion 1/72 scale
« Reply #24 on: September 07, 2013, 07:52:05 AM »
Incredible engine detailing, LM!  This is a masterpiece in the making.
Cheers,
Bud
"All men dream: but not equally. Those who dream in the dark recesses of the night awake in the day to find all was vanity. But the dreamers of day are dangerous men, for they may act their dreams with open eyes, and make it possible." -T. E. Lawrence

Offline Des

  • Administrator
  • Hero Member
  • ******
  • Posts: 9325
    • ww1aircraftmodels.com
Re: Royal Aircraft Factory FE 2b conversion 1/72 scale
« Reply #25 on: September 07, 2013, 09:29:37 AM »
Awesome work on the engine, your attention to detail in this small scale is amazing, well done.

Des.
Late Founder of ww1aircraftmodels.com and forum.ww1aircraftmodels.com

Offline Nigel Jackson

  • Hero Member
  • *****
  • Posts: 2608
Re: Royal Aircraft Factory FE 2b conversion 1/72 scale
« Reply #26 on: September 07, 2013, 08:23:06 PM »
It's looking really good Lone Modeller. You must have amazing eyes and manual dexterity to be able to embark on this. I can't wait to see the finished thing.

Best wishes
Nigel

Offline lone modeller

  • Hero Member
  • *****
  • Posts: 5317
Re: Royal Aircraft Factory FE 2b conversion 1/72 scale
« Reply #27 on: September 09, 2013, 06:39:51 AM »
Thank you all for your kind comments - however unlike Des's Spinne engine you could not inject fuel and strike a spark and it would start to rev!

Offline lone modeller

  • Hero Member
  • *****
  • Posts: 5317
Re: Royal Aircraft Factory FE 2b conversion 1/72 scale
« Reply #28 on: September 09, 2013, 06:47:55 AM »
You must have amazing eyes and manual dexterity to be able to embark on this.

Thank you for your kind remarks Nigel. I stated in my first post on this topic that I use an eye loupe - a magnifying glass which clips on to the arm of my spectacles. It gives me 5x magnification and makes the fine work possible - I strongly recommend it to anyone who wears spectacles. I bought mine from a DIY shop in Bath but they can easily be found on the internet - two lenses cost around £10. As for the manual dexterity I frequently have to make several attempts to get things right - just like everyone else I suspect.

Offline lone modeller

  • Hero Member
  • *****
  • Posts: 5317
Re: Royal Aircraft Factory FE 2b conversion 1/72 scale
« Reply #29 on: September 15, 2013, 05:49:20 AM »
Evening All,
 I was about to start work on the wings when I came across an odd pair of wings in a spares box. I had known that these were in the box but had not looked at them closely before. When I did I saw that they were from a Veeday BE2c: I had used the fuselage many years ago to convert an RE 8 into a BE 2e and the 2c wings had been left over. The FE 2 outer wing panels were similar to the BE 2c so I was able to use these so I have saved the DH 4 kits for another project.


   I cut new centre section panels from plastic card which I shaped to aerofoil section, after I had thinned the Veeday parts which are seriously over-thick. In order to strengthen the wing joints I used small pieces of fuse wire which I glued into holes that I had drilled into the ends of the wing panels with superglue. When the joints were dry I used filler to clean up the joints. I also had to use card fillets to fill the small recesses on the lower wings and these too were cleaned up with filler.


    I placed the nacelle on a plan of the FE and took one of the bottom wings to test how it fitted to the nacelle. I then laid the nacelle on the wing and marked where the wing needed to be cut and shaped the joint so that the wing fitted well against the nacelle side. This operation was repeated with the other wing.  I made sure that the leading edges of the wings were at 90 degrees to the centre line of the nacelle and that when both wings were in place they sat properly over the plan. One wing was glued to the nacelle and supported while it dried so that the correct anhedral was achieved. The process was repeated for the other wing, and both were filled and rubbed down.
   
   I marked on the top of the lower wings and nacelle the location holes for the struts and drilled small holes. I also drilled holes on the underside of the wings for the wing skids at the same time. On the nacelle I cut two small recesses for the struts behind the pilot's cockpit. I used the lower wing and nacelle holes as a guide mark on the strut location holes on the underside of the upper wing and drilled those next. A new gravity tank was made from two pieces of 60 thou card glued together and shaped and glued to the lower side of the upper wing. All gaps were filled and rubbed down.

   Next time I will describe how I fit the booms to the wings.

Thanks for looking.
« Last Edit: July 12, 2017, 07:17:00 PM by lone modeller »