Author Topic: Royal Aircraft Factory FE 2b conversion 1/72 scale  (Read 9171 times)

Offline LindsayT

  • Hero Member
  • *****
  • Posts: 844
  • "Somehow it didn't seem like war at all..."
Re: Royal Aircraft Factory FE 2b conversion 1/72 scale
« Reply #30 on: September 15, 2013, 06:13:00 AM »
That's interesting, thanks for sharing the process.

LT

Offline Des

  • Administrator
  • Hero Member
  • ******
  • Posts: 9325
    • ww1aircraftmodels.com
Re: Royal Aircraft Factory FE 2b conversion 1/72 scale
« Reply #31 on: September 15, 2013, 09:03:23 AM »
Nice work with the wings, isn't it great to have a spares box, it's amazing what we can find especially for scratch builders  :)

Des.
Late Founder of ww1aircraftmodels.com and forum.ww1aircraftmodels.com

Offline lone modeller

  • Hero Member
  • *****
  • Posts: 5317
Re: Royal Aircraft Factory FE 2b conversion 1/72 scale
« Reply #32 on: September 19, 2013, 07:39:52 AM »
Evening All,

Fitting the booms on a pusher can cause headaches, and as no two designs seem to have been similar and I have a penchant for pushers, I have had to devise a method which will work on all of them. I know that there are arguments in favour making the booms as units which are then fixed to the wings after the latter have been put into place but I prefer to put them on directly to the wings before I paint the model and then complete the assembly afterwards. I have made three other pushers and found that the method I describe here gives an accurate angle in both plan and profile. It is not difficult and does not require expensive or complicated jigs: it may look crude but it is simple and it works well for me at least.

I started by marking carefully the points where the booms will be attached to the wing. In the case of the FE 2b the booms were attached to the top surfaces of both wings and both of the booms form a V so they are easier to fix than on the Vickers Gunbuses for example. The booms also had a small horizontal strut near the rear which helps to strengthen this assembly. I used the DF plan to mark the location and angle of the boom: I laid the wires which form the booms on the plan and the top of the trailing edge of the wing. I measured the length of the wire that had to extend on to the wing: this determined the length of the groove that needed to be cut. I made the groove by rotating a round file on the edge of the wing - I did this slowly and used pressure at the pointed end of the file to dig slightly more deeply so that the groove is deepest at its forward edge and very shallow at the trailing edge. I filed the leading edges of the booms so that the ends of the wires had a flatter surface which would fit into the grooves in the wings, and then filed the rear ends so that they form a pair of flat surfaces which give a sharp point at the end and a surface to bond. Getting the angles of the booms correct in profile is the most difficult part but I did this as this diagram and text describe.


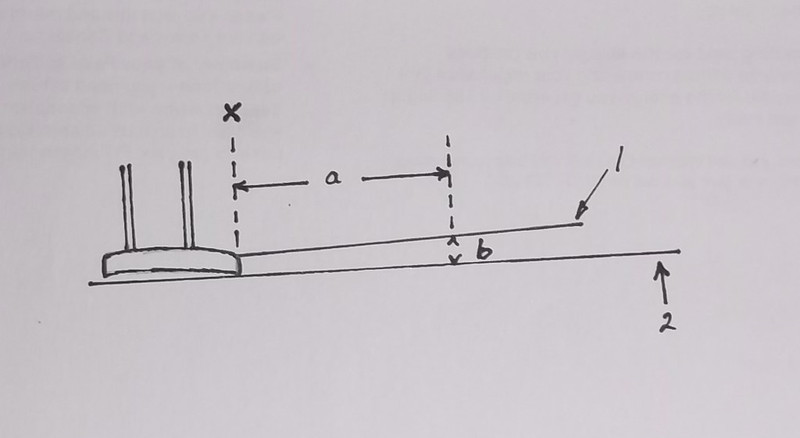
Measure the horizontal distance (a) between the trailing edge of the wing and the leading edge of the horizontal tail unit from the plan. Measure the vertical distance between a line drawn horizontally from the bottom surface of the trailing edge of the lower wing to where the boom crosses the leading edge of the horizontal tail surface (b), also from the plan. I placed the lower wings and nacelle on the plan so that the angle of the booms would be correct in plan, and the booms were glued to the wing. While the booms were setting I place a support made from plastic card exactly height (b) at the distance (a) from the tailing edge of the wing and let the booms rest on this while they dried out. I repeated this operation for the upper wing and booms, but had to be careful because the height (b) was slightly different. This sounds more complicated than it is in practice but when the wings are finally assembled the booms will be in their correct positions. (Well they were on the other pushers that I have made!)


This image shows the lower wing and booms on the DF plan which was used to get the correct alignment for the booms and location for the struts. It also shows the modified BE 2c wings and the plastic card inner panels attached to the nacelle. The lucky find of the BE 2c wings did not save a great deal of time as they had to be thinned, but it does mean that I have an intact DH 4 for another conversion. Thank goodness for spares boxes!

The next stage will be to paint the wings, nacelle, tail unit and add the markings before any further assembly, as the parts are easily accessible in this state.

Thanks for looking.
« Last Edit: July 12, 2017, 07:34:19 PM by lone modeller »

Offline coyotemagic

  • Hero Member
  • *****
  • Posts: 7710
  • "Here's to not buggering it up." -Winston Chuchill
    • My Models
Re: Royal Aircraft Factory FE 2b conversion 1/72 scale
« Reply #33 on: September 19, 2013, 08:36:12 AM »
Outstanding craftsmanship, LM.  Your technique for the booms looks effective.
Cheers,
Bud
"All men dream: but not equally. Those who dream in the dark recesses of the night awake in the day to find all was vanity. But the dreamers of day are dangerous men, for they may act their dreams with open eyes, and make it possible." -T. E. Lawrence

Offline Zabu

  • Hero Member
  • *****
  • Posts: 681
Re: Royal Aircraft Factory FE 2b conversion 1/72 scale
« Reply #34 on: September 19, 2013, 09:20:33 AM »
Hi lonemodeller.

Great explantion there. Not rude at all, sometimes you must go the simpler way to achieve the most difficult ones.

Thank you for sharing your technique with us. It will be quite handy for sure.

Cheers

Offline IanB

  • Hero Member
  • *****
  • Posts: 2439
Re: Royal Aircraft Factory FE 2b conversion 1/72 scale
« Reply #35 on: September 19, 2013, 12:48:16 PM »
Thanks for the tip! I have a few pushers awaiting attention and this will be very useful.

Ian

Offline Des

  • Administrator
  • Hero Member
  • ******
  • Posts: 9325
    • ww1aircraftmodels.com
Re: Royal Aircraft Factory FE 2b conversion 1/72 scale
« Reply #36 on: September 19, 2013, 01:40:18 PM »
Very nicely done LM, your description for the fitment of the booms will come in very handy for a lot of modelers.

Des.
Late Founder of ww1aircraftmodels.com and forum.ww1aircraftmodels.com

Offline Nigel Jackson

  • Hero Member
  • *****
  • Posts: 2608
Re: Royal Aircraft Factory FE 2b conversion 1/72 scale
« Reply #37 on: September 20, 2013, 12:08:28 AM »
Thanks for sharing this with us lone modeller. It's very helpful and helps to break down the barriers to building pushers.

Best wishes
Nigel

Offline Ernie

  • Hero Member
  • *****
  • Posts: 3961
  • "Once more into the breach"
Re: Royal Aircraft Factory FE 2b conversion 1/72 scale
« Reply #38 on: September 20, 2013, 12:22:05 AM »
Thanks a lot for the detailed explanation, LM.  Although I would love to
build one of the pushers, I am intimidated by the boom setup.  Your
instruction has done much to allay my fears.  I appreciate that and have
to say I'm enjoying your build.  I look forward to more updates of your fine work.

Cheers,
Ernie :)
The new old guy, take two...

Offline lone modeller

  • Hero Member
  • *****
  • Posts: 5317
Re: Royal Aircraft Factory FE 2b conversion 1/72 scale
« Reply #39 on: September 30, 2013, 07:27:05 AM »
Evening All,
Many thanks indeed for the complimentary remarks - they are really appreciated. When I started on my first pusher conversions, (the FB 5 and FB 9 which have appeared in completed models), I really did not think that they would be very difficult after I had converted a DH 4 to a BE 2a. It was the booms that caused me headaches at the time but I thought of the method I have described simply because it allows more leeway for the small errors that inevitably creep in to any project like a pusher. The method allows the modeller to "adjust" the wings and tail a little without it showing (unless you take accurate and careful measurements). As I build models to "look right" rather than 100% accuracy (which I do not have the skill to achieve and which is very difficult in God's Own Scale anyway), my method yields results that I can live with (just). I really hope that these notes will encourage others to give a pusher a go if only because they are so different from the more commonly presented later WW1 aircraft. They are actually not as difficult as they look - it seems that overcoming fear of them is the key - at least it was in my case. It is my intention to build a representative model of all of the British designed pusher types that saw active service with the RFC/RNAS so I will post some more articles when I get to make the other two types which I have still to tackle. But for now progress on the FE 2b.

I have completed the painting of the wings, tail surfaces and nacelle and put on the markings as this will not be easy later. I have gone for the greener end of the PC 10 spectrum and used a mixture of Humbrol white and clear doped linen for the undersurfaces. The cockades and rudder stripes were hand-painted: the roundels on the wings could have been taken from the DH 4 but those on the nacelle would be a problem and would have to come from another source - as it was the circles were not easy to scribe. The letter and number on the top wing were also hand painted as I could not find a suitable source, but the serial was from Letraset dry rub-down transfers. The nose markings were also dry rub-down touched in with white paint where the curvature caused small gaps. The tail surfaces are not fixed to the boom yet, they were placed there for the photograph: they will be permanently fitted later.


The next step will be to fix the top wing and rudder into place, so struts will now have to be cut and shaped from card as I will not be able to use those from the DH 4 as originally planned. If anyone is following this thread but using a pair of DH 4's you can use the wing struts by just removing the joining bar on the top. You will have to cut boom struts from card, Evergreen or other source however.

Thanks for looking.
« Last Edit: July 12, 2017, 07:30:58 PM by lone modeller »

Offline Des

  • Administrator
  • Hero Member
  • ******
  • Posts: 9325
    • ww1aircraftmodels.com
Re: Royal Aircraft Factory FE 2b conversion 1/72 scale
« Reply #40 on: September 30, 2013, 08:16:47 AM »
Very nicely painted, the green looks really good and your CDL is good also. The decals have been applied well and the hand painted markings are really well done, she is looking very smart and will be a very impressive model when completed.

Des.
Late Founder of ww1aircraftmodels.com and forum.ww1aircraftmodels.com

Offline GAJouette

  • Hero Member
  • *****
  • Posts: 3579
  • " Beware of the Spanish Inquisition"
Re: Royal Aircraft Factory FE 2b conversion 1/72 scale
« Reply #41 on: September 30, 2013, 11:04:54 AM »
  Lone Modeler,
Very Impressive works my friend. I'm in absolute awe of you guys who work such magic in so tiny a scale.
Highest Regards,
Gregory Jouette
" What Me Worry"

Offline Zabu

  • Hero Member
  • *****
  • Posts: 681
Re: Royal Aircraft Factory FE 2b conversion 1/72 scale
« Reply #42 on: October 01, 2013, 01:19:54 AM »
Hi LM.

It's looking good and to hand paint those cocardes isn't easy at all. Awosome paint job especially that B and 1 hand painting, those colors look quite on the spot to me.

Cheers

Offline PrzemoL

  • Hero Member
  • *****
  • Posts: 4882
  • There was Eru... and he made first the Ainur...
    • Przemysław Litewka
Re: Royal Aircraft Factory FE 2b conversion 1/72 scale
« Reply #43 on: October 01, 2013, 03:34:55 AM »
Great modelling! It is a build log which may finally tempt me to try my hand in scratch-building a 72nd scale Fee.
Ash nazg durbatuluk, ash nazg gimbatul,
Ash nazg thrakatuluk, agh burzum-ishi krimpatul.

Offline Ernie

  • Hero Member
  • *****
  • Posts: 3961
  • "Once more into the breach"
Re: Royal Aircraft Factory FE 2b conversion 1/72 scale
« Reply #44 on: October 01, 2013, 10:10:52 AM »
Your paint work is great, LM.  I am absolutely stunned by the roundels...
I could have sworn they were decals! I can't get over what you are doing
in the teeny scale.  Super work!

Cheers,
Ernie :)
The new old guy, take two...