Author Topic: LVA Fokker D.VII from Wingnut Wings  (Read 35657 times)

Offline IvotB

  • Sr. Member
  • ****
  • Posts: 426
Re: LVA Fokker D.VII from Wingnut Wings
« Reply #90 on: February 04, 2013, 07:43:56 PM »
Thanks for the compliments,

After spending hours (  8) ) on the floor to beat the carpet monster I now see in my 4th and 5th picture that I should have beaten the frame monster in stead.

As these pictures are bigger than life, I wondered what I did and I now see that I have falsely accused the carpet monster  ;D

I wonder if you see it too...

regards,
Ivo

Offline IvotB

  • Sr. Member
  • ****
  • Posts: 426
Re: LVA Fokker D.VII from Wingnut Wings
« Reply #91 on: February 05, 2013, 09:28:00 AM »
Some progress: added pipes from the airpump, line from the intake manifold down to the waterpump, fuel line, lever for the carburator control.


Got to do something with the light in these pictures and/or make the aluminium parts dirtier.


Top view


Exhaust looks a lot better. Highlighted the nuts on the rocker arms a little bit.


It's almost ready to put everything together, just some weathering of the wings.


regards,
Ivo

Offline coyotemagic

  • Hero Member
  • *****
  • Posts: 7710
  • "Here's to not buggering it up." -Winston Chuchill
    • My Models
Re: LVA Fokker D.VII from Wingnut Wings
« Reply #92 on: February 05, 2013, 02:36:10 PM »
Just keeps getting better and better, Ivo!
Cheers,
Bud
"All men dream: but not equally. Those who dream in the dark recesses of the night awake in the day to find all was vanity. But the dreamers of day are dangerous men, for they may act their dreams with open eyes, and make it possible." -T. E. Lawrence

Offline IvotB

  • Sr. Member
  • ****
  • Posts: 426
Re: LVA Fokker D.VII from Wingnut Wings
« Reply #93 on: February 06, 2013, 08:36:25 PM »
Tried some weathering on the bottom of the engine with weathering powders, but it wasn't a success. Brushed off easily so there is no harm done.

I also ran into a fit problem with the fin. First I have installed the horizontal stabiliser and the the elevator. Then you can place the fin over it as the bottom hinge on the fin falls over the connection rod between the left and right elevator. It fits ok, but it is just a little bit too far aft and then the rudder won't fit correctly to the bottom hinge at the bottom of the fuselage as the back of the fin and the back of the fuselage are not perfectly in line.
Perhaps this problem is a result from the fact that I have painted everything already, although I can't see where this problem would surface. I'll let you know the outcome.

Nice about the kit is that the fin is not in line with the fuselage but slightly located to the left in the front to compensate for motor torque. I even have the impression that in the real thing you could even adjust this point as a kind of fixed trim.

regards,
Ivo

Offline IvotB

  • Sr. Member
  • ****
  • Posts: 426
Re: LVA Fokker D.VII from Wingnut Wings
« Reply #94 on: February 07, 2013, 08:18:09 AM »
Pictures are better than words:


Here you see the bottom of the rudder missing the hinge and the gap between rudder and fuselage is larger than the gap between the rudder and the fin.

A little pushing makes it better:


Now I wonder whether there should be a gap under the fin. I wasn't expecting that, but for trimming purposes perhaps it is correct.


Torque compensation. Very nice detail.


regards,
Ivo

Offline mgunns

  • Hero Member
  • *****
  • Posts: 2255
Re: LVA Fokker D.VII from Wingnut Wings
« Reply #95 on: February 07, 2013, 09:29:02 AM »
Hello Ivo:

Not to rain on your parade, but it appears as if you but the tail section on upside down which may account for some of your fit problems.  :(

Cheers

Mark
Mark

We few, we happy few.....

Offline IvotB

  • Sr. Member
  • ****
  • Posts: 426
Re: LVA Fokker D.VII from Wingnut Wings
« Reply #96 on: February 07, 2013, 10:03:12 AM »
I don't think so. You may get the impression because you see from the last picture at the top that the horizontal stabiliser seems hollow. It is by the way, but it is impossible to put it on wrong, because on the bottom side it has rims with which it fits into the fuselage, the torque compensation would be wrong too and the openings for the upper control of the elevator would be awkward.

So unless you mean something else, I don't see what is upside down.

regards,
Ivo

Offline mgunns

  • Hero Member
  • *****
  • Posts: 2255
Re: LVA Fokker D.VII from Wingnut Wings
« Reply #97 on: February 07, 2013, 12:22:59 PM »
Hello Ivo:  No, that is what I meant.  It has what appears to be a recess, but you are right, WNW has the tab to locate into the fuselage.

Best

Mark
Mark

We few, we happy few.....

Offline Dal Gavan

  • Sr. Member
  • ****
  • Posts: 469
Re: LVA Fokker D.VII from Wingnut Wings
« Reply #98 on: February 07, 2013, 02:44:31 PM »
She's looking good, Ivo.  I have no idea about the tail (I'm still learning about these canvas aeroplanes  ;D ), but a gap between the fin and fuselage seems to be fairly common for a number of types of aircraft.

I like the finish, too, it's nice to see a Netherlands finish for a change.

Cheers.

Dal.

Offline IvotB

  • Sr. Member
  • ****
  • Posts: 426
Re: LVA Fokker D.VII from Wingnut Wings
« Reply #99 on: February 08, 2013, 10:26:58 AM »
I put the fin on today and there is just a small gap left. The rudder fits fine and sits nicely in the bottom hinge. The control lines are attached too, so apart from the rigging of the stabilisor and the tail skid the tail is ready.

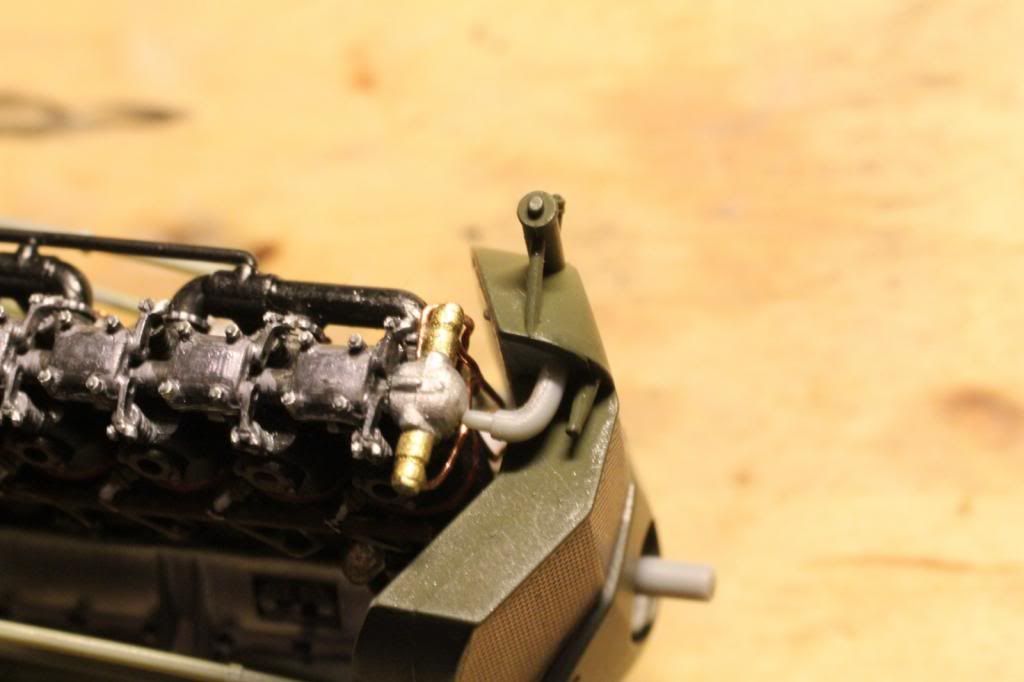
Now after seeing good progress from Willi I added almost the last detail on the engine:


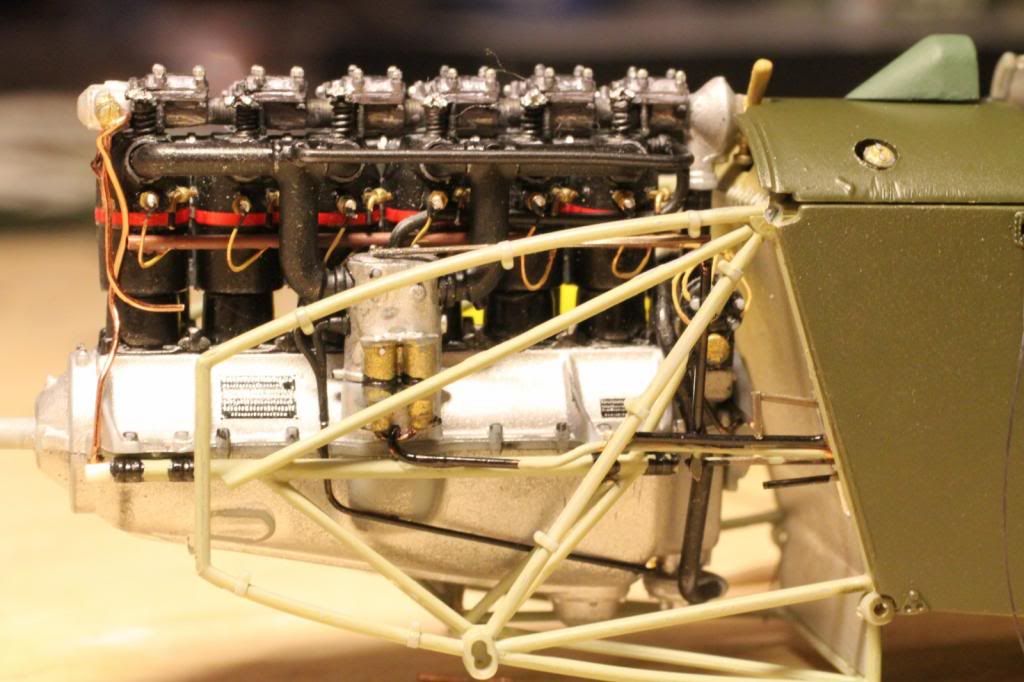
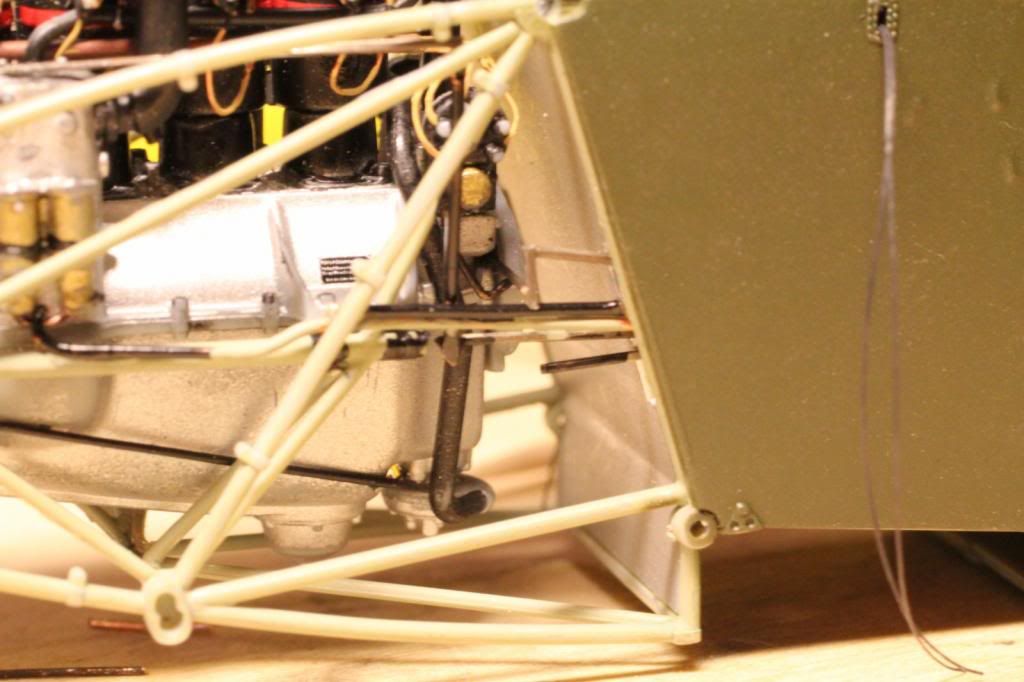
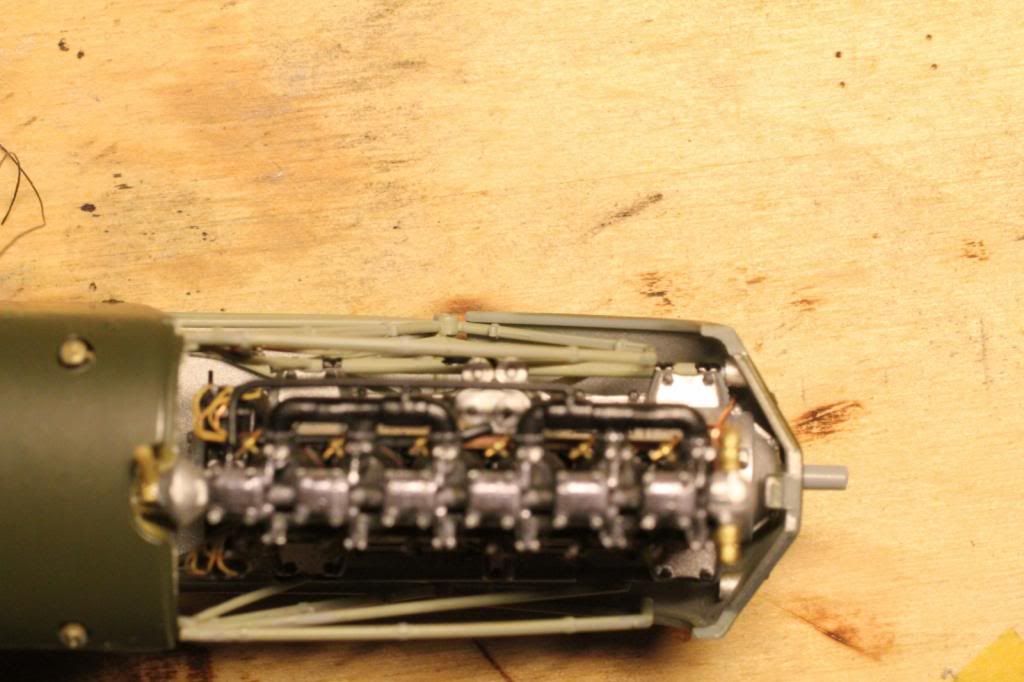
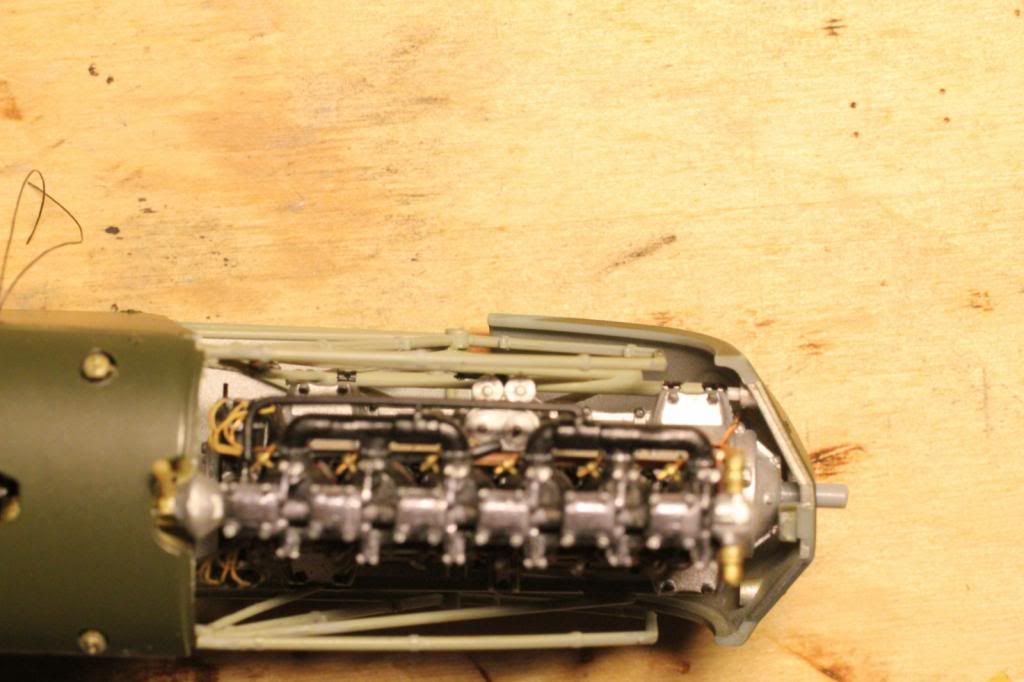
The throttle is now completely attached although no further details are installed on top of the carburator. Also the spark advance lever is attached to the left magneto. The right magneto is attached in the same fashion as the rod that moves the lever to the magneto runs behind the engine to the other side thus shifitng the magnetos equally. You don't see much of it, but I know it's there. Perhaps more can be seen on this photo:


I think I am going to leave the mixture control unattached. I didn't find any information on this.

Then I tried the front covers looking for the fit problems that some have encounterd in this part of the model. It may not be thesame for everyone as WNW supplies several possibilities in covering up the front with different top covers (I used the ones that are marked in the manual not te be used for the versions in the kit, but those are correct for the LVA version). I also used the radiator for version D, which is thicker and had in the middle a wider flat area in front than the other.

First I tried the chin cowling, the radiator, the bottom with the hatch for oil replacement and the top covers. This went on without any fit problems:


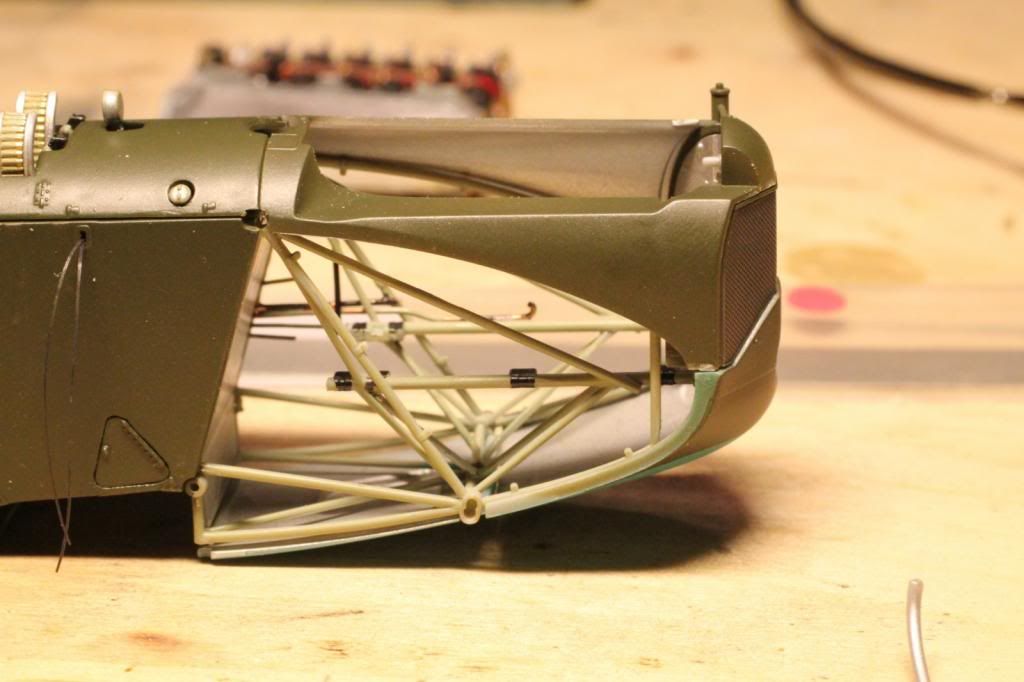
Moreover I found especially that the radiator and the top covers fitted perfectly (of course without the engine, which is going to cause problems in front)

Then a picture of the fit between the chin cowl and the cover with hatch:


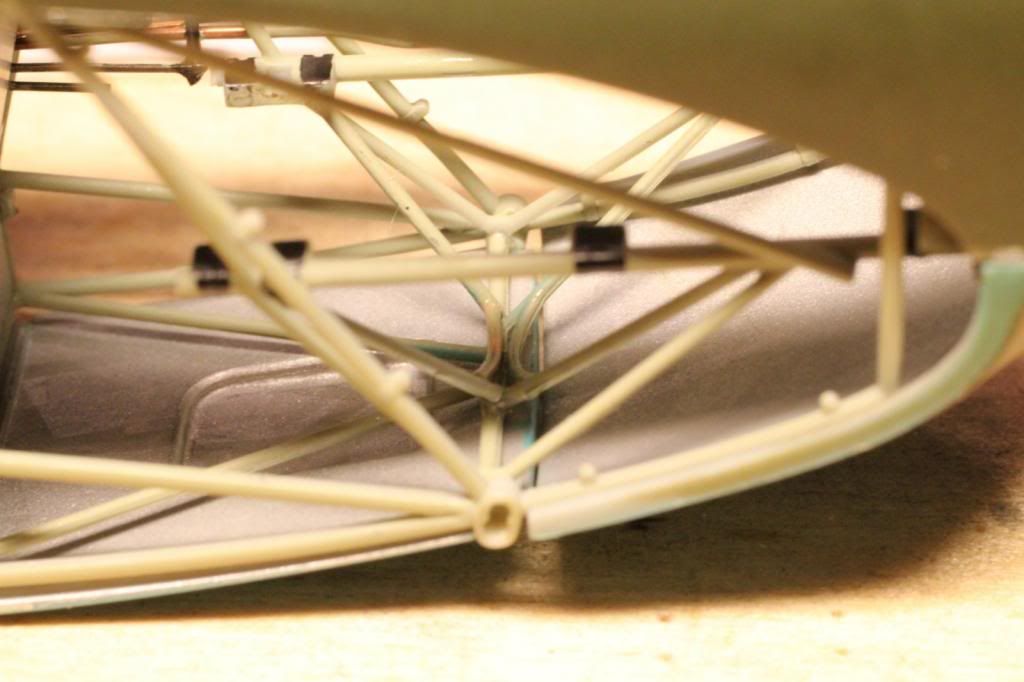
This shows a small gap and the panels are not in line (the chin cowl is lower than the other at the joint), but you can push the chin cowl a little further on the front frames and then the fit is good.

Next step is to fit the triangular panel:


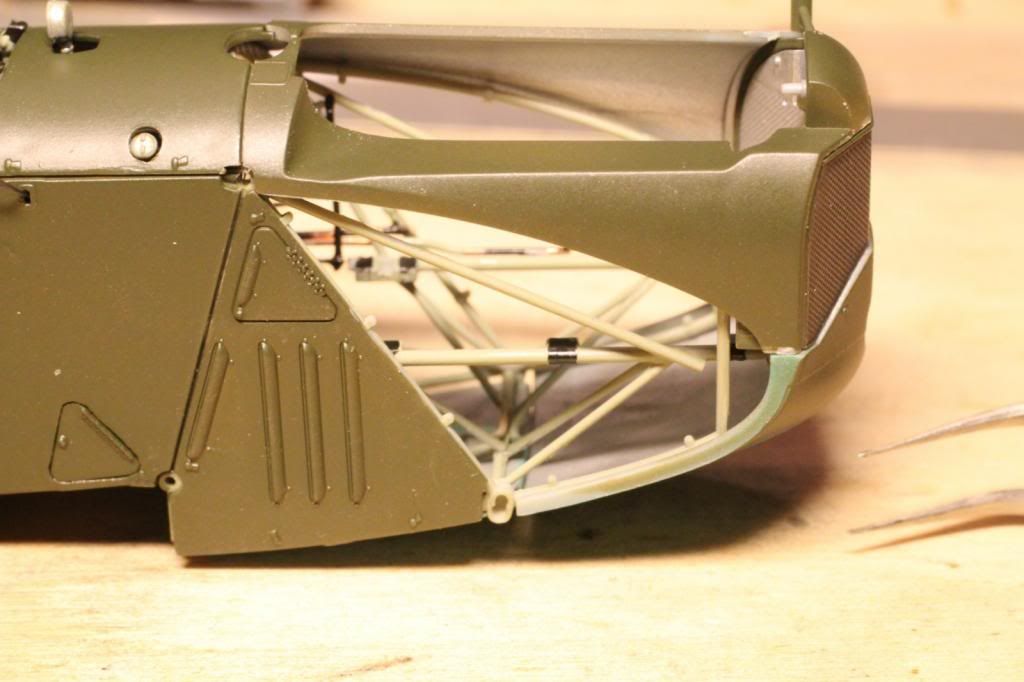
This panel absolutely seems to belong here, because it fits perfectly in the frame.

Last panel is the forward panel with the curved front which falls over the top cover and over the sides of the chin cowl. Because it is all dry fitting I couldn't make a picture as I needed an extra pair of hands and my wife was out, but it fitted ok.

Then I did discover 2 problems. If you look from the top down to the chin cowl with the bottom frame tubes in between I noticed that the chin cowl is pushing the frame inward because of the imitation connections for the screws to fit the covers:


Here you can see the frame pushed inward


This is how the frames should look like.

A little bit of filing of the inside edge of the chin cowl will solve this problem.


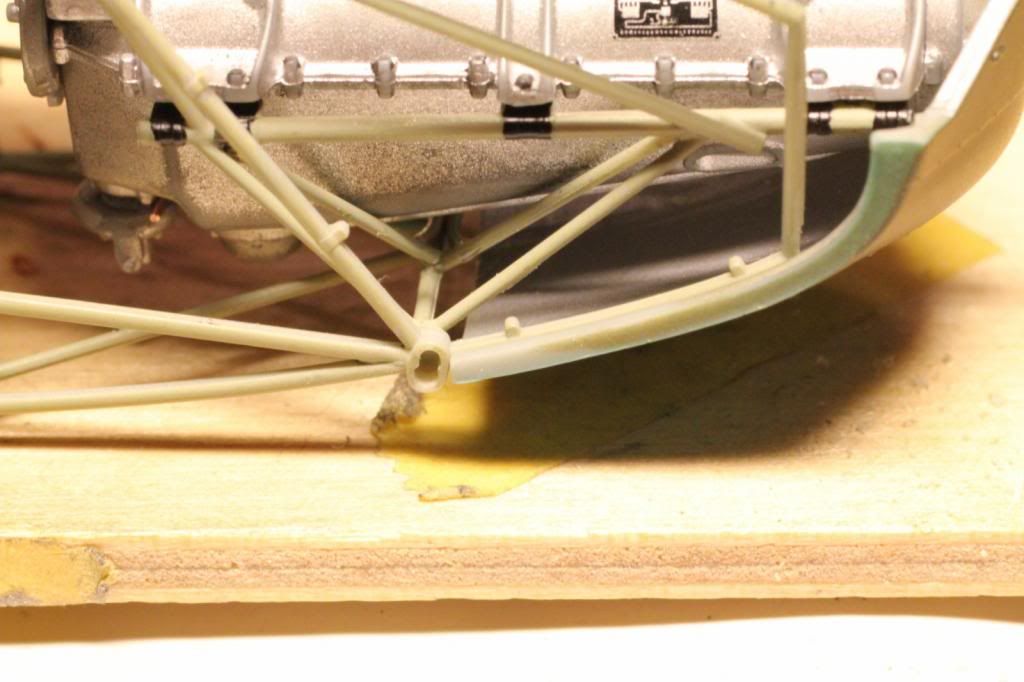
Here you can see that the chin cowl follows the curve of the bottom frame tube perfectly.


Here I do find a problem: the radiator that I am going to use doesn't have enough room for the airpump. You can that the unpainted water hose connected to the radiator that should fit into the housing of the front of the engine isn't going to get there.  I will have to remove some plastic at the top left inside of the radiator to make this airpump fit. Perhaps I have used the wrong part for the inside of the radiator, I am going to check that first, but I remembered that only one part will fit in this radiator.

regards,
Ivo

Offline miamiangler

  • Full Member
  • ***
  • Posts: 194
Re: LVA Fokker D.VII from Wingnut Wings
« Reply #100 on: February 08, 2013, 12:27:37 PM »
You did lots of progress, Lots of good info . looks like the radiator is much thicker then the one I`m using .

Offline GAJouette

  • Hero Member
  • *****
  • Posts: 3579
  • " Beware of the Spanish Inquisition"
Re: LVA Fokker D.VII from Wingnut Wings
« Reply #101 on: February 08, 2013, 12:47:11 PM »
  Ivo,
Each time I look at that Mercedes the more impressed I am with your detailing my friend. Truly awesome works!
Highest Regards,
Gregory Jouette
" What Me Worry"

Offline coyotemagic

  • Hero Member
  • *****
  • Posts: 7710
  • "Here's to not buggering it up." -Winston Chuchill
    • My Models
Re: LVA Fokker D.VII from Wingnut Wings
« Reply #102 on: February 08, 2013, 12:56:54 PM »
  Ivo,
Each time I look at that Mercedes the more impressed I am with your detailing my friend. Truly awesome works!
Highest Regards,
Gregory Jouette
My thoughts, exactly!
Cheers,
Bud
"All men dream: but not equally. Those who dream in the dark recesses of the night awake in the day to find all was vanity. But the dreamers of day are dangerous men, for they may act their dreams with open eyes, and make it possible." -T. E. Lawrence

Offline Epeeman

  • Hero Member
  • *****
  • Posts: 1419
Re: LVA Fokker D.VII from Wingnut Wings
« Reply #103 on: February 09, 2013, 01:45:25 AM »
Hello, Ivo -

Glad to see you are making great progress and that, generally, your cowling panels fit well.   For note, I also had the same problem with the radiator too close to the air pump.   Air pump is now slightly pushed off to one side but you would have to look very closely to really notice.

Regards

Dave
As we say in fencing, what's the point?

Offline kornbeef

  • Hero Member
  • *****
  • Posts: 961
  • U.K. Carpet monster genocide squad leader.
Re: LVA Fokker D.VII from Wingnut Wings
« Reply #104 on: February 09, 2013, 07:01:14 PM »
Ivo. your airpump/rad issue. I think the rad has a recess in it. Its skinned over the top but if you have the Windsock D.VII Anthology 1 take a look on page 13 pic 4 & 5. Not the clearest shots I warrant but show enough to make you work out the setup?
Added page 14 theres a sketch shows how its recessed Likely this refers to all rads to some extent

simply cut grind a section out the uper rad, move the cooling hose connection forwards, it looks like the other stub (for preheating or testing maybe) now comes off the cooling pipe that connects to the cylinders

Hope this helps your inpiring build

Keith
« Last Edit: February 09, 2013, 07:03:34 PM by kornbeef »
Never too old to learn sumfink noo