Author Topic: Eduard Weekend Edition 1/48 SE5a - Hispano Suiza. Eduard Weekend Edition 1/48  (Read 10862 times)

Offline Gisbod

  • Hero Member
  • *****
  • Posts: 2438
Yep, I’d agree with everything Frank says there,

I found it to be like making a Wingnut’s kit in miniature. It is a lovely kit, but care is certainly required. Looking at your other thread, I certainly wouldn’t be put off, if you’re not enjoying it, put it to one side and make something simpler and just enjoy the process!

I’ve had my ups and downs in life and I’ve found modelling to be a real sanctuary at times.

Best wishes,

Guy
“Oh! I have slipped the surly bonds of Earth -
Put out my hand, and touched the face of God.”

P.O. John Gillespie Magee 1941

Offline hrcoleman66

  • Sr. Member
  • ****
  • Posts: 275
I think your interior painting and detailing looks Fantastic! I am sort of shocked at the fit as this isn't an Old Mold and one would expect better! I also notice some really nice molded detail and some like the access hatch on the right fuselage that look sort of iffy  ::) JMHO,
RAGIII

I think the fault was mine.  The fine copper wire I used for the rigging was c/a’d to the outer sides of the framing...  I suspect, that this was enough to cause some interference with the fuse sides.  There are tiny grooves moulded into the outer sides of the framing to take whatever rigging you choose to use, but after o had sanded the sides, these were obliterated.  Still, the maybe 0.3mm thickness of the wire was enough to cause the problem...  I surmise.

Cheers,

Hugh

Offline hrcoleman66

  • Sr. Member
  • ****
  • Posts: 275
The fit of this kit is perfect. I know this , because I build it already. But it is unforgiving regarding any small mistake inside.
I guess you have paint on some glued surface. This is often written also about WNW kits.
If the cockpit frame is sitting right and deep enough on the lower wing, the fuselage halves fits around the seat frame.

This is no critics on your work, nicely painted by the way, just a information for the next builder of the kit to look for.
I must also admit, that it is definitly not an easy kit because of the number of parts. Don't get me wrong, it is a great kit with a fantastic engineering (let's call it a WNW in 1/48), but it needs some care during build.

Cheers,
Frank
Thanks Frank.

I agree.  Not enough care taken during the build of the framing...  points to note for the next time I build this kit (I have the “Viper” profipack version in my stash for later...  but it’s a long was down my list.

Cheers,

Hugh

Offline hrcoleman66

  • Sr. Member
  • ****
  • Posts: 275
Yep, I’d agree with everything Frank says there,

I found it to be like making a Wingnut’s kit in miniature. It is a lovely kit, but care is certainly required. Looking at your other thread, I certainly wouldn’t be put off, if you’re not enjoying it, put it to one side and make something simpler and just enjoy the process!

I’ve had my ups and downs in life and I’ve found modelling to be a real sanctuary at times.

Best wishes,

Guy

Thanks Guy.

I not put off, not by a long shot.  I think it’s more of a reality check...  kind of like expecting to be able to rattle off the Hummel Trumpet concerto in E major, just because you did ten years ago before you gave it away...  my modelling skills need to be relearned and reestablished.

Cheers,

Hugh

Offline hrcoleman66

  • Sr. Member
  • ****
  • Posts: 275
Today,

after mowing the lawns and helping wife with other garden duties, I got stuck in and gave the relevant surfaces a coat of Tamiya Deck Tan.  This included the finely moulded recesses for the control line pulleys.

Then I grabbed the finest brush I had and painted in the details; brown for the timber sections (Ribs and spars), flat aluminium for the pulley mechanism and then using a finely sharpened tech pencil with a 0.5mm HB lead drew in the control lines themselves.  The blow images outline the process.

Also, as you can see, I managed to fill that gaping maw that I had caused on the underside of the fuselage...  It's not perfect, but after weathering, I'm hoping it wont be too obvious that this was a problem. 

The assembly and the upper main plane are now drying in the garage after the control line pulley recesses got a coat of clear and a black oil wash...  Which I will show later.


Cheers,

Hugh

Offline RAGIII

  • Hero Member
  • *****
  • Posts: 18844
Excellent recovery on the seam Hugh! Wings and pulleys are looking great!
RAGIII
"A man has to know his limitations": Harry Callahan

"Don't slop it on" Lynda Geisler

Offline Alexis

  • Hero Member
  • *****
  • Posts: 7947
  • Love the self
Excellent recovery on the seam Hugh! Wings and pulleys are looking great!
RAGIII

Second this , glad to see you press on Hugh  :)


Alexis
Hurra ! , Ich Leben Noch
Body and life is a vessel we use to travel the planet . Femininity is the gift , The miracle comes from what we do with it .

Offline hrcoleman66

  • Sr. Member
  • ****
  • Posts: 275
Thanks Terri and Rag.

Today I got the bits back inside from the Garage (I've previously advised of our exotic parrots and my wife's very black and white attitude to fumes of any sort in the house) and fitted the transparent covers for the control cable pulley recesses.  These were held in place with PVA glue.

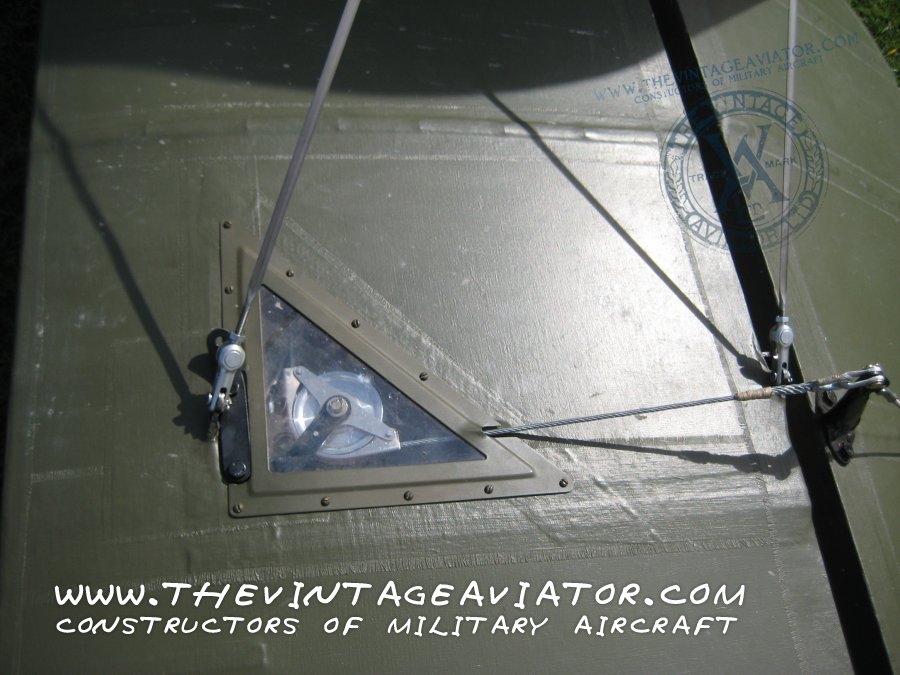
You can see that there is quite a gap between the transparent piece and the rest of the part, so the triangle of the observation window will be masked off (there is about a 1mm border around each one) and then a border masked around each one so as to allow me to fill this area and then sand it back almost flush (just the thickness of the tape remaining.  This will hopefully repliate the quite heavy rib tape I recall seeing on the RAAF Point Cook Museum example.  Although, the Vintage Aviator examples shows the Horizontal Stab to have a different way of tackling this to the Main planes.


But that filling will be a while away, unless I do it with the old Tipex pen that I found with my old paint store...  But I can't find my Tamiya filler.   The local shops are closed due a spike in our Covid cases and a statewide (if surprisingly short (5 Day)) lockdown...  I could order some on line I guess.

In the mean time, I'm being nagged to do some more work on this.


Its a scratch built example of the HMS Surprise.  The ship from the film "Master and Commander".  My wife asked me to build it for a friend of ours, and who am I to argue.  I found the lines drawing on line and set about working it up into something passable.  Completely scratch built.  The only shop bought parts in the end will be the cannons and the dead eyes for the rigging.

Please be gentle, It's my first model ship.  My father built scores of them when I was growing up.  There was always a small table between him and the Television in the evenings as he worked on the rigging... 

The more eagle eyed of you will notice another kit box on the bench...  That's the Roden BE12b.  This is going to be my MOJO fidning build.  It has already been started (I've cut parts off the sprues and started cleaning them up). 
This one will be genuinely OOB.  Apart from rigging of course.  I recall from building the BE2c that this kit is based on, it goes together OK.


Cheers,

Hugh

Offline RAGIII

  • Hero Member
  • *****
  • Posts: 18844
The SE is coming along quite nicely Hugh. Thanks for posting the reference shot of the aileron control pulleys and cover. You are My kind of Modeler...3 at once  ::)
RAGIII
"A man has to know his limitations": Harry Callahan

"Don't slop it on" Lynda Geisler

Offline hrcoleman66

  • Sr. Member
  • ****
  • Posts: 275
The SE is coming along quite nicely Hugh. Thanks for posting the reference shot of the aileron control pulleys and cover. You are My kind of Modeler...3 at once  ::)
RAGIII

Plus two work in progress largish steam engines (one beam engine 1”bore by 1.5” stroke and one twin with each cylinder of indentical dimensions) from castings...  😜

Cheers,

Hugh

Offline Gisbod

  • Hero Member
  • *****
  • Posts: 2438
Lovely ship!

I do like subjects in wood  ;)

And I’m very keen to see how the B12 turns out...

Guy
“Oh! I have slipped the surly bonds of Earth -
Put out my hand, and touched the face of God.”

P.O. John Gillespie Magee 1941

Offline Alexis

  • Hero Member
  • *****
  • Posts: 7947
  • Love the self
I would say you have found your groove . Good for you Hugh . 

Those inspection windows aren't the greatest to deal with . Same thing on their Camel kit which I hope they address this better in their up coming new tooled kit .

Is there PE framing in the kit to cover up that gap a bit ?


Alexis
Hurra ! , Ich Leben Noch
Body and life is a vessel we use to travel the planet . Femininity is the gift , The miracle comes from what we do with it .

Offline hrcoleman66

  • Sr. Member
  • ****
  • Posts: 275
Hi Terri,

Not in this kit.  No PE in the weekend edition.  I should check the profipack viper box in my stash and see what’s in that.

Yeah, I remember that on the camel...

Cheers,

Hugh.

Offline hrcoleman66

  • Sr. Member
  • ****
  • Posts: 275
Hello everyone.

Just a quick update.  I've not been able to access my spray gear for various reasons (a bed currently being stored in the garage...  ::)...)  So I've been occupying my self in other ways.

The cowl is on and the undercarriage dry fitted.  I'm now ready to go out and

a) clean up the Clear Doped Undersides, ready for masking and post shading (or maybe preshade and then filter)...

then,

b) mask the top surface for ribs for a preshade and then a couple of light coats of PC10 (or equivalent).


I'm still tossing up whether I want to use the kit decals or mask and paint the roundels.

Just as a side note, by comparison to the Eduard Ne 11 (which I have in the 2016 released weekend edition) which was originally released 2001, the SE5a is HIGHLY and precisely engineered.  The wheels snapped on to the axles and probably will never need gluing.  The Cabane struts are a slot and glue scenario...  And fell precisely into the correct alignment with no adjustment needed.

Now for the bad news.  Whether through a fault of mine, or molded in, the lower wing seems to have less dihedral than it should have and I might have to do some fiddling during the fitment of the upper wing to get it all correct.

Cheers,

Hugh

Offline RAGIII

  • Hero Member
  • *****
  • Posts: 18844
Excellent progress Hugh! I am looking forward to the further painting of the wings and fuselage. As for the dihedral I hope all works out well!
RAGIII
"A man has to know his limitations": Harry Callahan

"Don't slop it on" Lynda Geisler