Author Topic: Aviatik 'Berg' D.I  (Read 30650 times)

Offline UFAG

  • Hero Member
  • *****
  • Posts: 644
Re: Aviatik 'Berg' D.I
« Reply #60 on: October 20, 2019, 08:42:05 PM »
Take the aviatik to the next level, beautifull..

Offline Mike Norris (UK)

  • Hero Member
  • *****
  • Posts: 2477
  • RAF Old and Bold
    • Mikes WW1 Aircraft Models
Re: Aviatik 'Berg' D.I
« Reply #61 on: October 20, 2019, 10:57:45 PM »
Take the aviatik to the next level, beautifull..

I think it should be me saying that for your 'Berg' build,

Mike


Retired - 27 years RAF service then 20 years Military Aerospace Technical Author/editor.

Offline Mike Norris (UK)

  • Hero Member
  • *****
  • Posts: 2477
  • RAF Old and Bold
    • Mikes WW1 Aircraft Models
Re: Aviatik 'Berg' D.I
« Reply #62 on: October 22, 2019, 06:31:25 AM »
Hi all,
Well, starting on the tail unit there are a few areas that needed to be addressed:
The 'Berg' had pronounced 'wash-out' (upward flare) at the outer trailing edge of the ailerons. Although it looks as though this was attempted in the kit parts, the 'wash-out' was nowhere pronounced enough. This required careful bending after heat soaking in hot water (boiled).
The combined fin and rudder had a few areas that I felt needed to be re-profiled after comparing the kit part to drawings in several notable publications. 
The tail planes and elevators, when laid together with the rib tapes aligned were found to be off-set to each other. I also felt these parts needed re-profiling.

Mike


Retired - 27 years RAF service then 20 years Military Aerospace Technical Author/editor.

Offline coyotemagic

  • Hero Member
  • *****
  • Posts: 7710
  • "Here's to not buggering it up." -Winston Chuchill
    • My Models
Re: Aviatik 'Berg' D.I
« Reply #63 on: October 22, 2019, 08:37:58 AM »
Outstanding work on the corrections, Mike!
Cheers,
Bud
"All men dream: but not equally. Those who dream in the dark recesses of the night awake in the day to find all was vanity. But the dreamers of day are dangerous men, for they may act their dreams with open eyes, and make it possible." -T. E. Lawrence

Offline Mike Norris (UK)

  • Hero Member
  • *****
  • Posts: 2477
  • RAF Old and Bold
    • Mikes WW1 Aircraft Models
Re: Aviatik 'Berg' D.I
« Reply #64 on: October 22, 2019, 08:42:21 AM »
Hi all,
The more I get on with this kit and its 'instruction manual', the more problems I find.
Here's a classic.
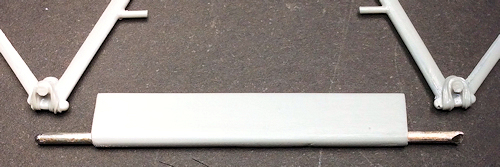
Resin undercarriage struts - note they have solid moulded axle ends with the bungee suspension cord.
The undercarriage fairing has, for strength, a 'solid steel' pin moulded into the fairing.
The 'instruction manual' has a small photograph showing the parts with a hole in the undercarriage struts, which I assume is for the pin in the axle to fit through.
The steel pin can't reasonably be drilled to insert a smaller diameter rod which could then be inserted into a hole drilled into the axle ends.
Therefore I assume they expect you to drill out the moulded resin axle ends (same diameter as the pin in the fairing) to accept the steel pin, leaving just the moulded bungee cord intact.

Someone didn't think this one through.

Option 1 - remove the axle ends and bungee cords from the struts, epoxy glue the fairing pin ends to the struts then replicate the bungee cords with wire.
Option 2 - file the pin ends small enough to fit into a hole drilled into the moulded axle ends.

Mike

« Last Edit: October 22, 2019, 08:52:31 AM by Mike 'Sandbagger' Norris »


Retired - 27 years RAF service then 20 years Military Aerospace Technical Author/editor.

Offline Alexis

  • Hero Member
  • *****
  • Posts: 8019
  • Love the self
Re: Aviatik 'Berg' D.I
« Reply #65 on: October 22, 2019, 10:44:36 AM »
Option one Mike , would be the best way to go . Option two , to many variables . Or at least for me to make a mess out of option two . It is a head scratcher though .


Terri
Hurra ! , Ich Leben Noch
Body and life is a vessel we use to travel the planet . Femininity is the gift , The miracle comes from what we do with it .

Offline coyotemagic

  • Hero Member
  • *****
  • Posts: 7710
  • "Here's to not buggering it up." -Winston Chuchill
    • My Models
Re: Aviatik 'Berg' D.I
« Reply #66 on: October 22, 2019, 12:08:42 PM »
Option 3, a variation on 1, would be to just drill through the axle ends/bungees the same diameter as the axle.  That's the way I would go.  More strength and less labor.
Cheers,
Bud
"All men dream: but not equally. Those who dream in the dark recesses of the night awake in the day to find all was vanity. But the dreamers of day are dangerous men, for they may act their dreams with open eyes, and make it possible." -T. E. Lawrence

Offline kensar

  • Hero Member
  • *****
  • Posts: 2513
  • Reshaping the world - one piece at a time.
Re: Aviatik 'Berg' D.I
« Reply #67 on: October 22, 2019, 09:43:50 PM »
Option 4 - cut off steel axle flush with fairing.   Drill 2 small holes adjacent to the steel axle end, in front and behind the axle in both the fairing part and the LG parts.  Glue in metal pin to reinforce the joint and glue it all together.
Just thinking out loud.  Depends on how much of the original kit you want to preserve.

Option 1 is good, too.

Offline Mike Norris (UK)

  • Hero Member
  • *****
  • Posts: 2477
  • RAF Old and Bold
    • Mikes WW1 Aircraft Models
Re: Aviatik 'Berg' D.I
« Reply #68 on: October 22, 2019, 10:58:38 PM »
Hi all,
Thanks for your inputs.
I'll have a crack at it later.
Just a shame they didn't mould the undercarriage struts without the axle ends included - it would have been to easy then,

Mike


Retired - 27 years RAF service then 20 years Military Aerospace Technical Author/editor.

Offline Mike Norris (UK)

  • Hero Member
  • *****
  • Posts: 2477
  • RAF Old and Bold
    • Mikes WW1 Aircraft Models
Re: Aviatik 'Berg' D.I
« Reply #69 on: October 23, 2019, 04:25:46 AM »
Hi all,
Before starting on the undercarriage changes, the lower wing need to be prepared.
The front spars of the lower wings were connected by a steel bar, which was located on the bottom surface of the fuselage.
As such the leading edges of the lower wings sat slightly below the fuselage.
This is different from most aircraft of the time where the lower wing front spars were integral to the fuselage construction.
To locate the lower wings to the fuselage, 1.0 mm diameter holes needed to be drilled into the wing roots and one hole each side of the fuselage.
Metal rods were inserted into holes in the wing roots.
When test fitted, the wing root rear rods insert into the fuselage holes and the longer front rod against the underside of the fuselage.

Mike


Retired - 27 years RAF service then 20 years Military Aerospace Technical Author/editor.

Offline Mike Norris (UK)

  • Hero Member
  • *****
  • Posts: 2477
  • RAF Old and Bold
    • Mikes WW1 Aircraft Models
Re: Aviatik 'Berg' D.I
« Reply #70 on: October 23, 2019, 07:05:59 AM »
Hi all,
Well I went for option 1 in the end.
It seems to have worked although these shots are test fitting only and I've yet to create the bungee suspension cords from wire.
I replaced the kit supplied bracing bar with 0.9 mm diameter tube, as the kit part was too short,

Mike


Retired - 27 years RAF service then 20 years Military Aerospace Technical Author/editor.

Offline Alexis

  • Hero Member
  • *****
  • Posts: 8019
  • Love the self
Re: Aviatik 'Berg' D.I
« Reply #71 on: October 23, 2019, 10:17:38 AM »
Thumbs up Mike !  :)


Terri
Hurra ! , Ich Leben Noch
Body and life is a vessel we use to travel the planet . Femininity is the gift , The miracle comes from what we do with it .

Offline RAGIII

  • Hero Member
  • *****
  • Posts: 19688
Re: Aviatik 'Berg' D.I
« Reply #72 on: October 23, 2019, 10:49:53 PM »
Exceptional progress Mike!
RAGIII
"A man has to know his limitations": Harry Callahan

"Don't slop it on" Lynda Geisler

Offline Mike Norris (UK)

  • Hero Member
  • *****
  • Posts: 2477
  • RAF Old and Bold
    • Mikes WW1 Aircraft Models
Re: Aviatik 'Berg' D.I
« Reply #73 on: October 24, 2019, 01:26:38 AM »
Hi all,
The undercarriage assembly is completed.
Struts modified by removing the pre-moulded axle ends and bungee suspension cords.
Cross bracing anchors points added to the bottom front of the forward undercarriage struts.
Axle secured to the undercarriage struts and 0.4 mm diameter lead wire used to replicate the bungee cord suspension.
Bracing bar in kit replaced (too short) with 0.9 mm diameter brass tube,

Mike


« Last Edit: October 30, 2019, 11:42:56 PM by Mike 'Sandbagger' Norris »


Retired - 27 years RAF service then 20 years Military Aerospace Technical Author/editor.

Offline Robin

  • Sr. Member
  • ****
  • Posts: 386
Re: Aviatik 'Berg' D.I
« Reply #74 on: October 24, 2019, 01:33:28 AM »
Superb!

Robin  :)
Found my mojo and clipped it's wings, so it won't fly away.