Author Topic: Aviatik 'Berg' D.I  (Read 22116 times)

Offline Mike Norris

  • Hero Member
  • *****
  • Posts: 2214
  • RAF Old and Bold
    • Mikes WW1 Aircraft Models
Aviatik 'Berg' D.I
« on: October 06, 2019, 05:53:38 AM »
Hi all,
I thought it was about time I took on another resin kit, as the last resin model I built was the DFW T28 'Floh' from 'Planet Models'.
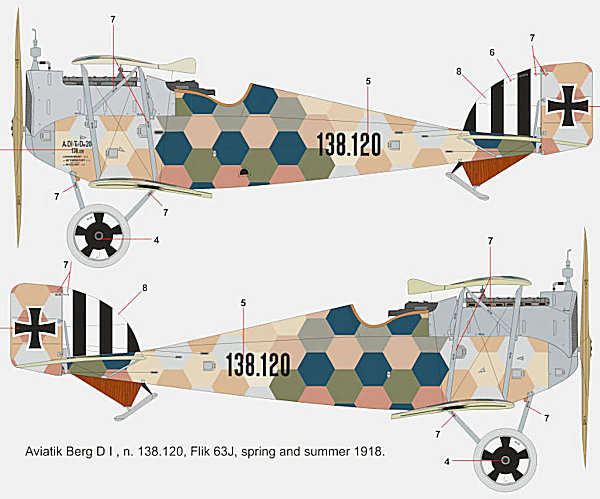
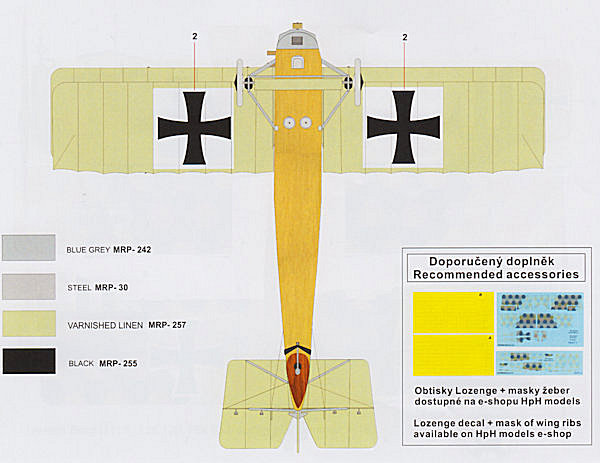
I've had the 'HPH Models' 1:32 scale Aviatik 'Berg' D.I in my stash for quite awhile, so thought it was about time I gave it a go.
Already I've encountered a couple of things that may cause problems.
1. The instruction manual, normal I think for 'HPH Models', consists of a small booklet with photographs and arrows showing where parts fit.
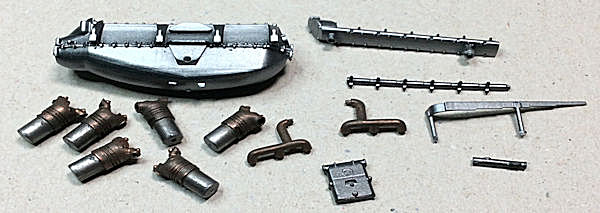
However these illustrations leave a lot to be desired, especially those for assembling the engine, which has many parts and the smallest in the entire kit.
Some of the call out illustrations for parts are not the same as the actually resin parts supplied in the kit, which is a bit confusing.
2. More of a concern is that the kit is supplied with mask sheets for painting the lozenge - not the easiest route to take.
So I ordered the optional decal sheets.
These arrived in polythene bags and without the normal tissue paper protection sheets. Consequently the bags stuck to the exposed decals and despite being careful extracting the decal sheets, some were chipped where they's stuck to the bag. Also the bags had left an imprint across every decal, which I'm not sure will show after the decals are applied.
Thinking this might have been a 'one off' I ordered another set of decals, but these packaged the same way and in the same condition.
I emailed 'HPH' and suggested they revise how the package these decals - I haven't had a reply!!
I see that our very own 'Des' built his 'Berg' as the prototype and without any lozenge camouflage. Maybe he encountered the same problems?

Anyway we are modellers, not assemblers, so on I go.
I decided to work on the engine first, contrary to the instruction manual.
Unless I'm very carefully, some of the tiny engine parts may end up feeding the 'carpet monster' - we'll, but at least the kit is supplied with some spare parts.
I'm using 'Alclad' lacquers on the engine and have dulled down the copper water jackets on the cylinders and the intake manifolds by applying 'Tamiya' Weathering Master (Set D - Oil Stain), which gives the copper an older, heated look.
Long way to go on this one I think,

Mike   


« Last Edit: October 06, 2019, 06:13:41 AM by Mike 'Sandbagger' Norris »


Retired - 27 years RAF service then 20 years Military Aerospace Technical Author/editor.

Offline RAGIII

  • Hero Member
  • *****
  • Posts: 18843
Re: Aviatik 'Berg' D.I
« Reply #1 on: October 06, 2019, 06:01:16 AM »
Great start on a kit not often seen! Looking forward to your build as always,
RAGIII
"A man has to know his limitations": Harry Callahan

"Don't slop it on" Lynda Geisler

Offline Nigrivender

  • Jr. Member
  • **
  • Posts: 65
  • Do wrong and it will be good
Re: Aviatik 'Berg' D.I
« Reply #2 on: October 06, 2019, 07:20:54 AM »

I watch and give the page, it may be useful

https://www.aviattic.co.uk/hph-aviatik-berg-d1.html
If something can't be repaired it means it's not broken

Offline UFAG

  • Hero Member
  • *****
  • Posts: 644
Re: Aviatik 'Berg' D.I
« Reply #3 on: October 06, 2019, 07:29:59 AM »
I am with this one...!!

Offline Robin

  • Sr. Member
  • ****
  • Posts: 386
Re: Aviatik 'Berg' D.I
« Reply #4 on: October 06, 2019, 07:52:43 AM »
First time I see this odd colorful lozenge scheme...it looks spectacular!

I look forward to see this come together. :)

Robin
Found my mojo and clipped it's wings, so it won't fly away.

Offline Mike Norris

  • Hero Member
  • *****
  • Posts: 2214
  • RAF Old and Bold
    • Mikes WW1 Aircraft Models
Re: Aviatik 'Berg' D.I
« Reply #5 on: October 06, 2019, 08:20:48 AM »


Retired - 27 years RAF service then 20 years Military Aerospace Technical Author/editor.

Offline Radarman

  • Hero Member
  • *****
  • Posts: 688
Re: Aviatik 'Berg' D.I
« Reply #6 on: October 06, 2019, 08:50:52 AM »
Mike,
I guess the fun never stops around your work bench.
I'll enjoy watching this one.
                                          Kevin
We are all victims of history!

Online Juan

  • Hero Member
  • *****
  • Posts: 2456
  • All gave some, some gave all.
Re: Aviatik 'Berg' D.I
« Reply #7 on: October 06, 2019, 08:53:33 AM »
Pulling up a comfy chair to enjoy this one.

Offline coyotemagic

  • Hero Member
  • *****
  • Posts: 7710
  • "Here's to not buggering it up." -Winston Chuchill
    • My Models
Re: Aviatik 'Berg' D.I
« Reply #8 on: October 06, 2019, 01:53:22 PM »
Looking forward to watching you work your magic on this one, Mike!


I watch and give the page, it may be useful

https://www.aviattic.co.uk/hph-aviatik-berg-d1.html

Thank you for posting this, I have the 1/48 version of this and will use both this, and Mike's build as guides.
Cheers,
Bud
"All men dream: but not equally. Those who dream in the dark recesses of the night awake in the day to find all was vanity. But the dreamers of day are dangerous men, for they may act their dreams with open eyes, and make it possible." -T. E. Lawrence

Offline Edo

  • Hero Member
  • *****
  • Posts: 707
Re: Aviatik 'Berg' D.I
« Reply #9 on: October 06, 2019, 04:46:19 PM »
wow! this is one of my favourite planes (ihope CSM will make one sometimes.... ::))
in the meanwhile p, i’ll njoy watching your build!
ciao
edo

Offline Mike Norris

  • Hero Member
  • *****
  • Posts: 2214
  • RAF Old and Bold
    • Mikes WW1 Aircraft Models


Retired - 27 years RAF service then 20 years Military Aerospace Technical Author/editor.

Offline Mike Norris

  • Hero Member
  • *****
  • Posts: 2214
  • RAF Old and Bold
    • Mikes WW1 Aircraft Models
Re: Aviatik 'Berg' D.I
« Reply #11 on: October 06, 2019, 11:54:27 PM »
Hi all,
The basic engine build is done.
This involved assembling the engine block, cylinders' cam shaft, overhead valve gear housing, magnetos and drive shaft, ignition rail and the carburettor housing and intake manifolds.,
The paints used were primarily 'Alclad' lacquers (Duraluminium, Aluminium, Steel, Copper and Brass).
The only weathering applied so far is the 'Tamiya' Weathering Master (Set D - Oil Stain), which was sponged onto the copper cylinder heads and intake manifolds, in order to give an old, heated look.
There will be more weathering applied once the engine is complete.

Now onto the fiddly bits - support frame, pipe and water pump, timing handle assembly, valve gear, spark plugs, ignition leads etc,

Mike   


Retired - 27 years RAF service then 20 years Military Aerospace Technical Author/editor.

Offline Jorgo

  • Sr. Member
  • ****
  • Posts: 367
Re: Aviatik 'Berg' D.I
« Reply #12 on: October 07, 2019, 04:17:47 AM »
Wonderful painting, chapeau! I‘m looking forward to your next update.

Jörg

Bughunter

  • Guest
Re: Aviatik 'Berg' D.I
« Reply #13 on: October 07, 2019, 04:33:32 AM »
This will be again a beatiful model, very interesting Lozenge colors. Against this info my 1/48 decals for this plane looks some how strange ???
I will watch!

Cheers,
Frank

Offline kensar

  • Hero Member
  • *****
  • Posts: 2505
  • Reshaping the world - one piece at a time.
Re: Aviatik 'Berg' D.I
« Reply #14 on: October 07, 2019, 04:44:20 AM »
Excellent start, Mike.  I'll be following along.