Author Topic: Lloyd C.V 1/32 Scratch Build Project  (Read 45068 times)

Offline IanB

  • Hero Member
  • *****
  • Posts: 2496
Re: Lloyd C.V 1/32 Scratch Build Project
« Reply #240 on: July 03, 2013, 12:58:15 PM »
Absolutely gorgeous work, Bob. She really is looking very nice indeed.
 As a further filip to those who have never scratchbuilt anything, I just posted my 1:72 BlĂ©riot build from a year or so ago which I just realised isn't on here! It's my first, and so far only, scratchbuild.   http://forum.ww1aircraftmodels.com/index.php?topic=2013.0

It really isn't that difficult once you set your mind to it....it's just planning ahead....GO FOR IT!

Ian
« Last Edit: July 04, 2013, 08:07:29 AM by Des »

Offline coyotemagic

  • Hero Member
  • *****
  • Posts: 7710
  • "Here's to not buggering it up." -Winston Chuchill
    • My Models
Re: Lloyd C.V 1/32 Scratch Build Project
« Reply #241 on: July 03, 2013, 02:02:24 PM »
Really nice work on the plumbing, Bob!
Cheers,
Bud
"All men dream: but not equally. Those who dream in the dark recesses of the night awake in the day to find all was vanity. But the dreamers of day are dangerous men, for they may act their dreams with open eyes, and make it possible." -T. E. Lawrence

Offline Rob Hart

  • Hero Member
  • *****
  • Posts: 699
Re: Lloyd C.V 1/32 Scratch Build Project
« Reply #242 on: July 03, 2013, 10:35:38 PM »
Wow!

Offline GAJouette

  • Hero Member
  • *****
  • Posts: 3579
  • " Beware of the Spanish Inquisition"
Re: Lloyd C.V 1/32 Scratch Build Project
« Reply #243 on: July 04, 2013, 04:15:44 AM »
  Bob,
Awesome works my old friend.
Highest Regards,
Gregory Jouette
" What Me Worry"

Offline pepperman42

  • Hero Member
  • *****
  • Posts: 4507
  • Sergeant, my brown pants.......
Re: Lloyd C.V 1/32 Scratch Build Project
« Reply #244 on: July 05, 2013, 11:40:36 AM »
Fine engineering at its best!!

Steve

Offline rhallinger

  • Hero Member
  • *****
  • Posts: 1976
Re: Lloyd C.V 1/32 Scratch Build Project
« Reply #245 on: July 05, 2013, 12:10:59 PM »
Thanks everyone! ;D  I have added the radiator supports and windscreen, and completed the cabane rigging.  I also dry-fitted the tail planes just to see how she would look.  ;)  I may go ahead and affix those soon.  Here she is this evening:


The rigging is monofilament colored with a silver Sharpie, affixed with Bob's Buckles tubes to the Gaspatch turnbuckles in the wings.  I like the way Bob's tubes allow adjustment of tension in the line before gluing, and the clean connection they provide.  The cabane rigging uses Bob's tubes and buckles.  The windscreen may have too much rake to it, so I may make another.  It is made from clear plastic bubble packaging.


Well, it seems that I am just about ready to break out the jig and place the airframe therein, preparatory to positioning and affixing the top wing. ;D  At last! (Still have to make that observer's cage though.  Wish me luck Willi!).

Cheers,

Bob

Offline Des

  • Administrator
  • Hero Member
  • ******
  • Posts: 9325
    • ww1aircraftmodels.com
Re: Lloyd C.V 1/32 Scratch Build Project
« Reply #246 on: July 05, 2013, 12:25:00 PM »
Looking absolutely beautiful Bob, your workmanship is first class and attention to detail is superb, looking forward to seeing the top wing in place.

Des.
Late Founder of ww1aircraftmodels.com and forum.ww1aircraftmodels.com

Offline mgunns

  • Hero Member
  • *****
  • Posts: 2255
Re: Lloyd C.V 1/32 Scratch Build Project
« Reply #247 on: July 06, 2013, 02:12:18 AM »
Hello Bob:

Been awhile since I stopped by your place to see how you're doing on this magnificent build.  Truly outstanding.  Your care, perseverence and attention to detail, (The devil is in the details!) is producing an outstanding model.  I am looking forward, as you, to seeing how this turns out.

Best

Mark
Mark

We few, we happy few.....

Offline pepperman42

  • Hero Member
  • *****
  • Posts: 4507
  • Sergeant, my brown pants.......
Re: Lloyd C.V 1/32 Scratch Build Project
« Reply #248 on: July 07, 2013, 02:50:19 AM »
Stunning work - and now looking like an airplane!!!!!

Steve

Offline rhallinger

  • Hero Member
  • *****
  • Posts: 1976
Re: Lloyd C.V 1/32 Scratch Build Project
« Reply #249 on: July 07, 2013, 11:12:33 AM »
Here's a teaser of this bird in the jig, with the top wing just resting in place (the tweezers are for weight:


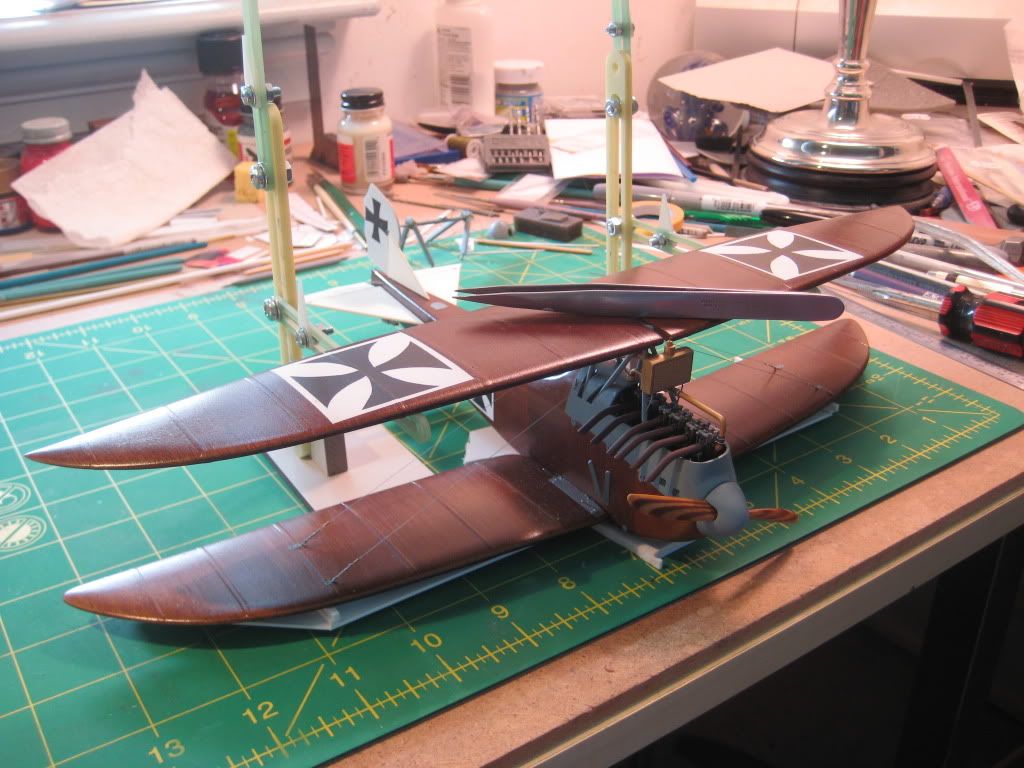
There is a serious side to showing this, and I am requesting your thouhts on the best way to proceed.  I have made interplane struts from bamboo skewers sanded to shape with brass pins inserted at each end, bent appropriately to establish the inboard rake of the struts.  I have drilled holes in the bottom wings for the struts, but not yet in the top wing.  My thought was to secure the top wing in the appropriate position in the jig relative the the rest of the aircraft, resting on the cabanes, and then insert the struts in their bottom holes and mark the drill points for the bottom of the top wing that way.  I will also add the rigging points, hardware and rigging to the bottom of the top wing before installing.  I've never done struts this way before, so I thought I'd solicit the wisdom of this assemblage before I foul things up completly.  ;)  Any suggestions or thoughts would be much appreciated.  Thanks!

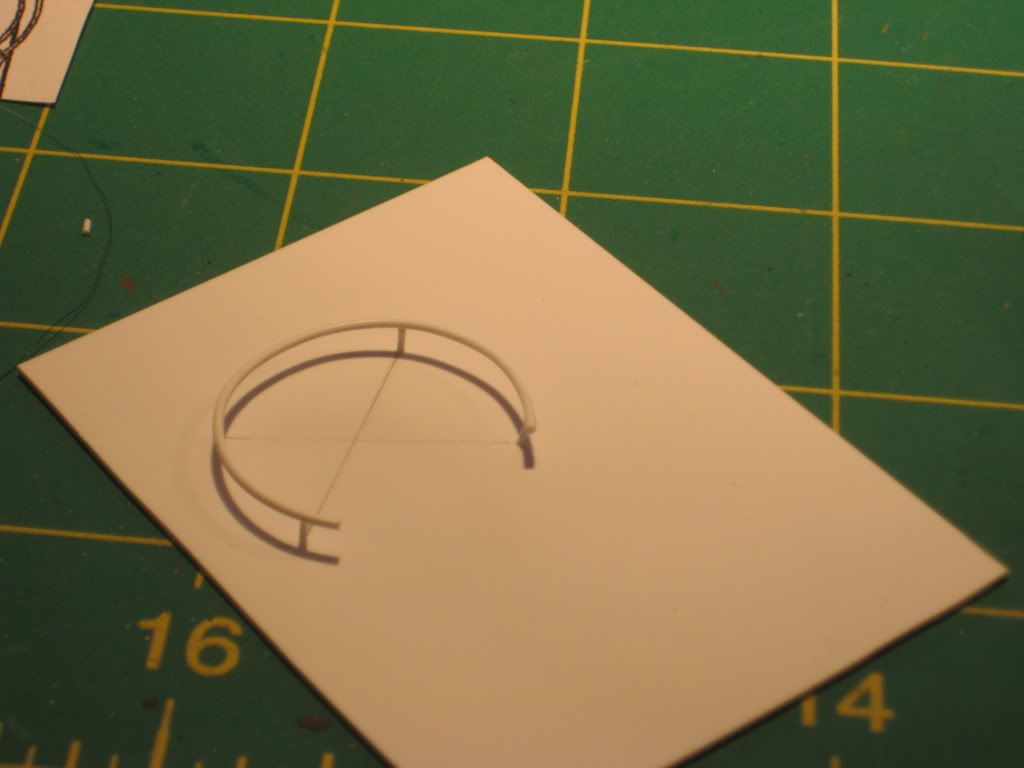
I've also started crafting the observer's cage, a la Willi's (Miami Angler's) method of bending plastic rod as shown in his build log at Swanny's for his beautiul 1/48 SH Lloyd.  Thanks for the technique Willi! ;D


That's all for now.  Thanks for your ideas.

Regards,

Bob

Offline Ernie

  • Hero Member
  • *****
  • Posts: 3961
  • "Once more into the breach"
Re: Lloyd C.V 1/32 Scratch Build Project
« Reply #250 on: July 07, 2013, 11:40:23 AM »
Holy cow, Bob! Just when I figure I'm starting to cope
with making models again (OOB of course ;D), I happen
across your wonderful build.  I really admire your talent,
creating such a great model from nothing.
I look forward to the rest of the project. Thanks for
sharing it with us.

Cheers,
Ernie :)
The new old guy, take two...

Offline rhallinger

  • Hero Member
  • *****
  • Posts: 1976
Re: Lloyd C.V 1/32 Scratch Build Project
« Reply #251 on: July 07, 2013, 12:15:03 PM »
Thanks Ernie!  This is my first WWI scratch build, and I did it because I really wanted a LLoyd in 1/32, and there was so much help and encouragement on this forum. :D  I've tried new things and learned a great deal.  However, it will be nice to get back to an OOB build once this one's finished, as I've been at it for about seven months now.  ;)  I'm at the most dicey part now, top wing attachment and struts---it's very different than a kit, where everything is pre-measured and engineered for you, and it's a little scary for me, particularly with those funky angled A-H struts!.  I hope I can figure it out. :o 

Regards,

Bob

Offline IanB

  • Hero Member
  • *****
  • Posts: 2496
Re: Lloyd C.V 1/32 Scratch Build Project
« Reply #252 on: July 07, 2013, 01:46:36 PM »
Very nice indeed Bob,
 re the upper wing mountings: personally I would mark and drill the rigging and strut mounting holes prior to mounting the top wing, using the plans, then mount the wing, then tweak your strut pins to fit properly....I've tried it the other way around and although it fits nicely it may not be accurate, and drilling the wing when it's in place is not a good idea - you may not be able to get the drill in the correct place and angle, it can loosen the wing, and cause all sorts of other problems!

Ian

Offline rhallinger

  • Hero Member
  • *****
  • Posts: 1976
Re: Lloyd C.V 1/32 Scratch Build Project
« Reply #253 on: July 08, 2013, 12:10:16 AM »
Thanks Ian.  I've looked things over and have decided to follow your recommended approach.  I think it will work just fine.  I appreciate your insight and guidance. :D

Regards,

Bob

Offline Chris Johnson

  • Hero Member
  • *****
  • Posts: 1959
Re: Lloyd C.V 1/32 Scratch Build Project
« Reply #254 on: July 08, 2013, 12:30:24 AM »
Nice job on the rigging Bob. She's a beauty all around.

Cheers,

Chris
You can have it good; You can have it fast; you can have it cheap. Pick any two, but all three are impossible.