Author Topic: Lloyd C.V 1/32 Scratch Build Project  (Read 45003 times)

Offline GAJouette

  • Hero Member
  • *****
  • Posts: 3579
  • " Beware of the Spanish Inquisition"
Re: Lloyd C.V 1/32 Scratch Build Project
« Reply #75 on: January 17, 2013, 07:08:54 AM »
  Bob,
Great work on the interior details my friend. Looking forward to more.
Highest Regards,
Gregory Jouette
" What Me Worry"

Offline rhallinger

  • Hero Member
  • *****
  • Posts: 1976
Re: Lloyd C.V 1/32 Scratch Build Project
« Reply #76 on: January 19, 2013, 03:04:43 PM »
Here's the weekly update.  The cockpit is nearly finished.  I built it from Evergreen sheet, strip and tube stock.  The steering wheel was a leftover part from the Pup kit.  It's not prototype for the Lloyd, but I'm decreeing that the OEM wheel was shot up on a mission and had to be replaced quickly with whatever was on hand. ;)  The seat cushions were made from dark brown Sculpy modeling clay baked per the instructions then weathered lightly.

The wood parts were simulated by painting with Tamiya Desert Yellow covered with a mix of brushed out Burnt Sienna and Burnt Umber oils, sealed after dry with Tamiya Clear Yellow/Orange mix.  The wood grain can't be seen in the photos, but looks pretty good to the eyeball.  Metal shades are brushed on Mr. Hobby metal colors in appropriate shades.  The IP was made with Airscale instrument decals and Aeroclub bezels.  The observer's shelf/table is ready, but attaches to the fuselage side so must await placement until the cockpit assembly is in place in the fuselage.


Albatros 1234, thank you for your kind offer of the austro daimler engine.  I may take you up on it in the future for an OEFFAG Albatros conversion myself, but for the Lloyd I decided to model a WKF built Series 82 aircraft with Benz bz.IV engine, which I obtained from WNW.  That will be next, followed by locating and drilling the appropriate openings in the fuselage for the lower wing attachments, landing gear struts and tail.

I have also prepared the parts for the wing/airfoil jig, but more about that later.

Thanks for looking! 

Regards,

Bob   


Offline Des

  • Administrator
  • Hero Member
  • ******
  • Posts: 9325
    • ww1aircraftmodels.com
Re: Lloyd C.V 1/32 Scratch Build Project
« Reply #77 on: January 19, 2013, 07:38:20 PM »
Ecellent progress Bob, the interior is looking very smart indeed, all your colours appear to be spot on.

Des.
Late Founder of ww1aircraftmodels.com and forum.ww1aircraftmodels.com

Offline GAJouette

  • Hero Member
  • *****
  • Posts: 3579
  • " Beware of the Spanish Inquisition"
Re: Lloyd C.V 1/32 Scratch Build Project
« Reply #78 on: January 19, 2013, 08:33:17 PM »
  Bob,
Fantastic work on her interior my old friend. Awesome project!
Highest Regards,
Gregory Jouette
" What Me Worry"

Offline bobs_buckles

  • Hero Member
  • *****
  • Posts: 3827
  • Freedom isn't free.
    • Bobs Buckles
Re: Lloyd C.V 1/32 Scratch Build Project
« Reply #79 on: January 20, 2013, 12:26:56 AM »
The hard scratchin' is paying off, Bob - Looks great!
Keep us updated  ;)

Von Buckle


https://www.bobsbuckles.co.uk/

Last Minute Man Of Faith

Offline pepperman42

  • Hero Member
  • *****
  • Posts: 4507
  • Sergeant, my brown pants.......
Re: Lloyd C.V 1/32 Scratch Build Project
« Reply #80 on: January 20, 2013, 12:30:48 AM »
Nice work. The colour combinations are very good.

Steve

Offline coyotemagic

  • Hero Member
  • *****
  • Posts: 7710
  • "Here's to not buggering it up." -Winston Chuchill
    • My Models
Re: Lloyd C.V 1/32 Scratch Build Project
« Reply #81 on: January 20, 2013, 01:09:43 AM »
Brilliant work on the innards, Bob!  Can't wait to see it all stuck together.
Cheers,
Bud
"All men dream: but not equally. Those who dream in the dark recesses of the night awake in the day to find all was vanity. But the dreamers of day are dangerous men, for they may act their dreams with open eyes, and make it possible." -T. E. Lawrence

Offline ALBATROS1234

  • Hero Member
  • *****
  • Posts: 2657
Re: Lloyd C.V 1/32 Scratch Build Project
« Reply #82 on: January 20, 2013, 05:26:22 AM »
looks like a lloyd cv to me, youre doing a bang up job so far. scratch building has got to be rewarding. i of course have scratched odds and ends to enhance a build but to build an entire craft from nothing and end up with something so nice has got to feel good. keep up the great work.

Offline rhallinger

  • Hero Member
  • *****
  • Posts: 1976
Re: Lloyd C.V 1/32 Scratch Build Project
« Reply #83 on: January 21, 2013, 11:19:25 AM »
Here is another mini-update as I feel my way forward with this project.  The first photo is the fuselage sidewall interior, which still has some details to be added:


Before proceeding with completing the fuselage, I need to locate and drill out the attachment points for the lower wings, cabane struts, tail and horizontal stabilizer.  I plan to do these like Des did with his scratch builds (and the 1/48 SH builds also)--with brass tube in the fuselage and brass rod pins.  Any advice on this method would be appreciated, as I have never done it before.  I still need to get the brass tube/rod.

It occurred to me that I first need to do the wings, so I know how much space I have to work with in the wing cross-section, so I have laid out the wings on 3mm sheet styrene, as shown:


I will use the method Des followed on his Voisin to provide an airfoil shape to the wings.  The parts for th jig with clamps are shown in the photo.  I am using a plastic cutting board as the base and metal shelf brackets for the fixed guides.


I'll let you know how all of this works. :)

Regrds,

Bob   

Offline pepperman42

  • Hero Member
  • *****
  • Posts: 4507
  • Sergeant, my brown pants.......
Re: Lloyd C.V 1/32 Scratch Build Project
« Reply #84 on: January 21, 2013, 12:36:40 PM »
More great work!!

Steve

Offline rhallinger

  • Hero Member
  • *****
  • Posts: 1976
Re: Lloyd C.V 1/32 Scratch Build Project
« Reply #85 on: January 22, 2013, 01:00:11 PM »
Before completing the cockpit and addng HGW seatbelts, I am proceeding with the wings.  Since I do not have a Microlux band saw, I am cutting out the 3mm thick styrene wings the old fashioned way--with a small razor saw blade:


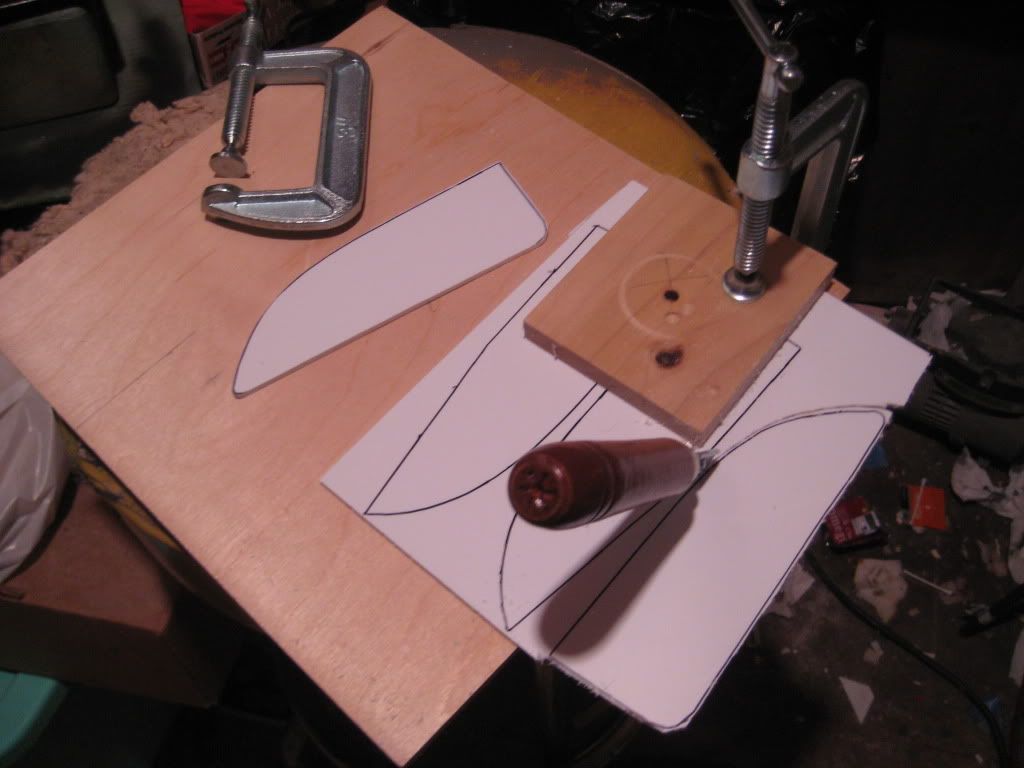
The bottom wings are now cut out and require sanding to outline.  This takes a bit of time, so the top wings will follow tomorrow.


I am following the construction method outlined by Des in his Voisin build log.  The next step will be to sand the leading and trailing edges a bit thinner (but not all the way).  Then I will have to assemble the jig and proceed with clampng the airfoil curve into the wings and fixing with boiling water as per Des's build log.  Thereafter, I can sand the leading and trailng edges to proper shape and thickness.

The Lloyd had unusual wings in that they were covered with mahogany veneer over spanwise stringers attached to relatively few ribs.  This makes the modeling much easier, as there are no ribs and stretched fabric depressions to worry about, just a few thin wood battans over the veneer seams running chordwise.  Here is an example on the 1/48 Special Hobby model, built by Peter Plattner:


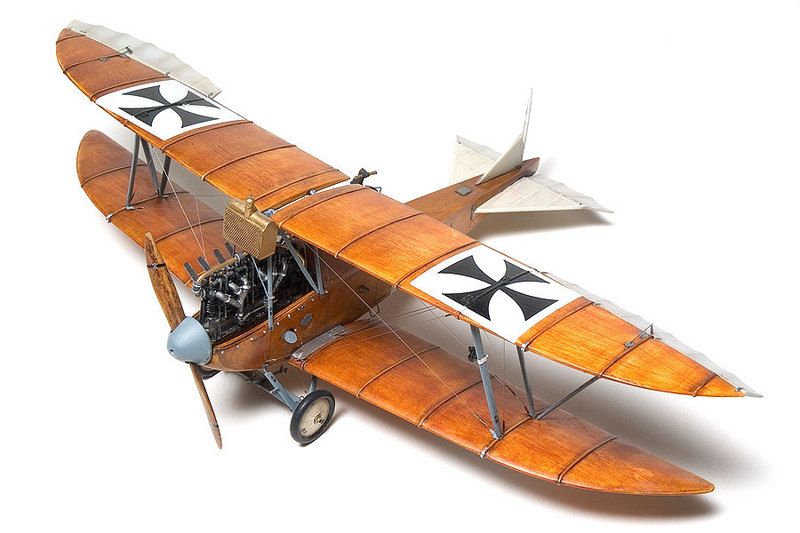
Something to whet my appetite. :)  I hope my 1/32 version turns out this well! ;)  
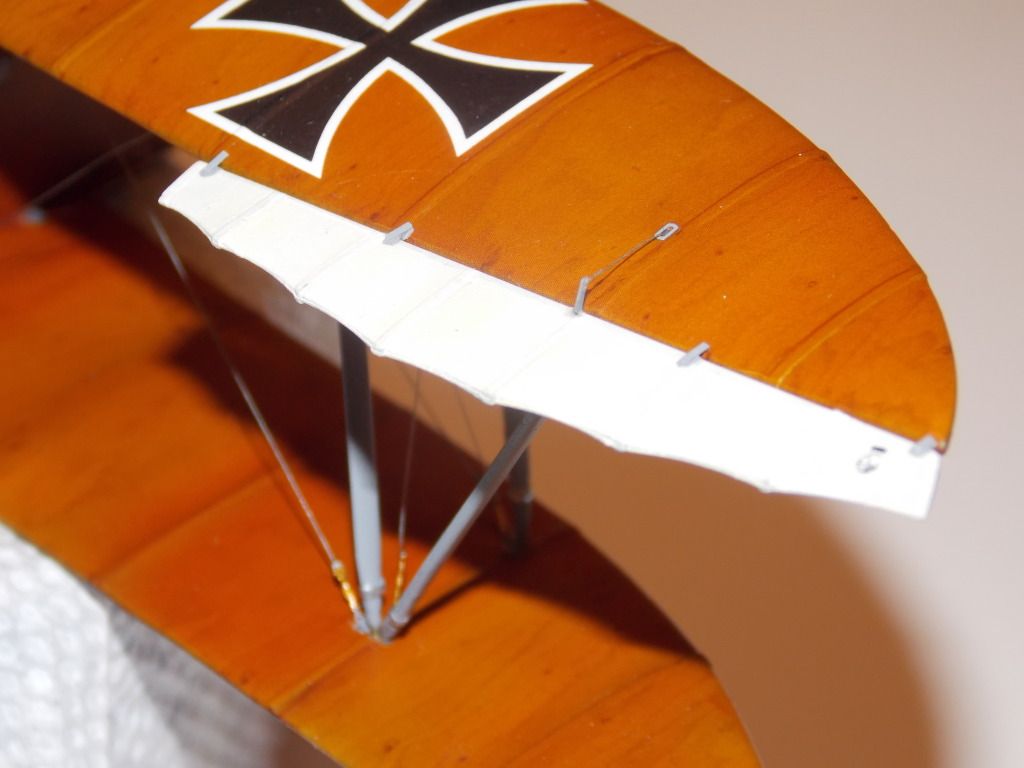
Beautiful work Peter! ;D

I had to include another example borrowed from miamiangler's build log, since Will's log has been so helpful to my project.  Thanks Willi!  Great job! ;D


More soon.

Regards,

Bob

Online uncletony

  • Hero Member
  • *****
  • Posts: 4392
    • Aircraft In Pixels
Re: Lloyd C.V 1/32 Scratch Build Project
« Reply #86 on: January 22, 2013, 01:49:08 PM »
Yay!

Offline GAJouette

  • Hero Member
  • *****
  • Posts: 3579
  • " Beware of the Spanish Inquisition"
Re: Lloyd C.V 1/32 Scratch Build Project
« Reply #87 on: January 23, 2013, 05:03:58 AM »
  Bob,
Looking forward to seeing the wings completed my old friend. No doubts in my mind you'll end up with wings on par with the examples you've shown if not even better. One thing for certain once she's completed she'll be one awesome early Wooden Wonder.
Highest Regards,
Gregory Jouette
" What Me Worry"

Offline rhallinger

  • Hero Member
  • *****
  • Posts: 1976
Re: Lloyd C.V 1/32 Scratch Build Project
« Reply #88 on: January 24, 2013, 02:25:39 PM »
A little more still this evening.  Here are the rough-sanded wings before adding the airfoil camber:


Next, the first one gets clamped into the Des wing jig to the appropriate camber:


Put the kettle on to a boil, douse the contents over the cambered wing, then rinse under cold water, and you get this result (after two attempts):


There is still a good deal of sanding to do to get the correct shape and taper of the wing, but it's well on its way.  Three more to do still (the other side of the bottom wing and both sides of the split top wing. 

Although this feels like lots of rapid progress, I know that the tricky and time-consuming part of this build will be doing the brass-pinned cabane struts and mounting bracket to attach the top wings (somewhat similar to the way the top wings are mounted on Des's Voisin), and getting the landing gear together and attached firmly to the fuselage.  I am slightly nervous about all of that. :o

Nonetheless, progress!  I'll get there in small steps.  Glad I have until April!

Regards,

Bob

Online uncletony

  • Hero Member
  • *****
  • Posts: 4392
    • Aircraft In Pixels
Re: Lloyd C.V 1/32 Scratch Build Project
« Reply #89 on: January 24, 2013, 03:01:20 PM »
Very cool, thanks for sharing your workflow.