Author Topic: Roden Be2c 1/48 (Mojo Build)  (Read 9887 times)

Offline markleecarter

  • Full Member
  • ***
  • Posts: 114
Roden Be2c 1/48 (Mojo Build)
« on: January 17, 2018, 07:05:46 PM »
I'm sure I'm not the only one to have made a new year's resolution to finish some of those incomplete kits, but first I wanted to get my mojo back with a straightforward (almost) oob build. I probably should have chosen something easier than a Roden, but I've wanted a completed Be2c for a long time so I picked one up and decided I would try to get back to some of that simple joy of when I first started building and not worrying too much about every detail and not spend months and months on getting it finished.

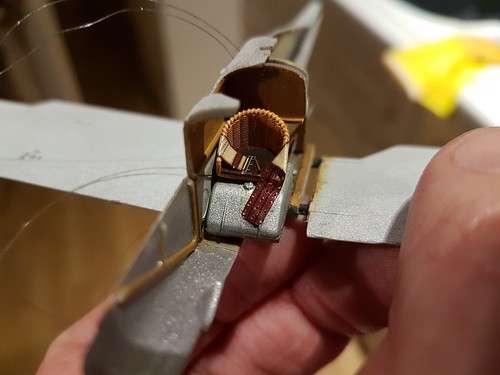
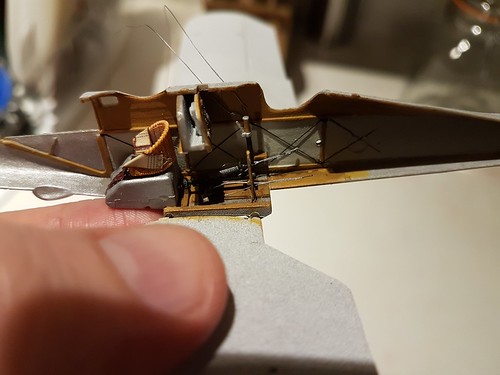
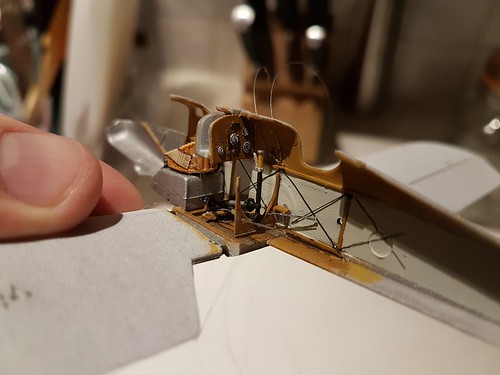
I have only ever built one Roden before - a 1/48 SE5a and I had forgetten how vague some of the instructions and attachment points are! Still it is coming together. I know I said oob but so far I have swapped the seats for Barracuda ones, added Eduard steel lap belts (advertised as for their new SE5a) and replaced the instruments with Eduard ones. Also internal rigging, a panel behind the gunner's seat and rudder control wires.

I have also already run the double rigging wires from within the fuselage and the wires that go from the top of the cabane struts because it should be easier than doing it from the outside in. Time will tell whether this was a good idea or not!

20180116_213307 by markleecarter, on Flickr

20180116_213257 by markleecarter, on Flickr

20180116_213236 by markleecarter, on Flickr


Offline AndrewS

  • Full Member
  • ***
  • Posts: 241
Re: Roden Be2c 1/48 (Mojo Build)
« Reply #1 on: January 17, 2018, 07:11:56 PM »
Nice cockpit!

Working myself on a Roden kit I understand your effort  ::)

 ;D

Online PrzemoL

  • Hero Member
  • *****
  • Posts: 4888
  • There was Eru... and he made first the Ainur...
    • Przemysław Litewka
Re: Roden Be2c 1/48 (Mojo Build)
« Reply #2 on: January 17, 2018, 08:13:52 PM »
Great interior.
What scheme are planning? A two-seater it seems.
Ash nazg durbatuluk, ash nazg gimbatul,
Ash nazg thrakatuluk, agh burzum-ishi krimpatul.

Offline RAGIII

  • Hero Member
  • *****
  • Posts: 18845
Re: Roden Be2c 1/48 (Mojo Build)
« Reply #3 on: January 17, 2018, 08:46:21 PM »
Terrific work on the interior. Your additions look fantastic.
RAGIII
"A man has to know his limitations": Harry Callahan

"Don't slop it on" Lynda Geisler

Offline Des

  • Administrator
  • Hero Member
  • ******
  • Posts: 9325
    • ww1aircraftmodels.com
Re: Roden Be2c 1/48 (Mojo Build)
« Reply #4 on: January 17, 2018, 08:56:37 PM »
Very nice work on the interior, looking forward to the next update.

Des.
Late Founder of ww1aircraftmodels.com and forum.ww1aircraftmodels.com

Offline Thumbs up

  • Hero Member
  • *****
  • Posts: 568
Re: Roden Be2c 1/48 (Mojo Build)
« Reply #5 on: January 18, 2018, 07:10:40 AM »
Following.

Offline Juan

  • Hero Member
  • *****
  • Posts: 2457
  • All gave some, some gave all.
Re: Roden Be2c 1/48 (Mojo Build)
« Reply #6 on: January 18, 2018, 07:13:02 AM »
I would say you have your mojo back by looking at your work, looks great.

Offline Softscience

  • Full Member
  • ***
  • Posts: 245
Re: Roden Be2c 1/48 (Mojo Build)
« Reply #7 on: January 18, 2018, 12:57:51 PM »
That kind of result would get my mojo back.

I'm biased though. I love the look of the B.E.2

I didn't know there was a kit.

I look forward to seeing more.

Offline Syd Solo

  • Sr. Member
  • ****
  • Posts: 258
Re: Roden Be2c 1/48 (Mojo Build)
« Reply #8 on: January 19, 2018, 12:34:02 PM »
Very nice work. Love the wicker seat and belts. Roden kits aren't usually easy builds.

Cheers

Syd

Offline markleecarter

  • Full Member
  • ***
  • Posts: 114
Re: Roden Be2c 1/48 (Mojo Build)
« Reply #9 on: January 19, 2018, 06:31:05 PM »
Thank you all so very much for your kind words - they are also a good mojo boost!

A quick update showing the finished engine and I have glued together the forward part of the fuselage. The plastic seems a little warped so I'm buttoning it up quite slowly. Annoyingly I forgot to put the panel I made behind the pilot's head which is absent in the kit - I doubt very much it will fit now but I might see if I can squeeze something in somehow.

20180118_223245_001 by markleecarter, on Flickr

20180118_223300 by markleecarter, on Flickr

20180118_223307 by markleecarter, on Flickr

Not sure which scheme yet but I am leaning towards a fairly straight copy of the one that used to hang in the IWM in Lambeth which I think is now at Duxford.

Offline RAGIII

  • Hero Member
  • *****
  • Posts: 18845
Re: Roden Be2c 1/48 (Mojo Build)
« Reply #10 on: January 19, 2018, 09:27:43 PM »
The engine is beautiful! Overall a fantastic build. I am looking forward to seeing the next update!
RAGIII
"A man has to know his limitations": Harry Callahan

"Don't slop it on" Lynda Geisler

Offline Softscience

  • Full Member
  • ***
  • Posts: 245
Re: Roden Be2c 1/48 (Mojo Build)
« Reply #11 on: January 19, 2018, 10:54:55 PM »
great looking engine. The spark plug wires are a nice addition.

Offline Borsos

  • Hero Member
  • *****
  • Posts: 3321
Re: Roden Be2c 1/48 (Mojo Build)
« Reply #12 on: January 19, 2018, 11:52:07 PM »
Nice start on this rarely  modelled bird. I will follow your progrss with great interest.
Best regards
Borsos
"Deux armées aux prises, c'est une grande armée qui se suicide."
Barbusse.
"Ein Berg in Deutschland kann doch einen Berg in Frankreich nicht beleidigen. Oder ein Fluß oder ein Wald oder ein Weizenfeld."
Remarque.

Offline lone modeller

  • Hero Member
  • *****
  • Posts: 5322
Re: Roden Be2c 1/48 (Mojo Build)
« Reply #13 on: January 20, 2018, 06:04:44 AM »
I too always wanted a BE 2c in my collection - I think that it was an important aircraft. Judging by this blog you have certainly got your mojo back, and what skill! Beautiful interior and engine - am looking forward to seeing more.

Stephen.

Offline markleecarter

  • Full Member
  • ***
  • Posts: 114
Re: Roden Be2c 1/48 (Mojo Build)
« Reply #14 on: January 23, 2018, 07:13:13 PM »
Thanks again everyone for all your kind words and encouragement.

A little update now I have got a bit of paint on. It's still base coats and I will be adding some shading and slight weathering once I'm a bit further along. The wood actually has some subtle grain but it is completely invisible in the photo. I spent a long time trying to get a shade of grey on the cowling that I was happy with as every colour seemed to dry an entirely different shade to how it looked when wet. I've now reached the maximum number of layers before all the detail gets lost so I'll leave the colour as is.

I've also just taped the rudder fin in place and it is my first go at painting the rudder rather than using a decal. I am quite pleased! All paints are done with a hairy stick.

2018-01-23_08-46-33 by markleecarter, on Flickr