Author Topic: 1/32 Fokker v.23 - my first scratchbuild  (Read 19967 times)

Offline kensar

  • Hero Member
  • *****
  • Posts: 2503
  • Reshaping the world - one piece at a time.
Re: 1/32 Fokker v.23 - my first scratchbuild
« Reply #45 on: March 24, 2018, 11:01:02 PM »
Thank you GrazzaS. I appreciate your posting.

Ken

Offline RAGIII

  • Hero Member
  • *****
  • Posts: 18793
Re: 1/32 Fokker v.23 - my first scratchbuild
« Reply #46 on: March 24, 2018, 11:05:03 PM »
Your cockpit looks as good as ANY super detailed WNW DVII pit! Of course even better in that it is scratch built!!
RAGIII
"A man has to know his limitations": Harry Callahan

"Don't slop it on" Lynda Geisler

Offline lcarroll

  • Administrator
  • Hero Member
  • ******
  • Posts: 8547
Re: 1/32 Fokker v.23 - my first scratchbuild
« Reply #47 on: March 24, 2018, 11:18:50 PM »
    Incredibly beautiful detail Ken, and it looks real to a degree I truly envy! Scratch Built you say? This is some very impressive work, great modelling!
Cheers,
Lance

Online PrzemoL

  • Hero Member
  • *****
  • Posts: 4853
  • There was Eru... and he made first the Ainur...
    • Przemysław Litewka
Re: 1/32 Fokker v.23 - my first scratchbuild
« Reply #48 on: March 27, 2018, 10:35:01 PM »
Great modelling. Spectacular results with that cockpit.
Ash nazg durbatuluk, ash nazg gimbatul,
Ash nazg thrakatuluk, agh burzum-ishi krimpatul.

Offline GAJouette

  • Hero Member
  • *****
  • Posts: 3579
  • " Beware of the Spanish Inquisition"
Re: 1/32 Fokker v.23 - my first scratchbuild
« Reply #49 on: March 28, 2018, 02:55:46 AM »
 Ken,
Excellent work on her cockpit section my friend. I'm looking forward to seeing it with the seat and belts in place. Keep up the high excellence!
Highest Regards,
Gregory Jouette
" What Me Worry"

Offline dr 1 ace

  • Hero Member
  • *****
  • Posts: 2340
Re: 1/32 Fokker v.23 - my first scratchbuild
« Reply #50 on: March 28, 2018, 08:33:38 AM »
Great work all the way around !

Ed
Life is short, enjoy it, nobody gets out alive.

Offline kensar

  • Hero Member
  • *****
  • Posts: 2503
  • Reshaping the world - one piece at a time.
Re: 1/32 Fokker v.23 - my first scratchbuild
« Reply #51 on: April 02, 2018, 09:27:26 AM »
I am honored to see such complementary comments from you heavy hitters.  Thank you. 
I try to improve my techniques and try new things on every model I build.  I have made lots of scratchbuilt parts, but this is the first whole model I have scratchbuilt.

Update for April 1

Seems like things are going slow at this point, but I have put in a lot of time.  I corrected the wings and painted them, and worked out the control connections.  Decalling is started.  I have simulated rib taping with decal strips on the rudder.  I moved the cockpit forward some to better match the photos.  One major learning I am taking away from this build is do not trust drawings made by others.  I based the model on some drawings that just didn't match the photos and this is the reason for all the corrections.

I have made engine covers from sheet aluminum.  They are very fragile, so this may not be a good construction technique for some applications.  I have not decided how to finish them as yet. I also have some aluminum tape used for HVAC ductwork that looks like a good covering material, like Bare Metal Foil, only thick enough to sand and polish.
Covers in place for a test fitting.


The crankcase on the engine was so twisted that I elected to cut the cylinders free and just mount the cylinders in the model.  only the very top will be showing.  One has to be practical.
continuing on...
« Last Edit: April 21, 2018, 05:32:29 AM by p9o1r1sche »

Offline lcarroll

  • Administrator
  • Hero Member
  • ******
  • Posts: 8547
Re: 1/32 Fokker v.23 - my first scratchbuild
« Reply #52 on: April 02, 2018, 10:20:07 AM »
    Your engine cover cowlings look great, what gauge or thickness is the stock and where did you get it? I'd really like to try to do some similar and any
hints would be much appreciated!
Cheers,
Lance

Offline GAJouette

  • Hero Member
  • *****
  • Posts: 3579
  • " Beware of the Spanish Inquisition"
Re: 1/32 Fokker v.23 - my first scratchbuild
« Reply #53 on: April 02, 2018, 11:39:03 AM »
 Ken,
That's just awesome work my friend. I can't wait to see more!
Highest Regards,
Gregory Jouette
" What Me Worry"

Offline RLWP

  • Hero Member
  • *****
  • Posts: 1494
  • Bodger
Re: 1/32 Fokker v.23 - my first scratchbuild
« Reply #54 on: April 02, 2018, 07:40:37 PM »
I moved the cockpit forward some to better match the photos.  One major learning I am taking away from this build is do not trust drawings made by others.  I based the model on some drawings that just didn't match the photos and this is the reason for all the corrections.

Indeed. My take is a drawing is as much a model of an aeroplane as the the 3D thing I'm making. And making models of models isn't a good way of recreating 'planes.

Someone had to do some research, study pictures and use what reference material they could to make the drawings. They work to the best of their ability and in good faith, they are not infallible. Best to do your own research too - you'll probably learn something

Richard
Hendon for flying - the fastest way to the ground!

Offline RAGIII

  • Hero Member
  • *****
  • Posts: 18793
Re: 1/32 Fokker v.23 - my first scratchbuild
« Reply #55 on: April 02, 2018, 11:26:40 PM »
Continuing to be an outstanding piece of scratch building! I Love your cowl panels!
RAGIII
"A man has to know his limitations": Harry Callahan

"Don't slop it on" Lynda Geisler

Offline kensar

  • Hero Member
  • *****
  • Posts: 2503
  • Reshaping the world - one piece at a time.
Re: 1/32 Fokker v.23 - my first scratchbuild
« Reply #56 on: April 03, 2018, 01:56:53 AM »
Hello Lance - The aluminum is from a pie pan shown in post #8.  It is 0.006" thick and is partially work hardened from the pressing operation to form the pan.  I am able to cut it with scissors and can sand the edges carefully for fine shaping.  The scissors will deform the edge when cut, so I flatten it back out by rolling the smooth handle of a hobby knife over the metal against a hard surface.  Rolling the knife handle on the metal also makes it curl slightly, so if I want it flat, I turn it over and roll against the other side.  The more pressure you apply when rolling, the more curl.  I attempted to do this engine cover in metal because it is basically a simple curve.  If it was a compound curve, I would have gone with vac-formed styrene like I did for the bottom cowling.  I made a paper pattern to start with (seen in the first photo of my last post).

Richard - You are right about drawings.  This plane has next to no documentation and only a few pictures to go by -  A double edged sword as you can make up your own details, but the overall look should match photos as much as possible.

Gregory and RAGIII - thanks for following along and posting.  Its nice to know others are interested.
I'll soon be working on landing gear.  I found some rubber O rings I can use for tires.  The wheels will require more lathe work, which I like doing.

Offline kensar

  • Hero Member
  • *****
  • Posts: 2503
  • Reshaping the world - one piece at a time.
Re: 1/32 Fokker v.23 - my first scratchbuild
« Reply #57 on: April 09, 2018, 02:34:11 AM »
Update for April 8

Made some significant  progress lately.  Decaled the fuselage and put on the aluminum panels, installed the harness in the cockpit, and started the landing gear.
Again, sorry for the blurry pictures.

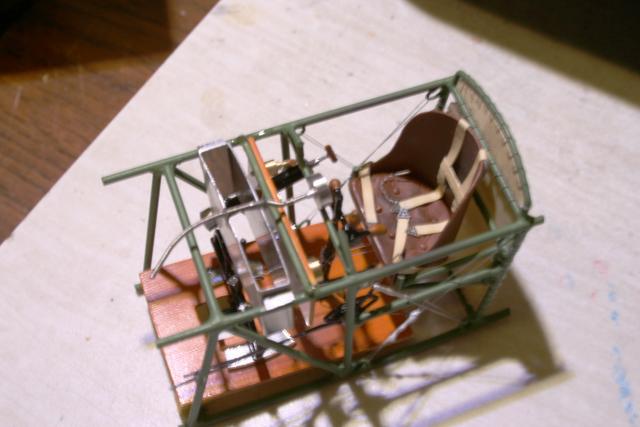
Finished cockpit before installing in fuselage.


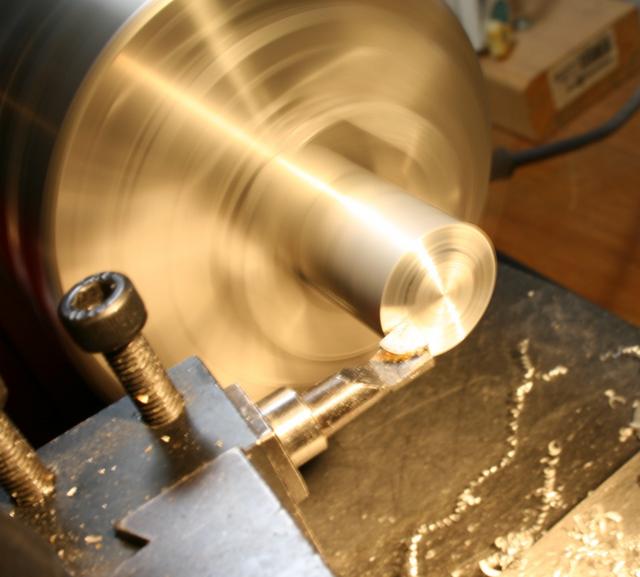
Turning the wheels.  Made them in two halves which will be glued together.  Hard to get a good picture with all the reflections, but the cutter is making the dished part of the wheel.


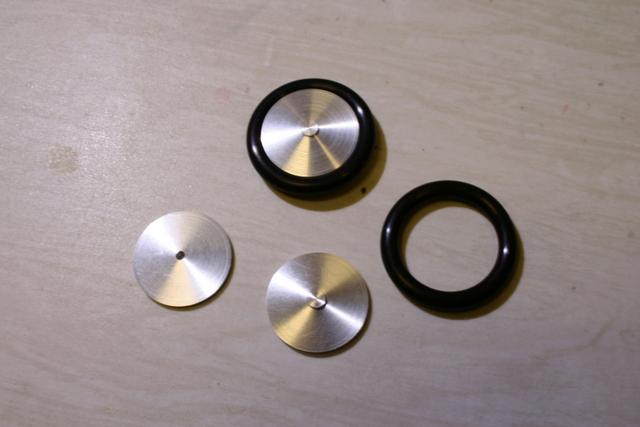
Finished wheels - the two halves and one assembled.  O rings for tires.


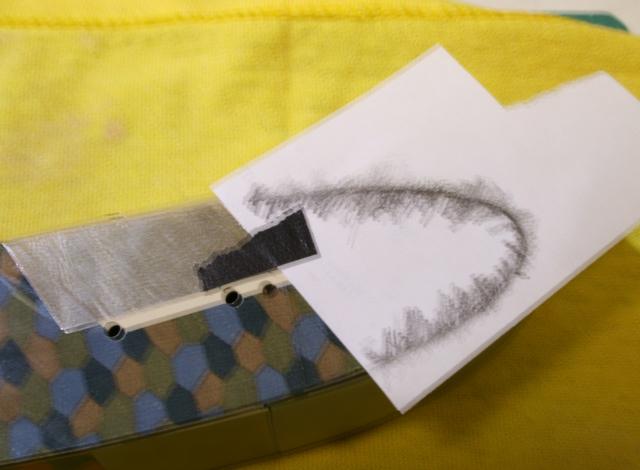
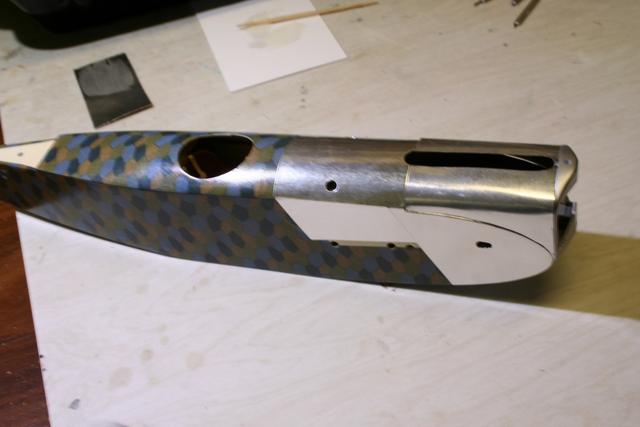
Making a pattern for the front of the cowling.  The rear part is on.  Made these with aluminum tape used for air conditioning ductwork.  It can be difficult to work with as the adhesive is very strong, so it can't be pulled up without ruining it, and it will lift up any decal it is applied on.


This shot shows the aluminum work done.  I will tone it down with some Tamiya flat clear after installing the engine cylinders and exhaust.  I will detail it with fasteners and access hatches.


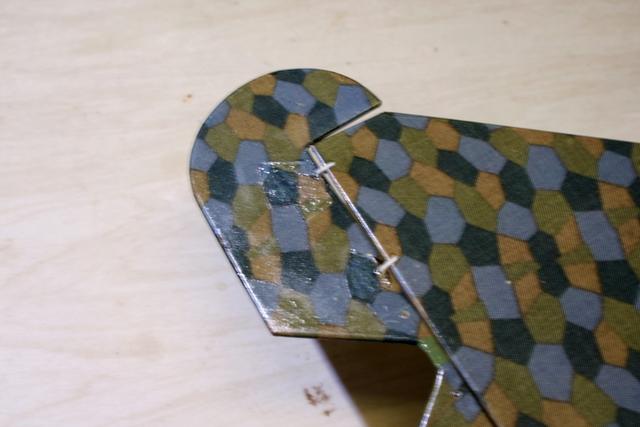
Disaster struck when I glued the elevator the to horizontal stabilizer.  The liquid cement ran over the elevator and ruined the decals in a couple of spots, which I patched.  Pattern-wise it looks good, but the surface is rough now.  The white hinges will be painted a dark gray.  Rib stitching tape to be added to the horizontal stabilizer.


So that's where I'm at presently.  I've started on the landing gear struts and the airfoil for the axle.

Till next time...
« Last Edit: April 21, 2018, 05:33:17 AM by p9o1r1sche »

Offline RLWP

  • Hero Member
  • *****
  • Posts: 1494
  • Bodger
Re: 1/32 Fokker v.23 - my first scratchbuild
« Reply #58 on: April 09, 2018, 03:45:11 AM »
Now, 'O' rings for tyres. I painted mine on the Morane Saulnier with Halfords Primer, then grey acrylic paint. They have gone sticky and split

Do a test with your intended paint

Oh, and lathe photography - after a lot of failures, I usually take pictures with the motor off now. It's less stressful so I get better pictures

I love those aluminium panels

Richard
Hendon for flying - the fastest way to the ground!

Offline krow113

  • Sr. Member
  • ****
  • Posts: 458
Re: 1/32 Fokker v.23 - my first scratchbuild
« Reply #59 on: April 09, 2018, 05:36:01 AM »
Going well!
Try sanding those O ring tires with steel wool or different grades of paper . Ive put rubber tires on a pill bottle and into the lathe for some quick 'miles' with sandpaper.