Author Topic: Caudron GIV 1/72 scratch build  (Read 21306 times)

Offline Ernie

  • Hero Member
  • *****
  • Posts: 3961
  • "Once more into the breach"
Re: Caudron GIV 1/72 scratch build
« Reply #15 on: July 26, 2016, 06:28:36 PM »
Nice start with the cowlings, Stephen.  My friend you are a brave
soul and must have nerves of steel for building those gorgeous tiny
Le Rhone's.  As always, my friend, your builds are truly spellbinding to follow!

Cheers,
Ernie :)
The new old guy, take two...

Offline Bolman

  • Full Member
  • ***
  • Posts: 158
Re: Caudron GIV 1/72 scratch build
« Reply #16 on: August 02, 2016, 03:00:54 AM »
Wow, I totally missed this one starting. Thanks for the heads up. Excellent start!!

John

Offline Manni

  • Hero Member
  • *****
  • Posts: 1768
    • Der Militärmodellbauer
Re: Caudron GIV 1/72 scratch build
« Reply #17 on: August 02, 2016, 04:00:37 PM »
I love that plane. I will be watiching your progress with interest.
Manni
"Ich hab' da mal was vorbereitet.": Jean Pütz
"Warum noch mehr Bausätze?!?": meine Frau

Offline gbrivio

  • Hero Member
  • *****
  • Posts: 1681
Re: Caudron GIV 1/72 scratch build
« Reply #18 on: August 03, 2016, 04:56:46 AM »
Very attractive aeroplane to reproduce and fine start with those nice cowlings. Good luck with your scratchbuild.
Also compliments to Eugeny for the engines: I bought a couple in the finished line (is quite cheating but eye relieving!)
 and they are real jewels.
Giuseppe.

Offline RAGIII

  • Hero Member
  • *****
  • Posts: 18793
Re: Caudron GIV 1/72 scratch build
« Reply #19 on: August 16, 2016, 12:49:50 AM »
You are off to your usual great start. The cowlings look perfect!
RAGIII
"A man has to know his limitations": Harry Callahan

"Don't slop it on" Lynda Geisler

Offline lone modeller

  • Hero Member
  • *****
  • Posts: 5300
Re: Caudron GIV 1/72 scratch build
« Reply #20 on: August 16, 2016, 07:46:01 AM »
Evening All,

Many thanks Ernie, John, Manni, Giuseppe and Rick for dropping by and leaving your encouraging remarks.

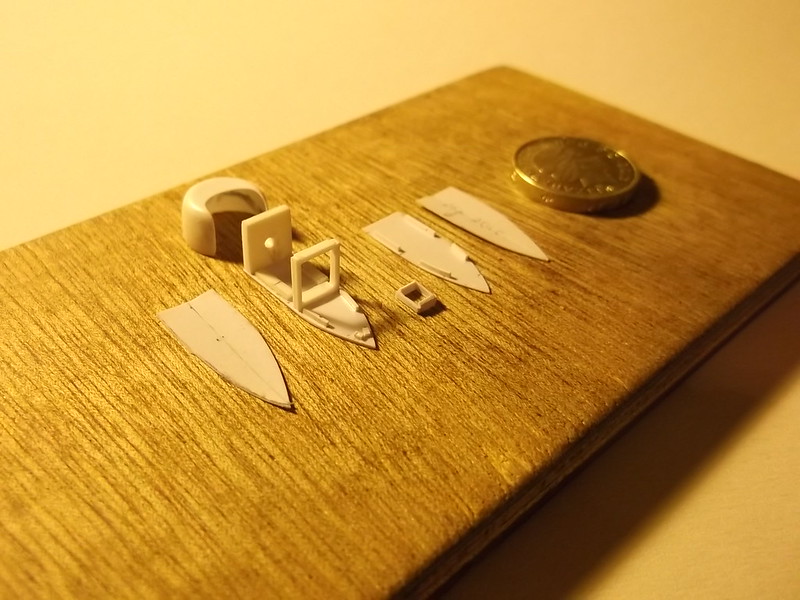
I decided, when I planned this build, that I would start with the cowlings and engine nacelles as I think that these will present the most difficult parts to make. Well the cowlings were fairly straightforward and I managed to finish those fairly quickly. The nacelles have proved to be otherwise. I have had three tries and have now got myself in a position where I hope I can finally assemble one which will look something like the nacelle on a real aircraft. The problem has been that the rear of the nacelle tapers and is curved at the same time. Getting 4 pieces of 20thou card to bend and form a neat and square point at the rear of the nacelle has proved to me that my intuition was correct: getting the nacelles right is probably going to be the most difficult part of this model. In fact I still do not have a complete one but I am close: the photo shows the parts of an earlier (failed attempt).


Briefly the nacelles will be made as follows:
The front is a square of 60 thou card with a hole drilled to take a pin to support the engine;
the four sides are from 20 thou card which has to be shaped to a point at the rear, but the edges have to curve. The sides are also not flat so I ran the back of my modelling knife down the centre line on the inside to score a slight outward bulge;
the top and bottom plates must have small notches cut in them to allow the struts to be cemented to the side plates and pass through the top and bottom plates. It is essential that the notches in the top and bottom line up exactly because the struts are vertical. The distance between the notches had also to be carefully measured as they have to align with the other interplane and cabane struts, and the nacelles have to be in the correct position with respect to the wings etc.;
I put small pieces of scrap strip along the edges of the top and bottom plates to help to keep the structure square and hold the corners while they dry out;
4 struts per nacelle had to be shaped from 20 x 30 thou Evergreen strip.

The struts were glued to the nacelle sides, formers put on to the bottom plate to help keep the whole thing square and then the top and side plates were cemented in place. The the fun began. Getting the four plates to come together at the rear to form a neat symmetrical shape, stay in place while I tried to secure them with liquid cement and not get cement everywhere except along the join, and then hold their shape while the cement dried proved to be a little tricky. In fact on the first attempt I managed to get an odd shape, cement everywhere and the struts were not properly aligned, so it went into the bin. The second attempt was better but I did not get the right curves on the sides and top and bottom plates so I decided to abandon that one too. Instead I decided to start work on the wings...

I have now got a the parts ready for the third nacelle and I will change my method of assembly to try to avoid the glue everywhere problem: I will assemble the forward part of a nacelle where everything is square and then join the top and one side at the rear first, allow that to dry out and then repeat the operation for the remaining side and bottom. I think this will work…

The wings are quite complex too. The trailing edge was very thin because the wing was made in a conventional manner for the forward part: two layers of canvas secured to ribs. However the rear edge of the upper surface was folded back on itself and stitched to the lower sheet to form a slope, and the trailing edge of the wing consisted of the lower sheet of canvas with the ribs exposed above. To represent this I have decided to make the wings from a sheet of 20thou card cemented to a wider strip of 10 thou card. I had sanded the trailing edge of the 20 thou strips to thin them down prior to joining the strips together: later I will reduce the step between the two sheets with paint filler. I will also represent the ribs with Evergreen strip. 

[/ur]

Hopefully I can show the completed nacelles in the next post.

Thanks for looking.

Stephen.
« Last Edit: July 02, 2017, 06:58:24 PM by lone modeller »

Offline lone modeller

  • Hero Member
  • *****
  • Posts: 5300
Re: Caudron GIV 1/72 scratch build
« Reply #21 on: August 29, 2016, 04:25:35 AM »
Evening All,

At last I have something substantive to report after what has been a bit of a frustrating period. At the third and fourth attempts I have finally managed to make a pair of engine nacelles that I can call acceptable.

The struts were glued to the side panels before the top and bottoms were glued into place. I glued the front ends of the nacelles first and allowed these to dry a bit before bending the top and bottom and gluing these and holding them with a simple clasp. When this was dry I carefully bent the sides round and glued these with liquid cement, again holding the assembly with clasps. That did the trick - no glue where I did not want it and the taper at the rear of the nacelle was as it should be. Just a tiny amount of filler on on of the nacelles was needed to seal some gaps. The I added the filler caps and the small fuel gauges on the sides: the latter were made by rounding the end of a piece of 60 the rod and cutting it off to glue into place. Once I had got the hang of putting these together they were actually quite easy - just had to go up the learning curve first.


I have also spent quite a lot of time on the wings. I have put 10 thou strips on the undersides and sanded the trailing edges of the thicker sections on the top sides of the wings. Then I added the ribs on the tops of the wings and on the trailing sections from 10 x 20 thou strip and sanded all of the ribs down so that they taper to the railing edges. I have also taken out the trailing edge scallops with a round file and fine glass paper. Now I have to fill the step at the edge of the 20 thou card to give the slope on the trailing edges of the tops of the wings - I intend to use ordinary filler and paint for this job. I am expecting that the latter is going to take a long time - certainly adding and sanding all of those ribs has so far!


Thanks for looking.

Stephen.
« Last Edit: July 02, 2017, 07:03:10 PM by lone modeller »

Offline Des

  • Administrator
  • Hero Member
  • ******
  • Posts: 9325
    • ww1aircraftmodels.com
Re: Caudron GIV 1/72 scratch build
« Reply #22 on: August 29, 2016, 04:31:12 AM »
You are making excellent progress Ian.

Des.
Late Founder of ww1aircraftmodels.com and forum.ww1aircraftmodels.com

Offline IanB

  • Hero Member
  • *****
  • Posts: 2435
Re: Caudron GIV 1/72 scratch build
« Reply #23 on: August 29, 2016, 09:30:34 AM »
Beautiful work on the nacelles and wings Stephen...I think Des has been on the vino......   ;)

Ian

Offline Manni

  • Hero Member
  • *****
  • Posts: 1768
    • Der Militärmodellbauer
Re: Caudron GIV 1/72 scratch build
« Reply #24 on: August 29, 2016, 04:14:15 PM »
Wonderful. But be careful and do not sneeze.
Manni
"Ich hab' da mal was vorbereitet.": Jean Pütz
"Warum noch mehr Bausätze?!?": meine Frau

Offline dr 1 ace

  • Hero Member
  • *****
  • Posts: 2340
Re: Caudron GIV 1/72 scratch build
« Reply #25 on: August 30, 2016, 04:48:01 AM »
Excellent start, must be a real 1/72 fan as not to wait for the 1/48 Copperstate edition coming soon....


Ed
Life is short, enjoy it, nobody gets out alive.

Offline Borsos

  • Hero Member
  • *****
  • Posts: 3315
Re: Caudron GIV 1/72 scratch build
« Reply #26 on: August 30, 2016, 10:25:19 PM »
You made fantastic engine nacelles! And you got the shape of the wings really nice. This is going to be a wonderful model, I cannot wait to see it finished!
Borsos
"Deux armées aux prises, c'est une grande armée qui se suicide."
Barbusse.
"Ein Berg in Deutschland kann doch einen Berg in Frankreich nicht beleidigen. Oder ein Fluß oder ein Wald oder ein Weizenfeld."
Remarque.

Offline ALBATROS1234

  • Hero Member
  • *****
  • Posts: 2657
Re: Caudron GIV 1/72 scratch build
« Reply #27 on: August 31, 2016, 06:54:45 AM »
Very nice work so far. I am glad you solved the nacelle issues. My first instinct as I read the story above was to think maybe using a piece of square hardwood stock and then sand to shape and then vacuform with the rear point facing up. But it seems you have it well I'm hand.cheers

Offline Thumbs up

  • Hero Member
  • *****
  • Posts: 568
Re: Caudron GIV 1/72 scratch build
« Reply #28 on: September 02, 2016, 12:34:43 AM »
Wonderful work so far! My solution to the wing rib fabric effect would to get some flexible paper masking tape and wrap the wing in it,then mould the tape around the ribs.I was contemplating this on my Caudron build.Also the tape has a CDL colour to it.

Offline lcarroll

  • Administrator
  • Hero Member
  • ******
  • Posts: 8546
Re: Caudron GIV 1/72 scratch build
« Reply #29 on: September 02, 2016, 01:00:32 AM »
I've been quietly following your progress on this one Stephen, and must compliment you on your patient and persistent approach to the challenges of the cowlings and nacelles, great work and results! This one will be another stunning model, and a pleasure to follow.
Cheers,
Lance