Author Topic: Meng FT 17 1:16 Diorama  (Read 20059 times)

Offline Edo

  • Hero Member
  • *****
  • Posts: 702
Re: Meng FT 17 1:16 Diorama
« Reply #15 on: July 19, 2016, 05:15:53 PM »
Hi all!
thank you for the feedback!
My children, luky them!, are at the seaside with grandpa and grandma so I had last week end all to myself and could spend it on the modelling bench  :)
I managed to do a lot of work on the engine, the transmission, radiator and even the comparment wall of the driving section of the tank.
I find that it is difficult to adapt to a larger scale: i always seem to understimate te correct size of the addition I want to make...
anyway here is the engine, almost done I'd say


I subsituted all the springs with copper wire and added a tap on the pipe. I also added "something" on the top of the engine: there are 4 cilynders on tthe engine, 4 candels and 4 "empty" spaces on the head of the engine. In an interesting video I found here (https://www.youtube.com/watch?v=QaQI9Qgeq6M) one can see that those spaces aren't empty at all (I kinda guess how those thing work but I can't really understand, nor know their name...)

This is the transmmission


The radiator


and the compartment wall


That is all for now!
ciao
Edo

Offline Borsos

  • Hero Member
  • *****
  • Posts: 3315
Re: Meng FT 17 1:16 Diorama
« Reply #16 on: July 19, 2016, 07:19:28 PM »
Edo, this is a wonderfully built engine, really first class! I am keen on seeing the whole tank!
Borsos
"Deux armées aux prises, c'est une grande armée qui se suicide."
Barbusse.
"Ein Berg in Deutschland kann doch einen Berg in Frankreich nicht beleidigen. Oder ein Fluß oder ein Wald oder ein Weizenfeld."
Remarque.

Offline Des

  • Administrator
  • Hero Member
  • ******
  • Posts: 9325
    • ww1aircraftmodels.com
Re: Meng FT 17 1:16 Diorama
« Reply #17 on: July 19, 2016, 07:26:38 PM »
Superb workmanship on the engine and transmission Edo, and the radiator looks very good as well.

Des.
Late Founder of ww1aircraftmodels.com and forum.ww1aircraftmodels.com

Offline IanB

  • Hero Member
  • *****
  • Posts: 2435
Re: Meng FT 17 1:16 Diorama
« Reply #18 on: July 19, 2016, 11:18:02 PM »
Nice work Edo.
I think the "empty spaces" you refer to are the primer cups, they are used to add fuel into each cylinder to help start the engine. The "candels" are called spark plugs in English. I'm looking forward to seeing this progress!

Ian

Offline Mark

  • Sr. Member
  • ****
  • Posts: 258
Re: Meng FT 17 1:16 Diorama
« Reply #19 on: July 20, 2016, 01:42:46 AM »
Yep, the "empty spaces" are for the primer cups, one for each cylinder. If I remember correctly, the layout is:

cup -- plug -- plug -- cup -- cup-- plug -- plug -- cup

Your engine looks GREAT!!! Hope I can approach that on my 1/35th model :)

Mark G

Offline coyotemagic

  • Hero Member
  • *****
  • Posts: 7710
  • "Here's to not buggering it up." -Winston Chuchill
    • My Models
Re: Meng FT 17 1:16 Diorama
« Reply #20 on: July 20, 2016, 02:03:47 AM »
Extraordinary work on the engine, Edo!  I doubt you would've achieved such flawless results with the kids around.  ;)
Cheers,
Bud
"All men dream: but not equally. Those who dream in the dark recesses of the night awake in the day to find all was vanity. But the dreamers of day are dangerous men, for they may act their dreams with open eyes, and make it possible." -T. E. Lawrence

Offline lone modeller

  • Hero Member
  • *****
  • Posts: 5300
Re: Meng FT 17 1:16 Diorama
« Reply #21 on: July 20, 2016, 02:45:00 AM »
That engine looks as though it is ready to have fuel put into those primer cups and then started. But do not forget to connect the equally brilliant radiator first or it will overheat and seize up!

Stephen.

Offline gbrivio

  • Hero Member
  • *****
  • Posts: 1681
Re: Meng FT 17 1:16 Diorama
« Reply #22 on: July 20, 2016, 02:54:35 AM »
The engine is full a model by itself, and a great model. Can't wait to see the whole thing.
Giuseppe

Offline Edo

  • Hero Member
  • *****
  • Posts: 702
Re: Meng FT 17 1:16 Diorama
« Reply #23 on: August 01, 2016, 06:10:53 PM »
Hi all! thank you for the support!
Tonight where I live was struck by a thunderstorm big enough to disrupt the sinking and savage network resulting in a couple of cm of water all over my basement!
Not a big deal, but it took good 3 hours of work by my wife and me to get going and it is still not completely over... fortunately my models were high above the floor  ::)...
My thought goes to all the people hit by a real flooding... that has to be really a disaster, one that I have always undervalued and what happened is a good lesson I had learned.

Anyway... here are some pic of the tank.
I started working at the interior:


The seat (quite crude in the model) is enhanced as Mastro Bertl has shown us.

The transmission needed some extra work as he fitting is not good: something like 2 mm too back which results in a non square engine wall, so I had to reduce the starting gear and a little of the transmission itself...


And started working on the left hand side


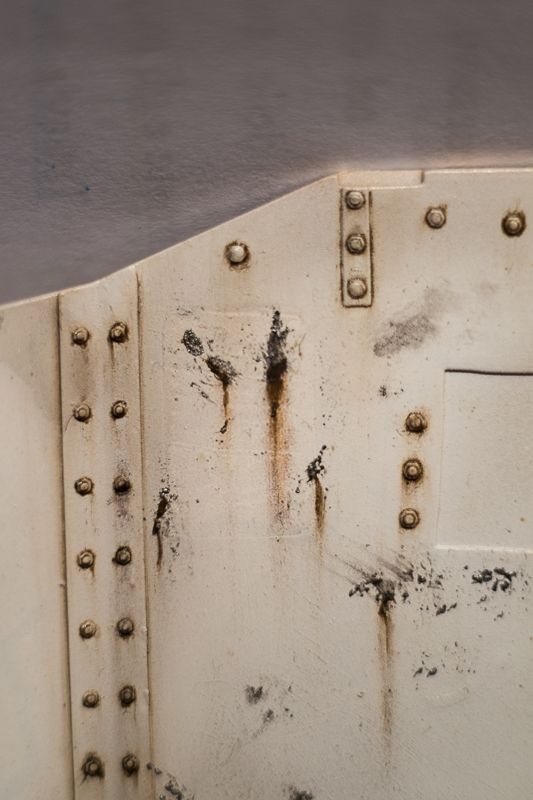
This is a close up of the rear left side to show the weathering I did: after a wash with raw umber, I used a sponge to apply a mix of black and silver to simulate chipping that was subsequently rusted with raw umber and pastels.
LOTS of ejection marks had to be removed something that i HATE to do... maybe is all wasted time as almost nothing will be seen in the end, but those roundels all over the surface is something I just can't live with  >:(
I also filled the area where the spare tank will be located as I want to show it outside the tank itself (more on that later, but if you look closely you can see whare it was supposed to be).

I laso enhanced (at least I hope so...  ::)) the gears in the driving compartment


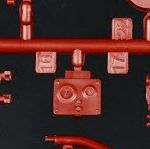
I haven't a picture of the original part, but this is what I found on the Net so you can see the difference


And this is why I cut a hole in the floor to accomodate the cabling under the driving compartment, not sure of the accuracy, but those gear HAVE to be connected to something  ::)
Well this is it for now...
ciao
Edo

Offline Manni

  • Hero Member
  • *****
  • Posts: 1768
    • Der Militärmodellbauer
Re: Meng FT 17 1:16 Diorama
« Reply #24 on: August 01, 2016, 07:04:45 PM »
Wow! I was just three weeks on vacation and...bam you have made a perfect looking motor and transmission. Beautiful.
Manni
"Ich hab' da mal was vorbereitet.": Jean Pütz
"Warum noch mehr Bausätze?!?": meine Frau

Offline Des

  • Administrator
  • Hero Member
  • ******
  • Posts: 9325
    • ww1aircraftmodels.com
Re: Meng FT 17 1:16 Diorama
« Reply #25 on: August 01, 2016, 07:34:38 PM »
You are doing a superb job with this build Edo, your attention to detail is excellent.

Des.
Late Founder of ww1aircraftmodels.com and forum.ww1aircraftmodels.com

Offline coyotemagic

  • Hero Member
  • *****
  • Posts: 7710
  • "Here's to not buggering it up." -Winston Chuchill
    • My Models
Re: Meng FT 17 1:16 Diorama
« Reply #26 on: August 02, 2016, 02:13:40 AM »
Truly remarkable interior work, Edo!
Cheers,
Bud
"All men dream: but not equally. Those who dream in the dark recesses of the night awake in the day to find all was vanity. But the dreamers of day are dangerous men, for they may act their dreams with open eyes, and make it possible." -T. E. Lawrence

Offline kornbeef

  • Hero Member
  • *****
  • Posts: 961
  • U.K. Carpet monster genocide squad leader.
Re: Meng FT 17 1:16 Diorama
« Reply #27 on: August 02, 2016, 02:34:18 AM »
Looking very nice Edo as your builds always do.  I like the subtle tonal difference around the area where the tank would have been A sweet touch.

1:16th really begs for those extra details I know (building Trumpeters 1:16th Pz.Kpw IV Ausf F right now and its missing tons of detail inside.)  This FT kit is on special offer in one of my two surviving Bricks and Mortar Model shops and it begs me to buy it everytime I go in.

Keep up the work

Keith
Never too old to learn sumfink noo

Offline lone modeller

  • Hero Member
  • *****
  • Posts: 5300
Re: Meng FT 17 1:16 Diorama
« Reply #28 on: August 02, 2016, 02:47:54 AM »
That is a really superb set of extra detailing and the paintwork is very convincing. The stains look really realistic.

Stephen.

Offline Edo

  • Hero Member
  • *****
  • Posts: 702
Re: Meng FT 17 1:16 Diorama
« Reply #29 on: August 02, 2016, 05:14:18 PM »
Thank you mates!
Your encouragement is very much appreciated!  :D

I am now working on 2 command lever (206-208 in the picture below I found on the Internet thank to Borsos advised link) Not sure what they are for, but sure need some attention as in the kit offering they are very basic.


see you soon!
ciao
edo