Author Topic: Otto Doppeldekker 1/72  (Read 11639 times)

Offline lone modeller

  • Hero Member
  • *****
  • Posts: 5317
Re: Otto Doppeldekker 1/72
« Reply #30 on: November 03, 2015, 06:31:30 AM »
Evening All,

As my last comment to Lance states, I have not been able to get much done recently, but what little I have achieved I am posting here. Basically it amounts to some work on the engine and bending some card from which I can cut the wings. The engine block was made from laminated card with smaller pieces to represent the bottom and rear of the block. The cylinders were cut from 60thou rod and I have drilled out holes for the inlet and outlet pipes.


The engine has been painted in basic colours and I have started to measure and cut the external rods which will be on the sides of the cylinders - they are to be fitted next. Then I can start on the wings.


Thanks for looking.

Stephen.
« Last Edit: August 12, 2017, 08:23:33 AM by lone modeller »

Offline pietro

  • Full Member
  • ***
  • Posts: 204
  • What?! Are you kidding?!
Re: Otto Doppeldekker 1/72
« Reply #31 on: November 05, 2015, 03:22:00 PM »
Stephan, Your scratch-building skills in 1/72 scale are truly remarkable, keep up the good work!
Pietro

Offline radio

  • Hero Member
  • *****
  • Posts: 3952
Re: Otto Doppeldekker 1/72
« Reply #32 on: November 08, 2015, 03:18:00 AM »
Wow great work.
Cheers
Martin

Offline Des

  • Administrator
  • Hero Member
  • ******
  • Posts: 9325
    • ww1aircraftmodels.com
Re: Otto Doppeldekker 1/72
« Reply #33 on: November 08, 2015, 07:06:04 AM »
Lovely work on the engine Stephen.

Des.
Late Founder of ww1aircraftmodels.com and forum.ww1aircraftmodels.com

Offline Old Man

  • Hero Member
  • *****
  • Posts: 600
Re: Otto Doppeldekker 1/72
« Reply #34 on: November 08, 2015, 10:51:15 AM »
This is coming along very nicely, Sir.

Great job on the motor.

Offline RAGIII

  • Hero Member
  • *****
  • Posts: 18840
Re: Otto Doppeldekker 1/72
« Reply #35 on: November 09, 2015, 12:10:37 AM »
Your engine is coming along beautifully! Outstanding as always!
RAGIII
"A man has to know his limitations": Harry Callahan

"Don't slop it on" Lynda Geisler

Offline lone modeller

  • Hero Member
  • *****
  • Posts: 5317
Re: Otto Doppeldekker 1/72
« Reply #36 on: November 09, 2015, 04:45:15 AM »
Evening All,

First my sincere thanks to all of you who have made positive comments on the build so far. I really do appreciate them, especially at times like the present when I seem to start to get somewhere only to be distracted by events in life……. and there are more on the way later this week!

Back to the model. I made the wings from 30thou plastic card using an idea from Stevehed that was posted on another site. I took a length a length of plastic drain pipe which has the end sealed with a cap which I bought from my local DIY store. The pipe is approximately 12 inches (30 cm) long and has a diameter of approximately 5 inches (12.5cm). I place the card into the tube and hold it back against the side with a wooden stick. Then I pour in boiling water and hold the plastic in the water for about 10 seconds after which I pour the water away and take out the card. The card is suitably curved and lengths of flying surface can be marked on and then cut out in the usual way.


The tail surfaces were cut from unbent card. The aerofoil section was achieved by filing and sanding the leading edges and heavily sanding towards the trailing edges. The trailing edge scallops were marked out in pencil before I shaped them with a round file. All surfaces had ribs added from 10 x 20 thou Evergreen strip which was sanded down when dry and then the sides smoothed a little with several coats of Humbrol white enamel.


The shape of the wings is as per the plans that I have - there were undoubtedly variations on this basic shape - just another feature of this particular type which makes building one a bit of a lottery to get the details right. However as I have written before I am concerned to have the basic shape right as I am not trying to build a model of a specific machine.

The top wing has a considerable span (about 8 inches - 25cm) and I am therefore concerned whether it will sag at the tips when it is mounted. I am reluctant to use laminated plastic sheet as that causes so much more work so I have tried a simple test to see what the likelihood of the wing sagging might be. I have held the wing at the points where the cabane struts will be located and was pleasantly surprised to see that there appears to be no sag at all - so I am hoping that this will follow through when I finally get to the point of putting the wing into place. I think that the curvature of the plastic may be imparting more strength than the plastic sheet would have it was flat. If it does not work there will be much gnashing of teeth and other unbiblical sounds which will not be spelled out here as this is a polite and friendly forum and I want to keep it that way…….

Now all I have to do is mount the lower wing and then put the booms on to both wings. These will be from florist's wire which I have used for similar booms with conversions of other pushers. However getting the alignments right is testing my ingenuity at the moment but I think that I may have solved the problem: the next post will reveal whether or not I have been successful.

Thanks for looking.

Stephen.
« Last Edit: August 12, 2017, 08:25:46 AM by lone modeller »

Offline Des

  • Administrator
  • Hero Member
  • ******
  • Posts: 9325
    • ww1aircraftmodels.com
Re: Otto Doppeldekker 1/72
« Reply #37 on: November 09, 2015, 06:41:57 AM »
Great work with the flying surfaces Stephen, I am intrigued with the technique you used and will give it a go. I have found that all of the wings I have made are still dead straight, none have sagged at all, the curve adds a great deal of strength. Looking forward to seeing more of this fantastic build.

Des.
Late Founder of ww1aircraftmodels.com and forum.ww1aircraftmodels.com

Offline IanB

  • Hero Member
  • *****
  • Posts: 2439
Re: Otto Doppeldekker 1/72
« Reply #38 on: November 09, 2015, 10:58:10 AM »
Lovely work Stephen. I have been thinking about scalloped wings recently and wondered if it might be possible to drill the plastic sheet with a large drillbit prior to cutting the wing out....... Let the bit do the work....I may try that sometime to see if it's feasible....

Ian

Offline Old Man

  • Hero Member
  • *****
  • Posts: 600
Re: Otto Doppeldekker 1/72
« Reply #39 on: November 11, 2015, 03:52:51 AM »
That is one great leap o' the critter, Sir!

Looking forward to more.

Offline lone modeller

  • Hero Member
  • *****
  • Posts: 5317
Re: Otto Doppeldekker 1/72
« Reply #40 on: November 12, 2015, 06:54:31 AM »
Thanks to all of you who have dropped by and left complimentary remarks. Coming from modellers with the skill that you all regularly demonstrate I greatly appreciate them.

Michael the value in real money of the coin that I use for a scale in my photographs is £1. A single Euro coin would be the same size (7/8 inch in real measurements or 13mm, diameter). I do not know how this would measure against a US coin.

I am really pleased that the idea of scratch building is growing on you. I have written elsewhere that you clearly have the skills to produce a masterpiece of museum standard first time - I just look forward to seeing it come together on this site - and hopefully before I see my next decadal birthday!

BTW I am an atheist by persuasion - my references to the Great Book reflect the fact that I attended Church of England controlled primary and secondary schools, so I was brought up in the protestant tradition, albeit by teachers who were very open minded and tolerant. I still retain a fascination for the text because it has played such an important part in the history and culture of Europe, (and of course North America too since the 17th century). However if you wish to continue to regard me as holier than thou I will not mind - probably because it is true?!!

Offline radio

  • Hero Member
  • *****
  • Posts: 3952
Re: Otto Doppeldekker 1/72
« Reply #41 on: November 13, 2015, 03:11:06 AM »
Beautiful work Stephen.
Cheers
Martin

Offline RAGIII

  • Hero Member
  • *****
  • Posts: 18840
Re: Otto Doppeldekker 1/72
« Reply #42 on: November 14, 2015, 12:28:48 AM »
Stephen,
I agree with all of the others. Your wings and the technique used are awesome! Lovely build as always!
RAGIII
"A man has to know his limitations": Harry Callahan

"Don't slop it on" Lynda Geisler

Offline ermeio

  • Hero Member
  • *****
  • Posts: 913
Re: Otto Doppeldekker 1/72
« Reply #43 on: November 22, 2015, 08:51:07 PM »
the bird is taking shape, Stephen
I like it!

Offline lone modeller

  • Hero Member
  • *****
  • Posts: 5317
Re: Otto Doppeldekker 1/72
« Reply #44 on: November 23, 2015, 05:00:02 AM »
Evening All,

Many thanks to all of you who have dropped by and left encouraging comments: as I have written in another thread it is in part through comments such as these that I have learned much and gained the confidence to tackle a model such as this one. However things have slowed right down recently as life has intervened between me and my modelling tray. (I work on a tray that was given to me by my mother when I started to make models as a pre-teenager. Sentiment or practicality? I am not sure which, but probably both).

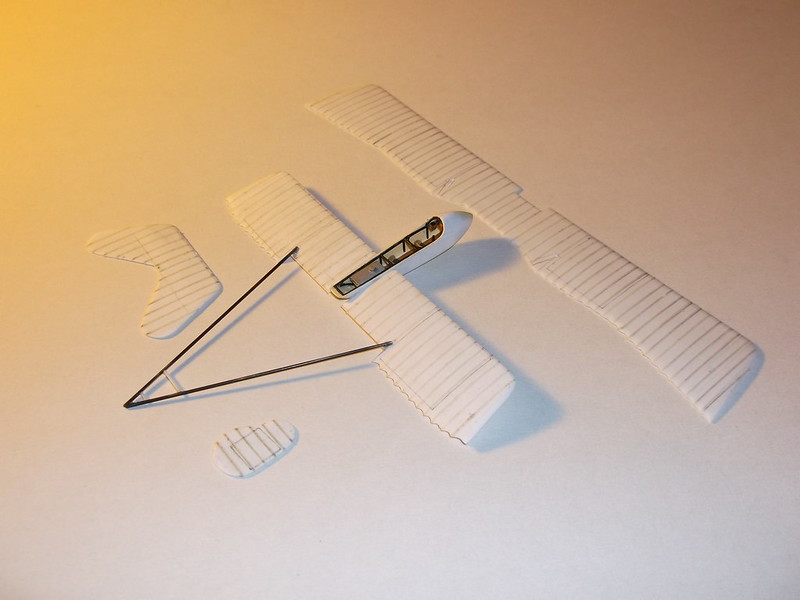
One of the hold-ups has been that I had to remake the lower wings - I had misinterpreted the drawings and the ones I had made were too short…. B****r! So for those reading and pondering Jorg's current thread in the Time to Relax section and are wondering how some modellers seem to produce perfect models, there is a lesson for you…. we all make mistakes. But as Old Man has written, an advantage of scratch building is that you can always make another part. Still frustrating though.

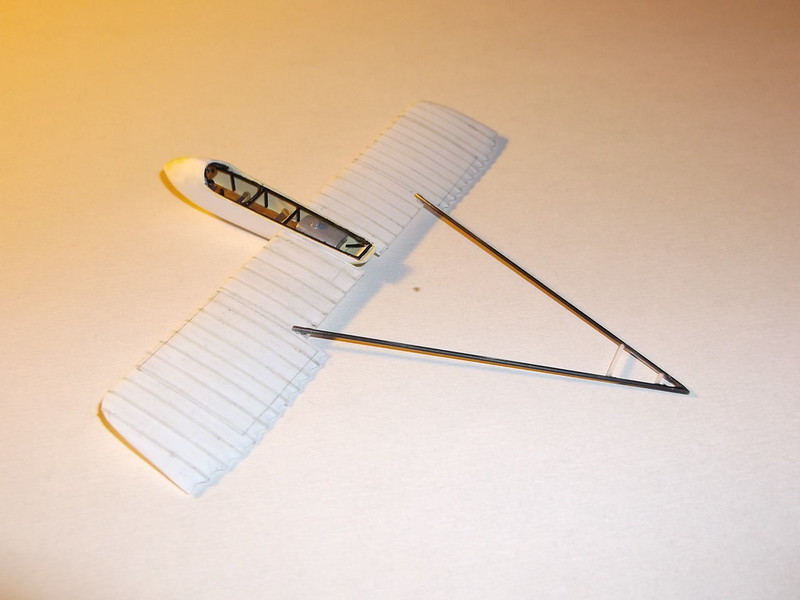
I have also been thinking about how to assemble this one. Normally with pushers I tend to join the lower wings to the fuselage nacelle and then put the booms on the upper and lower wings and paint them. I then add the outer struts, top wing and rudder in a single move, but with this model I do not think that that will be practical because the engine has to be fitted on top of the rear of the nacelle between the wings. The engine sits on a platform and there is a large radiator at the front of the engine which means the method I have used in the past will not work. So. First I joined the lower wings to the fuselage and then added the booms which were made as usual from florists wire. The booms were fixed into shallow grooves which I had made in the tops of the wings with the tip of a small round file and were glued into place with epoxy resin. I also put in the two small horizontal struts at the rear of the booms from plastic rod and fixed these with superglue.   


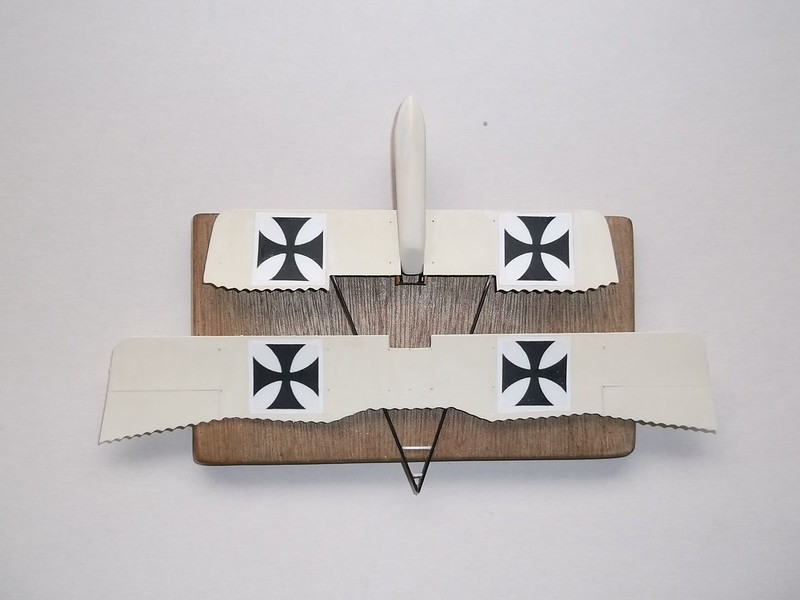
Now I painted the wings, fuselage, lower booms etc as per usual procedure in the past. The wing markings were home made on my computer, printed on waterside transfer paper, sealed with varnish and applied in the normal way.


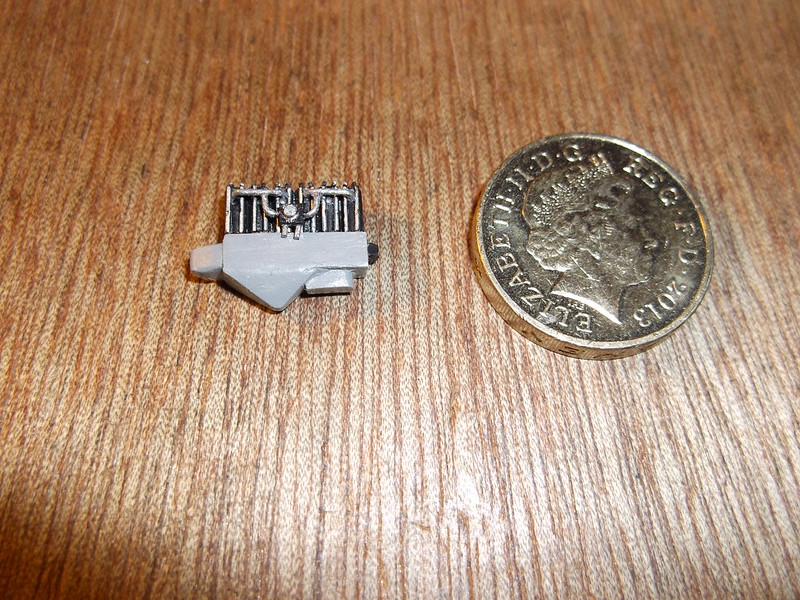
I have done some more work on the engine - added the inlet manifolds and the push rods which were mounted on the exterior of the engine cylinders. I intend to build the engine platform and mount the engine before I start trying to put the top wing on. The coin in the following image is £1.


Thanks for looking.
« Last Edit: August 12, 2017, 08:31:47 AM by lone modeller »