Author Topic: Airfix 1:12th scale Blower Bentley  (Read 21551 times)

Offline Rob Hart

  • Hero Member
  • *****
  • Posts: 696
Re: Airfix 1:12th scale Blower Bentley
« Reply #15 on: October 26, 2014, 01:25:43 PM »
The engine looks superb! The Testors BRG is a metallic color and may not be appropriate for the Bentley. Here are some Tamiya mixes for BRG:

8 x X-5 Green + 1 x X-4 Blue
or
8 x X-5 Green + 3 x X-1 Black
or
4 x X-5 Green + 1 x X-8 Light Yellow

Offline Des

  • Administrator
  • Hero Member
  • ******
  • Posts: 9325
    • ww1aircraftmodels.com
Re: Airfix 1:12th scale Blower Bentley
« Reply #16 on: October 26, 2014, 01:49:07 PM »
Humbrol make a British Racing Green in both enamel and acrylic, the enamel paint is No. 239.


ZERO paints also make an airbrush ready British Racing Green specifically for automotive models, their website address is in the photo.


Hope this helps you find the correct colour your are after.

Des.
Late Founder of ww1aircraftmodels.com and forum.ww1aircraftmodels.com

Offline IanB

  • Hero Member
  • *****
  • Posts: 2441
Re: Airfix 1:12th scale Blower Bentley
« Reply #17 on: October 27, 2014, 01:05:51 AM »
Thanks Rob and Des.
I think the green/black mix might be worth a try. You can see from the pic just how dark this car is and most BRG paints target the later 60's shade as shown on the Lotus in Des' post. The Tamiya XF 70 I was thinking of using is also not black enough.....


Ian
« Last Edit: July 16, 2017, 06:34:16 AM by IanB »

Offline IanB

  • Hero Member
  • *****
  • Posts: 2441
Re: Airfix 1:12th scale Blower Bentley
« Reply #18 on: October 27, 2014, 06:44:16 AM »
Besides thinking about paint colour, I also got a little more done today - I cut out the fuel tank side screens from wire mesh and added the strengthening fillets around the tank mounts, although I'm not sure that the CA glue I used will hold them, I'll find out later!
 I wanted to get these and the lower /rear fuel tank screens done before painting the tank. I'll then fit them and paint the tank again. That should ensure there are no paint free "shadows" under the screens and straps that hold the rear screen in place.


Thanks for looking in,

Ian
« Last Edit: July 16, 2017, 06:33:31 AM by IanB »

Offline IanB

  • Hero Member
  • *****
  • Posts: 2441
Re: Airfix 1:12th scale Blower Bentley
« Reply #19 on: November 01, 2014, 10:11:46 AM »
I made an attempt at the final stone screen today, but I it'll have to be redone. 3 hours, but not wasted....at least I now have a better idea of how to go about it...


I think .6mm instead of .4mm for the frame, and I'll fit the mesh to the frame flat, then bend it to fit the tank....

Ian
« Last Edit: July 16, 2017, 06:39:59 AM by IanB »

Offline IanB

  • Hero Member
  • *****
  • Posts: 2441
Re: Airfix 1:12th scale Blower Bentley
« Reply #20 on: November 02, 2014, 01:20:22 PM »
After another afternoon and two attempts, here's the final article:


Perhaps some paint mixing tomorrow.....

Ian
« Last Edit: July 16, 2017, 01:36:56 PM by IanB »

Offline Des

  • Administrator
  • Hero Member
  • ******
  • Posts: 9325
    • ww1aircraftmodels.com
Re: Airfix 1:12th scale Blower Bentley
« Reply #21 on: November 02, 2014, 02:24:45 PM »
The mesh is looking really good Ian, but I'm anxious to see some paint on her.

Des.
Late Founder of ww1aircraftmodels.com and forum.ww1aircraftmodels.com

Offline IanB

  • Hero Member
  • *****
  • Posts: 2441
Re: Airfix 1:12th scale Blower Bentley
« Reply #22 on: November 03, 2014, 02:00:37 AM »
That makes two of us, Des!
 I think I'll add the fittings to the side screens first so I can paint the insides, before putting it all together.

Ian

Offline IanB

  • Hero Member
  • *****
  • Posts: 2441
Re: Airfix 1:12th scale Blower Bentley
« Reply #23 on: November 05, 2014, 12:10:56 PM »
Still no paint, but a little more progress on the sidescreens and the leaf springs...


Ian
« Last Edit: July 16, 2017, 01:43:12 PM by IanB »

Offline IanB

  • Hero Member
  • *****
  • Posts: 2441
Re: Airfix 1:12th scale Blower Bentley
« Reply #24 on: November 09, 2014, 01:46:37 PM »
I decided today to start to tackle the most daunting part of this build - rewiring the wheels!
 I had already spent a good while thinking about how best to go about it, so this morning I bit the bullet and went for it. Before I did anything, I used the kit parts to make a jig to hold the hub central and at the correct height relative to the rim, and marked the rim and hub so that they would align correctly.
 My main problem was figuring out how to accurately drill the holes: should I make a stencil? If so, how? It would also have to be reuseable....  I decided in the end to use the kit parts as their own stencils....  I snipped off the spokes from the outer rim, leaving the stubs at the end, and used those as guides. I drilled each hole from the rim side, and at an angle, to allow for as straight a run as possible through the rim. Initially I only drilled part way through, then trimmed off the stubs and cleaned up the rim. After that I finished drilling through.
 The hub was marked and drilled, one hole just each side of the mark, and correctly staggered front to back. Then it was a relatively simple job to cut small lengths of .020" steel wire and thread it..."relatively" simple being the operative word.....


I must say, I'm very happy with the results, and even more so that I got it at the first attempt!

Now I know my method works, I'll take step-by-step pics of the next wheel as it's done and post them so that anyone contemplating spending a few days doing this can at least save themselves some of the hassle!

Ian
« Last Edit: July 17, 2017, 12:10:23 AM by IanB »

Offline Des

  • Administrator
  • Hero Member
  • ******
  • Posts: 9325
    • ww1aircraftmodels.com
Re: Airfix 1:12th scale Blower Bentley
« Reply #25 on: November 09, 2014, 01:53:27 PM »
Beautiful job on the wheel Ian, certainly looks a lot better than the kit supplied wheels. I'm sure that your wheel lacing tutorial will be greatly appreciated by the forum members, looking forward to seeing it.

Des.
Late Founder of ww1aircraftmodels.com and forum.ww1aircraftmodels.com

Offline eindecker

  • Hero Member
  • *****
  • Posts: 532
  • The penultimate word in scale modeling since 1956
    • Models In Scale
Re: Airfix 1:12th scale Blower Bentley
« Reply #26 on: November 10, 2014, 01:17:46 AM »
Beautiful! Questions, questions, questions... but they can wait until after your tutorial. Thanks!
Michael Scott
Author of "The Q Fragments" http://Http://theqfragments.com & Amazon for paperback and Kindle.

Offline Rob Hart

  • Hero Member
  • *****
  • Posts: 696
Re: Airfix 1:12th scale Blower Bentley
« Reply #27 on: November 10, 2014, 07:15:25 AM »
The wheel looks terrific! I'm also looking forward to your tutorial.

Offline IanB

  • Hero Member
  • *****
  • Posts: 2441
Re: Airfix 1:12th scale Blower Bentley
« Reply #28 on: November 11, 2014, 12:54:54 PM »
OK Gents, grab a beer and sit back......

First, the jig -it's pretty basic. A piece of stiff plastic card stock (about 2mm) with a hole drilled to accept a length of 2mm (.080") rod. I placed the wheel on the rod and pushed it down so that the rim was on the card, then cut the back off the rod and glued it in place. This made sure that the hub was at the correct height relative to the rim. A few pieces of .010" card were added around the spindle to take up the slack and stop it wobbling as the hub was not flush with the card. With the wheel sat on the spindle I then glued 4 pieces of thick rod to the card, pushed up tight against the rim, to hold it in the correct place.


 Next step was to mark the rim and hub to ensure correct alignment. (I brushed some white paint on first to make it easier to see the marks). The first mark is any one of the pairs of spokes where they meet the hub (the larger hub mark in the pic). Next, mark the rim opposite this mark, on both sides of the hub, to ensure correct alignment (notice that the rim marks are between the spokes).  Then mark the outer ends of the two spokes that start at your hub marking - one I marked "top" and one "bottom". These two marks should be the third spoke either side of your rim datum mark.
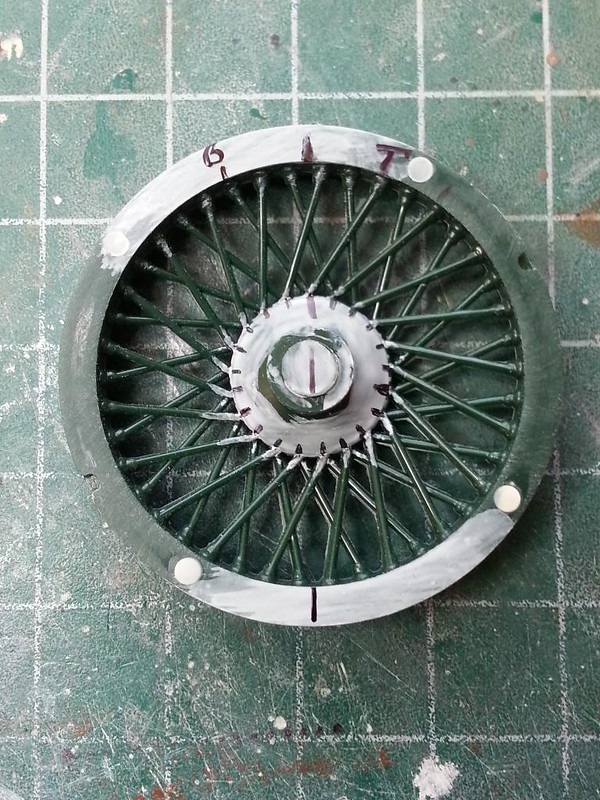


 You're now ready to cut the moulded spokes out, but make sure you leave the nipples at the rim - these will be your "stencil" for drilling the holes! Here's one I prepared earlier..... (sorry, I've been waiting years to say that - "Blue Peter" fans will understand))


 I am going to use .015" (.38mm) wire, so I used a .018" drill bit to drill the holes for the spokes. Drill from the rim side (the back) and make sure you don't drill perpendicular to the rim - for the top (inner) row the bit should point clockwise, for the back row, anti-clockwise. This will ensure that the spokes slide in easily and don't bow, which they will if the holes are perpendicular to the rim.


 I didn't drill all the way through at this point, and here's why: Once you've drilled all the holes (make sure they are deeper than the nipples on the rim!) you need to remove the nipples and clean up the rim. There is a nasty mould line there that also needs to be removed.


This will of course fill up the holes you just drilled, so now you can go ahead and finish drilling through.


 You're now about 2 1/2 hours in.... time to drill the hub: If you're looking at the edge of the hub ready to drill, the top row should be slightly to the right of the marks you made previously, with the bottom row slightly left. Drill these holes perpendicular to the hub edge.


 Once that's done, the hard work is over - time to start lacing! Bend one end of each spoke to about 45 degrees to fit into the hub holes.
 Start with your reference marks, then add the bottom row all the way around - they will fit into every other hole around the rim, make sure that you are following your reference mark and fitting the bottom row of the hub into the bottom row of the rim - notice from the earlier pics that the rim holes are staggered! After 6 or so, the hub will stay in position. (I removed the wheel from the jig to slide each spoke through the rim from below, then just slid it back on to the jig to fix the spoke to the hub with a tiny dab of CA gel on the spoke end). 


 About 5 hours after you started (assuming you used a pin vice like I did) you'll be finished! Half of one wheel done!


 As you can see, the second wheel (with the thinner wire) is much more to scale, so I shall rewire the first one, and stick with the .015" wire for the rest.

 Time for a beer!

Thanks for looking in!

Ian
« Last Edit: July 17, 2017, 12:38:12 AM by IanB »

Offline Rob Hart

  • Hero Member
  • *****
  • Posts: 696
Re: Airfix 1:12th scale Blower Bentley
« Reply #29 on: November 12, 2014, 11:58:15 AM »
Thank you, much appreciated.