OK Gents, grab a beer and sit back......
First, the jig -it's pretty basic. A piece of stiff plastic card stock (about 2mm) with a hole drilled to accept a length of 2mm (.080") rod. I placed the wheel on the rod and pushed it down so that the rim was on the card, then cut the back off the rod and glued it in place. This made sure that the hub was at the correct height relative to the rim. A few pieces of .010" card were added around the spindle to take up the slack and stop it wobbling as the hub was not flush with the card. With the wheel sat on the spindle I then glued 4 pieces of thick rod to the card, pushed up tight against the rim, to hold it in the correct place.

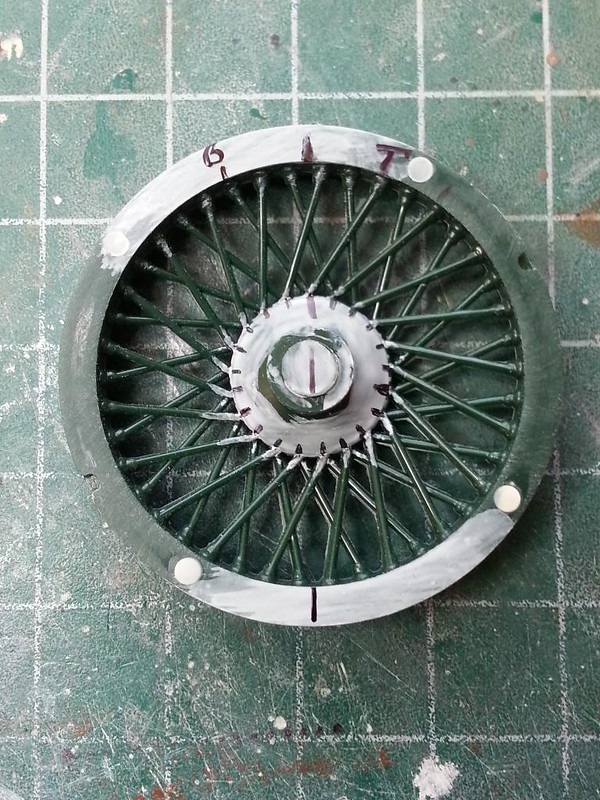
Next step was to mark the rim and hub to ensure correct alignment. (I brushed some white paint on first to make it easier to see the marks). The first mark is any one of the pairs of spokes where they meet the hub (the larger hub mark in the pic). Next, mark the rim opposite this mark, on both sides of the hub, to ensure correct alignment (notice that the rim marks are between the spokes). Then mark the outer ends of the two spokes that start at your hub marking - one I marked "top" and one "bottom". These two marks should be the third spoke either side of your rim datum mark.
You're now ready to cut the moulded spokes out, but make sure you leave the nipples at the rim - these will be your "stencil" for drilling the holes! Here's one I prepared earlier..... (sorry, I've been waiting years to say that - "Blue Peter" fans will understand))

I am going to use .015" (.38mm) wire, so I used a .018" drill bit to drill the holes for the spokes. Drill from the rim side (the back) and make sure you don't drill perpendicular to the rim - for the top (inner) row the bit should point clockwise, for the back row, anti-clockwise. This will ensure that the spokes slide in easily and don't bow, which they will if the holes are perpendicular to the rim.

I didn't drill all the way through at this point, and here's why: Once you've drilled all the holes (make sure they are deeper than the nipples on the rim!) you need to remove the nipples and clean up the rim. There is a nasty mould line there that also needs to be removed.


This will of course fill up the holes you just drilled, so now you can go ahead and finish drilling through.

You're now about 2 1/2 hours in.... time to drill the hub: If you're looking at the edge of the hub ready to drill, the top row should be slightly to the right of the marks you made previously, with the bottom row slightly left. Drill these holes perpendicular to the hub edge.

Once that's done, the hard work is over - time to start lacing! Bend one end of each spoke to about 45 degrees to fit into the hub holes.
Start with your reference marks, then add the bottom row all the way around - they will fit into every other hole around the rim, make sure that you are following your reference mark and fitting the bottom row of the hub into the bottom row of the rim - notice from the earlier pics that the rim holes are staggered! After 6 or so, the hub will stay in position. (I removed the wheel from the jig to slide each spoke through the rim from below, then just slid it back on to the jig to fix the spoke to the hub with a tiny dab of CA gel on the spoke end).

About 5 hours after you started (assuming you used a pin vice like I did) you'll be finished! Half of one wheel done!

As you can see, the second wheel (with the thinner wire) is much more to scale, so I shall rewire the first one, and stick with the .015" wire for the rest.
Time for a beer!
Thanks for looking in!
Ian

