Author Topic: 1:72 Maquette Ilya Muromets  (Read 49599 times)

Offline IanB

  • Hero Member
  • *****
  • Posts: 2441
Re: 1:72 Maquette Ilya Muromets
« Reply #225 on: December 07, 2017, 02:37:16 AM »
Stephen, I think you, and everyone else here, know exactly how much I "enjoyed" making the struts! :o

 Anyway, not much progress to speak of, but a quick update anyway. The struts are finished! I cut a slot in each end of all 24 of the little s*** and inserted a piece of .010" brass wire, secured with CA. A quick dab of PPP over the top and a sand down should leave no trace of the incision. Paint will, of course, show whether I am correct in that assumption!


 I have also completed the corrections to the underside. A sheet of .010" card (I decided against the .005" as I could see work being needed to level off areas that saw a little too much glue and melted it...) was stuck on after cutting out the square for the bomb aimer's window, After leaving it to dry for a day, it was trimmed to shape and any loose edges treated with PlasticWeld. It was left another day before I added a skim of PPP and cleaned it all up.


 I think that's ready to be masked off and painted now so Friday should see an airbrush session on that and the start of all the wooden bits.

Thanks for looking in!

Ian

Offline Juan

  • Hero Member
  • *****
  • Posts: 2457
  • All gave some, some gave all.
Re: 1:72 Maquette Ilya Muromets
« Reply #226 on: December 07, 2017, 03:32:07 AM »
Hi Ian, your dedication is paying off.   :D

Online RAGIII

  • Hero Member
  • *****
  • Posts: 18849
Re: 1:72 Maquette Ilya Muromets
« Reply #227 on: December 08, 2017, 01:38:02 AM »
You are going way above and beyond to make this kit right! Your results will be worth the effort!
RAGIII
"A man has to know his limitations": Harry Callahan

"Don't slop it on" Lynda Geisler

Offline Borsos

  • Hero Member
  • *****
  • Posts: 3324
Re: 1:72 Maquette Ilya Muromets
« Reply #228 on: December 08, 2017, 03:07:40 AM »
That's an impressive amout of work on a real beast. You are doing a great job, Ian. It will look awesome once completed.
Borsos
"Deux armées aux prises, c'est une grande armée qui se suicide."
Barbusse.
"Ein Berg in Deutschland kann doch einen Berg in Frankreich nicht beleidigen. Oder ein Fluß oder ein Wald oder ein Weizenfeld."
Remarque.

Offline IanB

  • Hero Member
  • *****
  • Posts: 2441
Re: 1:72 Maquette Ilya Muromets
« Reply #229 on: December 10, 2017, 12:25:37 PM »
Juan, Rick, Borsos, thanks for the comments! To be honest the wings could probably be better too, but I'm NOT going to redo all that work, it will have to stay as it is - lesson learned for next time!

 I got a good session in with the airbrush yesterday, and today decided that some of it needed a little extra work, so the underside of the nose was done again. I'm now happy with the fuselage! The red on the banner needs a little touching up, and I obviously need to redo some of the pastel work to blend it all in again, but other than that it's done!


 I also got the base coat sprayed on the props, engine mounts, and struts. Tomorrow should see some advance on those.....
 Almost back to where I was a month ago!

Ian

Offline Des

  • Administrator
  • Hero Member
  • ******
  • Posts: 9325
    • ww1aircraftmodels.com
Re: 1:72 Maquette Ilya Muromets
« Reply #230 on: December 10, 2017, 12:38:19 PM »
Looking really good Ian.

Des.
Late Founder of ww1aircraftmodels.com and forum.ww1aircraftmodels.com

Online RAGIII

  • Hero Member
  • *****
  • Posts: 18849
Re: 1:72 Maquette Ilya Muromets
« Reply #231 on: December 11, 2017, 01:41:39 AM »
Very well done Ian! No evidence of the additions and corrections and all looks beautiful! I am as always, impressed!
RAGIII
"A man has to know his limitations": Harry Callahan

"Don't slop it on" Lynda Geisler

Offline lone modeller

  • Hero Member
  • *****
  • Posts: 5322
Re: 1:72 Maquette Ilya Muromets
« Reply #232 on: December 11, 2017, 04:14:03 AM »
I'll bet you enjoyed shaping those struts..... This is going to be half kit and half scratch build by the time you finish it, and I know which parts will be the best!

Stephen.

Offline IanB

  • Hero Member
  • *****
  • Posts: 2441
Re: 1:72 Maquette Ilya Muromets
« Reply #233 on: December 11, 2017, 10:58:15 AM »
Thanks Des, Rick , and Stephen!
A little more done today, and I think by the end it will be 90% scratchbuilt, 10% kit - and the kit parts I've used are so heavily modified they bear no resemblance to the kit parts!

 Today was woodwork time. The leather was brushed on and the clear orange sprayed as usual.

Engine bearers, props, and struts all done.


 That is the good side of the struts, the other side is a little blotchy. I'll take another look tomorrow in decent light and see if they're ok or need redoing.

Ian

Online RAGIII

  • Hero Member
  • *****
  • Posts: 18849
Re: 1:72 Maquette Ilya Muromets
« Reply #234 on: December 12, 2017, 01:06:59 AM »
All of your wood parts look excellent to me! Well done as always!
RAGIII
"A man has to know his limitations": Harry Callahan

"Don't slop it on" Lynda Geisler

Offline IanB

  • Hero Member
  • *****
  • Posts: 2441
Re: 1:72 Maquette Ilya Muromets
« Reply #235 on: December 16, 2017, 11:41:44 AM »
Thanks Rick!

 The engine mounts have now been finished off with strips of Bare Metal Foil, and attached to the wings. The next step was the big one, to make sure the engines fitted correctly without the exhausts fouling the struts. That meant the first trial fit of the wings with a couple of struts in place to check the clearance.....and all is well! The props are only slid onto the shafts for clearance checks....


 The extensions on the front of the inner engine mounts were then trimmed back and the starboard engines CA'd in place.


 I'll fit the port ones tomorrow, then I need to finalise the rigging plan before going too much further in case further holes are needed which can't be drilled after attaching the lower wings.....

Thanks for looking in!

Ian

Offline lone modeller

  • Hero Member
  • *****
  • Posts: 5322
Re: 1:72 Maquette Ilya Muromets
« Reply #236 on: December 17, 2017, 04:48:59 AM »
I have written before Ian that this model is more you than Maquette! Looking at these pictures I am doubly convinced that I was right. This is going to be a winner when finished as it looks like one in even its partially assembled state.

Stephen.

Online RAGIII

  • Hero Member
  • *****
  • Posts: 18849
Re: 1:72 Maquette Ilya Muromets
« Reply #237 on: December 17, 2017, 05:21:05 AM »
Lined up perfectly and ready to roll! This is continuing to be an absolutely awesome build!
RAGIII
"A man has to know his limitations": Harry Callahan

"Don't slop it on" Lynda Geisler

Offline IanB

  • Hero Member
  • *****
  • Posts: 2441
Re: 1:72 Maquette Ilya Muromets
« Reply #238 on: December 20, 2017, 12:12:58 AM »
Before I got too far along I decided to do a plan for the rigging, and to try out an idea for the bound lines around the engine area.

 To explain a little: The rigging wires in the area of the the props were double or triple wires, with a wooden strip added between them. The whole was then bound to form a solid piece which would not result in loose cables fouling the props should they break.

This photo shows what I mean. It is used with the kind permission of Ray Rimmell/Albatros Productions.


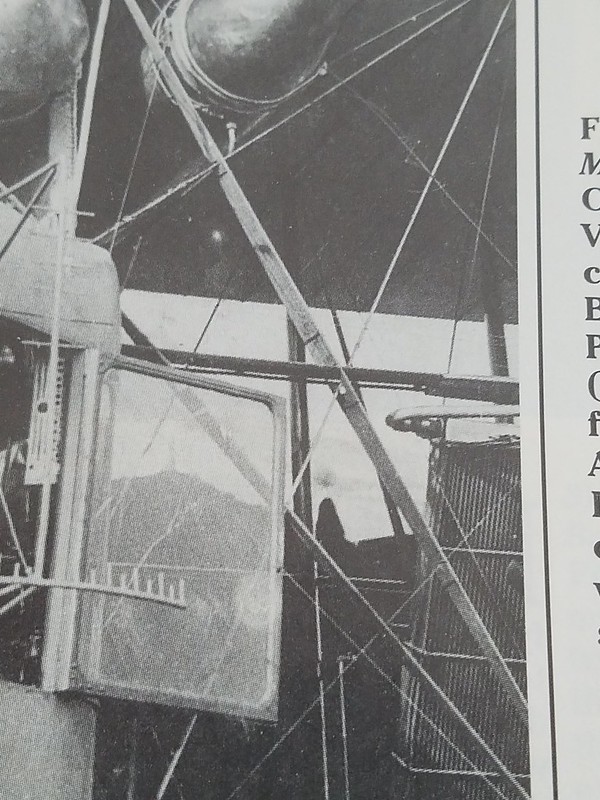
 You will also notice that the wires in one direction go around (or through, depending on which one you're looking at!) other wires - another complication!

 Originally I'd thought of simply using thin strips of plastic rod or sheet, but I couldn't think how to get the look right where the wires passed through each other. That led me to thinking in a different direction, but I needed to try it on a dummy run to see if it would actually work. That brings us to the trial...

 I put together a couple of pieces of scrap to form a small jig, then attached some "rigging wires". The idea was to use either white glue or Mr Surfacer to fill the gap between the wires. I started with Mr Surfacer, mainly because it's grey so it wouldn't need to be painted afterwards! I have both the 500 and 1000, and decided to go with the heavier 1000. Immediately I could see that it could work, so instead of white glue on the other side of the jig I used the 500.


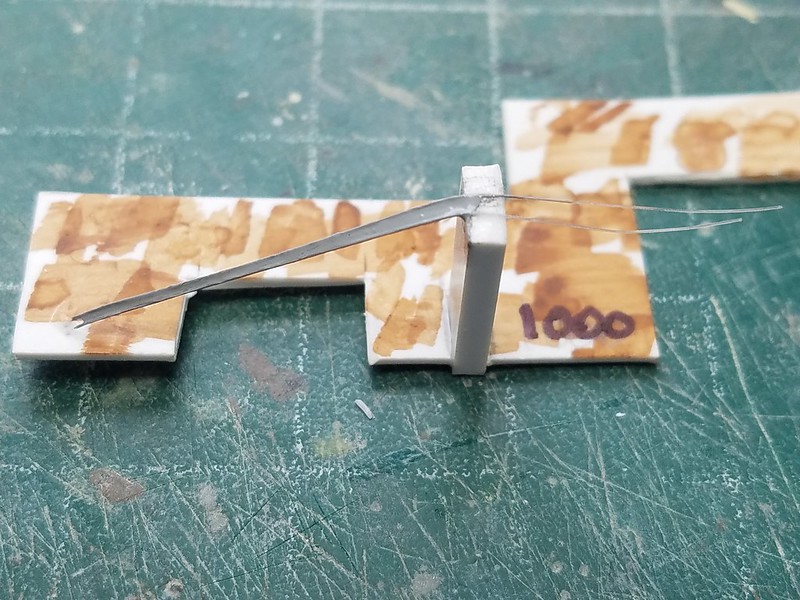
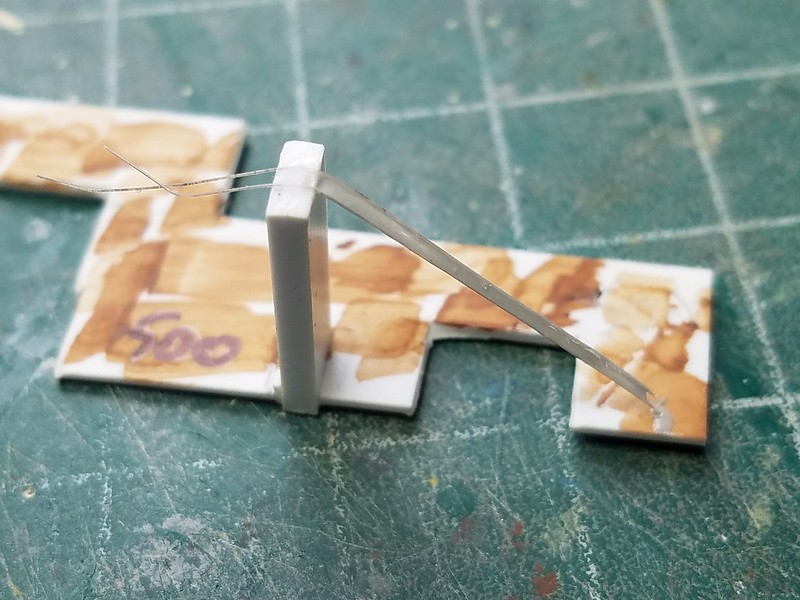
 This is with just one large "blob" added to one end and drawn out with a small brush. The 1000 is certainly easier to apply as the 500 wanted to pull along the wires and I had to drag the ends back down with the brush a couple of times. The key seems to be making sure you have a good sized blob (technical term!) on the brush to start with.
 Here's one showing both sides, with a ruler to show the sort of gaps I'm dealing with. There's a slight dip in places but nothing that a second coat shouldn't sort out, and more importantly, it hasn't sagged underneath but has stayed taut between the lines as required, It is also flexible and doesn't crack if I press on the wires.


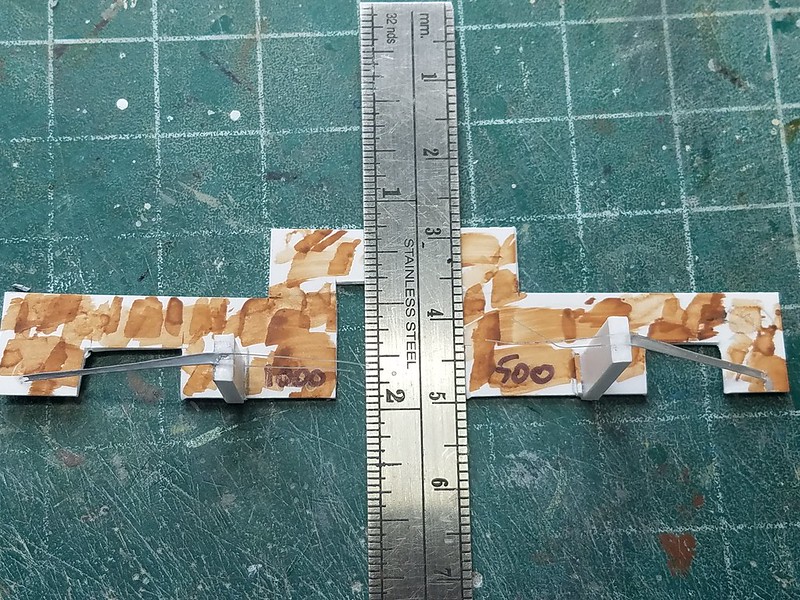
 This should also enable the wires to be run around each other with no problem. I think that problem has now been solved, so more rigging holes are needed before moving on.

 Ian

Offline RLWP

  • Hero Member
  • *****
  • Posts: 1494
  • Bodger
Re: 1:72 Maquette Ilya Muromets
« Reply #239 on: December 20, 2017, 12:26:29 AM »
There's no way one wire passes through another one. It would be impossible to tension them properly

What'd probably going on is one wire is bound to another to stop them fretting in use

Richard
Hendon for flying - the fastest way to the ground!