Author Topic: 1:32nd scale Hanriot HD.1  (Read 8872 times)

Offline Mike Norris (UK)

  • Hero Member
  • *****
  • Posts: 2480
  • RAF Old and Bold
    • Mikes WW1 Aircraft Models
1:32nd scale Hanriot HD.1
« on: November 05, 2023, 07:59:15 PM »
Hi all,
Something I don't do is to build two models at the same time.
However I'm starting a double build.
The first is the 'HPH Models' 1:32nd scale resin model of the Italian Macchi M.5 floatplane.
This is a commission build for the Commander of the Italian Frigate 'Federico Martinengo'.
His ship was named after the Italian naval pilot of WW1, Federico Carlo Martinengo.
I've previously built a version of this model and have a build log on the forum and on my web site.
The only differences between the two models will be the aircraft markings.
As such, I won't create a build log for this model here on the forum.

The second build is the 'Lukgraph' 1:32nd scale resin Hanriot HD.1.
This was on order before 'Copper State Models' announced their intention to release this model.
The model will be of the Belgian Hanriot HD.1, serial HD 24 of Willy Coppens, Escadrille 9me during 1918,

Mike


Retired - 27 years RAF service then 20 years Military Aerospace Technical Author/editor.

Offline Tim Mixon

  • Hero Member
  • *****
  • Posts: 945
  • Main focus is 1/72 WWI
Re: 1:32nd scale Hanriot HD.1
« Reply #1 on: November 07, 2023, 09:27:54 AM »
Eagerly awaiting both these builds Mike. The Macchi is on my short list of future projects. In 1/72 of course!

Offline DaddyO

  • Hero Member
  • *****
  • Posts: 989
Re: 1:32nd scale Hanriot HD.1
« Reply #2 on: November 07, 2023, 06:15:12 PM »
Great choices (The Hanriot is a favourite of mine that isn't seen that often

The Macchi is on my short list of future projects. In 1/72 of course!
Got the Pegasus Macchi in 72nd too Tim (which was nearly started before I decided to denude the shelf of Tripes, so perhaps when these are all finished) :-\ :D

Paul
There cannot be a crisis today, my schedule is full

Offline Mike Norris (UK)

  • Hero Member
  • *****
  • Posts: 2480
  • RAF Old and Bold
    • Mikes WW1 Aircraft Models
Re: 1:32nd scale Hanriot HD.1
« Reply #3 on: November 07, 2023, 08:09:04 PM »
Eagerly awaiting both these builds Mike. The Macchi is on my short list of future projects. In 1/72 of course!

Hi Tim,
I'll not post a build log here for the Macchi M.5 as there's already a build log for my previous model here:

https://forum.ww1aircraftmodels.com/index.php?topic=10645.0

There's of course my PDF build log on the 'logs' page on my site (link in signature block below),

Mike


Retired - 27 years RAF service then 20 years Military Aerospace Technical Author/editor.

Offline Tim Mixon

  • Hero Member
  • *****
  • Posts: 945
  • Main focus is 1/72 WWI
Re: 1:32nd scale Hanriot HD.1
« Reply #4 on: November 07, 2023, 09:37:27 PM »
Thanks Mike. I’ll definitely be referring to your build log.

Offline Mike Norris (UK)

  • Hero Member
  • *****
  • Posts: 2480
  • RAF Old and Bold
    • Mikes WW1 Aircraft Models
Re: 1:32nd scale Hanriot HD.1
« Reply #5 on: November 15, 2023, 02:24:02 AM »
Hi all,
The cockpit has been completed and the fuselage closed up.
As usual, working on 3D printed complete assemblies, such cockpit frames and engines, can limit what can be achieved with painting and assembly.
However, this kit didn't present too many problems.
That said I did replace the kit supplied cockpit instrument decals and pilots seat straps.
I used appropriate instrument decals from the 'Airscale' WW1 generic instrument set.
Also the kit supplied photo-etch seat belts, which are basic to say the least, are too short.
They can't be attached to where they should be on the cockpit side frames and still reach over the pilots seat.
So they were replaced with 'HGW models' fabric belts made up from my 'spares'.
I've added the following:
Throtle control rods (0.4mm Nickel Silver tube).
Fuel level indicator (0.5 mm Brass tube and copper wire).
Pulsometer pipe ('MFH' 0.4mm flexible tube).
Tachometer drive cable ('MFH' 0.4mm flexible tube).
Unidentified pipe on cockpit left (copper wire).
Machine gun trigger cable (lead wire).   
Rudder, aileron and elevator control cables (0.12 mm mono-filament and 0.4 mm Brass tube).
Cockpit side, bottom and seat frame crossed bracing wires (0.12 mm mono-filament and 0.4 mm Brass tube).

The cockpit opening of this aircraft is smaller than most, so even less is visible once the fuselage is closed up.

Also the engine is complete.
The only additions made were adding valve push rods (0.4mm Nickel-Silver tube).
Spark plug ignition leads ('EZ' black line).

Mike


Retired - 27 years RAF service then 20 years Military Aerospace Technical Author/editor.

Offline jeroen_R90S

  • Hero Member
  • *****
  • Posts: 1060
Re: 1:32nd scale Hanriot HD.1
« Reply #6 on: November 15, 2023, 09:11:09 PM »
Just released, now building it already > looks good, too!  8)

One question though... I recently purchased the LeRhone from Lukgraph, but (other than the printlines that need cleaning op...) I've found the fit of the cilinders into the crankcase really tight... did yo modify something for a better fit, or should I simply press them harder?
The printed stuff is really brittle, so I'm not all that keen to apply more pressure...
I've kind of avoided the construction of the engine so far ;)

Any tips, yes-do or no-do-nots?

Thanks in advance!

Jeroen

Offline PrzemoL

  • Hero Member
  • *****
  • Posts: 5316
  • There was Eru... and he made first the Ainur...
    • Przemysław Litewka
Re: 1:32nd scale Hanriot HD.1
« Reply #7 on: November 15, 2023, 09:41:39 PM »
Fine modeling, Mike. The interior is spectacular.
Unfortunately, those print traces on the engine crankcase does not look nice...
Ash nazg durbatuluk, ash nazg gimbatul,
Ash nazg thrakatuluk, agh burzum-ishi krimpatul.

Offline Mike Norris (UK)

  • Hero Member
  • *****
  • Posts: 2480
  • RAF Old and Bold
    • Mikes WW1 Aircraft Models
Re: 1:32nd scale Hanriot HD.1
« Reply #8 on: November 16, 2023, 04:09:28 AM »
Hi all,
All of the flight surfaces of the kit parts (wings, tail plane, elevator, ailerons, fin and rudder) have heavy and pronounced ribs, which will need sanding down.
These rib tapes caused rippling along the wing leading edges, which also needs to be removed.
Lastly, the internal metal reinforcing rods do keep the resin wings from distorting.
However they are very close to the surface and the ends have broken through the wing tips.
So filling and sanding required,

Mike


Retired - 27 years RAF service then 20 years Military Aerospace Technical Author/editor.

Offline Mike Norris (UK)

  • Hero Member
  • *****
  • Posts: 2480
  • RAF Old and Bold
    • Mikes WW1 Aircraft Models
Re: 1:32nd scale Hanriot HD.1
« Reply #9 on: November 16, 2023, 04:18:04 AM »
Just released, now building it already > looks good, too!  8)

One question though... I recently purchased the LeRhone from Lukgraph, but (other than the printlines that need cleaning op...) I've found the fit of the cilinders into the crankcase really tight... did yo modify something for a better fit, or should I simply press them harder?
The printed stuff is really brittle, so I'm not all that keen to apply more pressure...
I've kind of avoided the construction of the engine so far ;)

Any tips, yes-do or no-do-nots?

Thanks in advance!

Jeroen

Hi Jeroen,
I agree and yes the cylinders are difficult to just insert into their recesses in the engine block
I point marked the centre of each cylinder recess and then drilled them out to the internal edges of the recesses.
That made them easier to locate.
But as you say, the 3D prints are brittle so best to drill with increasing diameter drills,

Mike


Retired - 27 years RAF service then 20 years Military Aerospace Technical Author/editor.

Offline Mike Norris (UK)

  • Hero Member
  • *****
  • Posts: 2480
  • RAF Old and Bold
    • Mikes WW1 Aircraft Models
Re: 1:32nd scale Hanriot HD.1
« Reply #10 on: November 16, 2023, 04:19:49 AM »
Fine modeling, Mike. The interior is spectacular.
Unfortunately, those print traces on the engine crankcase does not look nice...

Hi Przemol,
Yes they're fairly prominent, but as the engine is more or less hidden by the cowl, I didn't bother to sand them away.
However, I did remove them from the 3D printed engine cowl,

Mike


Retired - 27 years RAF service then 20 years Military Aerospace Technical Author/editor.

Offline NigelR

  • Hero Member
  • *****
  • Posts: 1866
Re: 1:32nd scale Hanriot HD.1
« Reply #11 on: November 16, 2023, 07:15:56 PM »
Lovely work Mike, this is going to look good.

That engine is pretty poor, both in terms of the 3D print lines and the quality of the modelling. The Aviattic Siemens-Halske in the Pfalz DVIII is light years ahead of this.

I have the same problem on the wings of the Oeffag Albatros but fortunately the protruding wires seem to sand down pretty easily.

Offline PrzemoL

  • Hero Member
  • *****
  • Posts: 5316
  • There was Eru... and he made first the Ainur...
    • Przemysław Litewka
Re: 1:32nd scale Hanriot HD.1
« Reply #12 on: November 16, 2023, 10:06:33 PM »
Unfortunately, those print traces on the engine crankcase does not look nice...

Hi Przemol,
Yes they're fairly prominent, but as the engine is more or less hidden by the cowl, I didn't bother to sand them away.
However, I did remove them from the 3D printed engine cowl,

Mike

Clever approach  ;)  I will cheer for the success of this project, Hanriot is such a lovely machine
Ash nazg durbatuluk, ash nazg gimbatul,
Ash nazg thrakatuluk, agh burzum-ishi krimpatul.

Offline Mike Norris (UK)

  • Hero Member
  • *****
  • Posts: 2480
  • RAF Old and Bold
    • Mikes WW1 Aircraft Models
Re: 1:32nd scale Hanriot HD.1
« Reply #13 on: November 17, 2023, 09:55:12 PM »
Hi all,
Well I'll start with the flight surfaces.
I've sanded down all of the over scale rib tapes on all of the flight surfaces.
I've also filled then sanded where the wing internal support rods protruded from the wing tips.

The tail plane locating recess on the rear of the fuselage has two huge 1.2 mm diameter holes.
I assume these were intended to be used to locate the tail plane onto the fuselage.
However, the underside of the resin tail plane has no locating stubs and is smooth.
To ensure the tail plane located correctly, I resorted to inserting 1.2 mm diameter tubes into the fuselage holes, with 0.5 mm diameter rods fitted in the tubes.
I drilled the locating holes through the tail plane and fitted it down onto the rods.
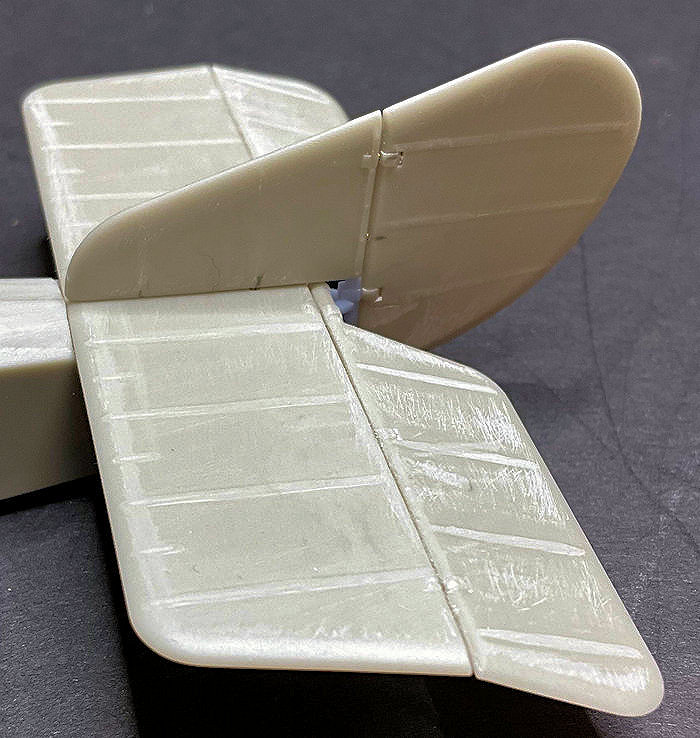
The fin is just a butt join to the top of the tail plane - not good.
So I drilled two 0.5 mm diameter holes in the base of the fin, so it could be located onto the protruding rods.

The rudder is also a butt join the the rear of the fin, so these were drilled and rods inserted to support the rudder.
I did the same to attach the elevator to the tail plane, which enabled me to angle the elevator down slightly.

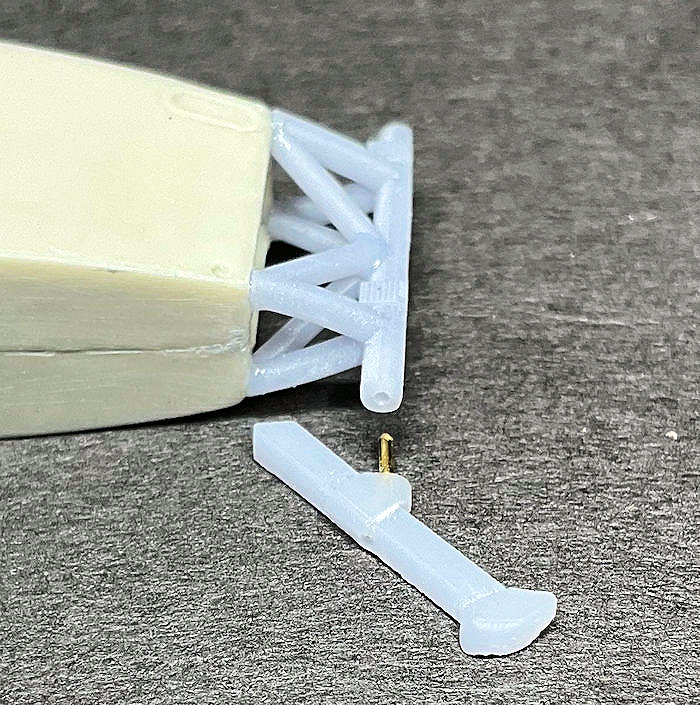
The 3D printed tail skid support and the tail skid are again just butt joins.
Therefore, I drilled and pinned the tail skid to the bottom of the rudder post on the support frame.
This should provide a sturdier joint for the tail skid.
Also I has to sand down the over-scale thickness of the tail skid to a more 'in-scale' thickness.

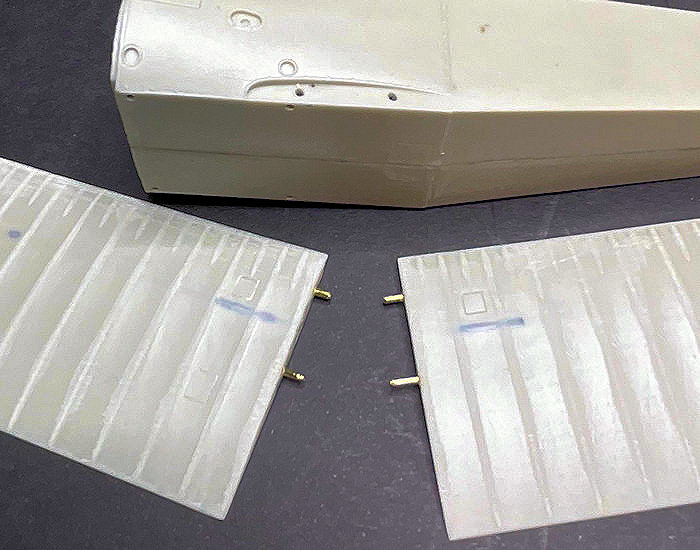
The lower wing halves are intended to have rods fitted to support them in the fuselage.
Whilst the wing roots can be drilled far enough to add sufficient rods, the amount of fuselage support is minimal.
Drilling to far into the fuselage means you'll hit the cockpit internal structure or components.
The wing rods are good enough to locate the wings into the fuselage.
But I think most of the wing support will be from the adhesive joints between the wing roots and fuselage.

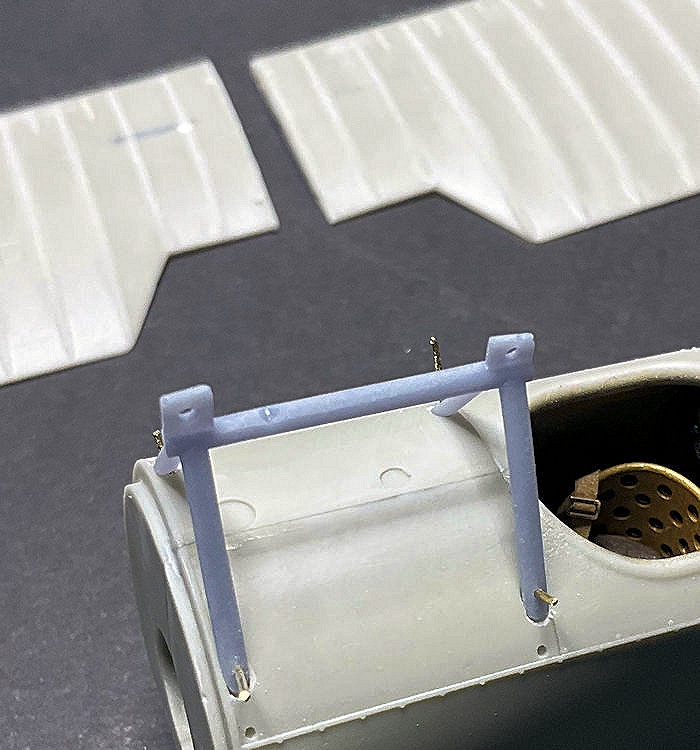
The upper wing halves are intended to be joined together using inserted rods, which pass through holes in the top of the 3D printed cabane struts assembly.
However, the spread of the printed cabane struts is too wide to fit into the fuselage recesses.
Pressure needs to be applied to get the struts located and given how brittle the printed resin is, they could break under pressure.
Also the ends of the struts are not shaped to fit into their locating recesses in the fuselage.
I reshaped the strut ends and managed to drill and pin the struts onto the fuselage to hold them in position.

So now it's onto sorting out the upper wing installation.   
Pretty good for the kit only cost 145 GBP  ???

Mike


« Last Edit: November 17, 2023, 10:09:03 PM by Mike Norris »


Retired - 27 years RAF service then 20 years Military Aerospace Technical Author/editor.

Offline Mike Norris (UK)

  • Hero Member
  • *****
  • Posts: 2480
  • RAF Old and Bold
    • Mikes WW1 Aircraft Models
Re: 1:32nd scale Hanriot HD.1
« Reply #14 on: November 18, 2023, 02:07:09 AM »
Hi all,
Again, a problem to overcome.
The interplane struts are 3D printed so have no internal support rods.
Also, they have no end locators.
However, the upper and lower wings have locating recesses.
I assume the original intention was that rods, from presumably resin struts, would use these locating recesses.
So I drilled 0.3 mm diameter holes into the end of the struts and added Brass locating rods.
These will hopefully provide better location for the 3D printed interplane struts.
That is assuming that the brittle resin struts don't break during assembly or under the weight of the solid resin upper wing halves - we'll see,

Mike


Retired - 27 years RAF service then 20 years Military Aerospace Technical Author/editor.