Author Topic: 1/48 Eduard Albatros D.Va (Otto Fuchs Jasta 77b)  (Read 4731 times)

Offline RAGIII

  • Hero Member
  • *****
  • Posts: 18840
Re: 1/48 Eduard Albatros D.Va (Otto Fuchs Jasta 77b)
« Reply #30 on: September 23, 2022, 05:16:38 AM »
I must say that between you and Brad you have embarrassed Me as to how much can be done in a small scale compared to what I do in 1/32nd  ;D  That being said I am following your techniques and perhaps I will be able to "Almost" duplicate them in the future  8) Your Albatros is Brilliant!!
RAGIII
"A man has to know his limitations": Harry Callahan

"Don't slop it on" Lynda Geisler

Offline Luftace

  • Jr. Member
  • **
  • Posts: 56
Re: 1/48 Eduard Albatros D.Va (Otto Fuchs Jasta 77b)
« Reply #31 on: September 29, 2022, 07:21:57 AM »
Thank you much RAGIII, I am humbled by your words. Hopefully I can hold your attention as I go forward. Slow going at times with doing a good bit of scratchbuilding to add what isn't included in the kit. More updates soon!

Chad

Offline Luftace

  • Jr. Member
  • **
  • Posts: 56
Re: 1/48 Eduard Albatros D.Va (Otto Fuchs Jasta 77b)
« Reply #32 on: January 29, 2023, 03:31:16 AM »
Hi all!
It's been quite a while now since any updates, but I have been steadily making progress. I need to be more diligent about posting as I am quite far ahead now, so will endeavor to bring this build current and share with you my further progress and misadventures. Gotta start somewhere, so let's continue with the exhaust.

Since I will be using the Roden engine that is slightly bigger than the Eduard supplied one, the exhaust would need to be modified to fit.
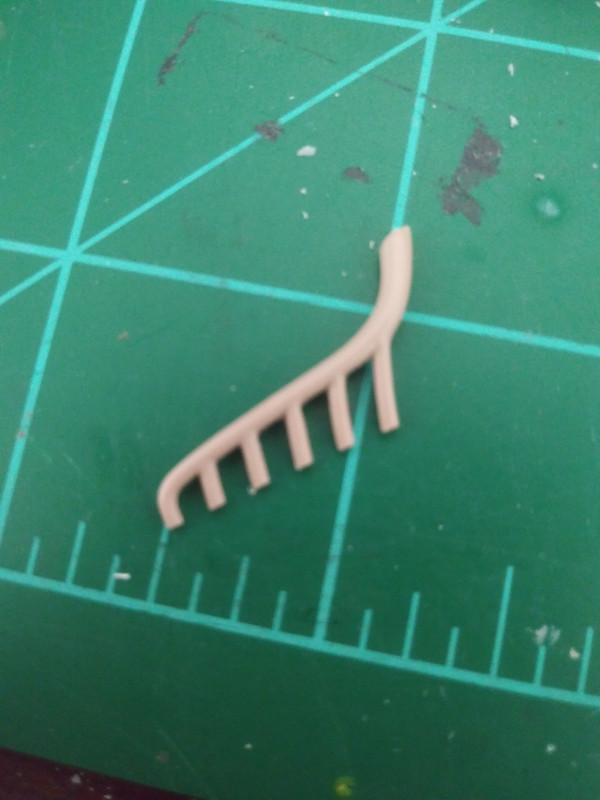
As you can see, the exhaust will not line up properly with the new engine. These early photos are of me testing it with the Engines and Things engine which I ultimately decided not to use. It is dimensionally the same size as the Roden engine so is fine for demonstrative purposes.

First I had to cut apart the exhaust. Scary, I know! With a deep breath, I started cutting.
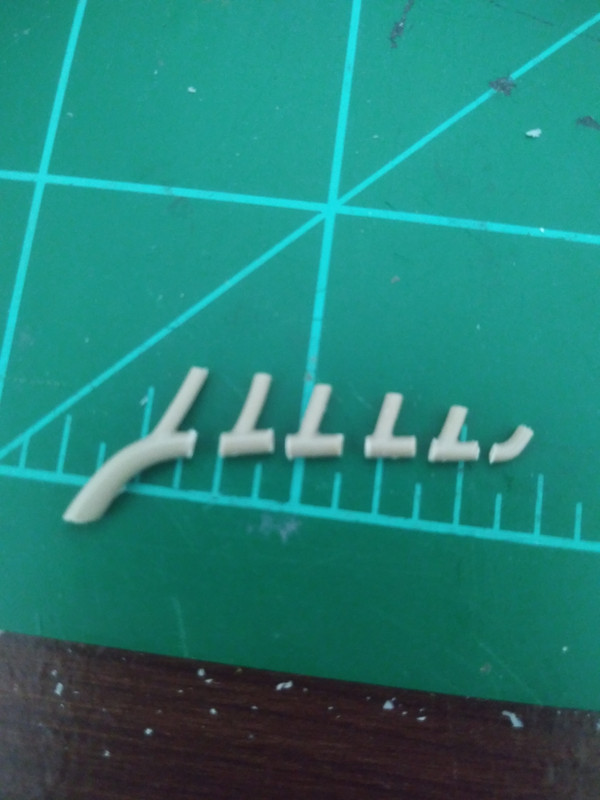

I then drilled through all the parts to be able to insert a length of wire later, making sure to keep track of the parts so that I put them back together properly.
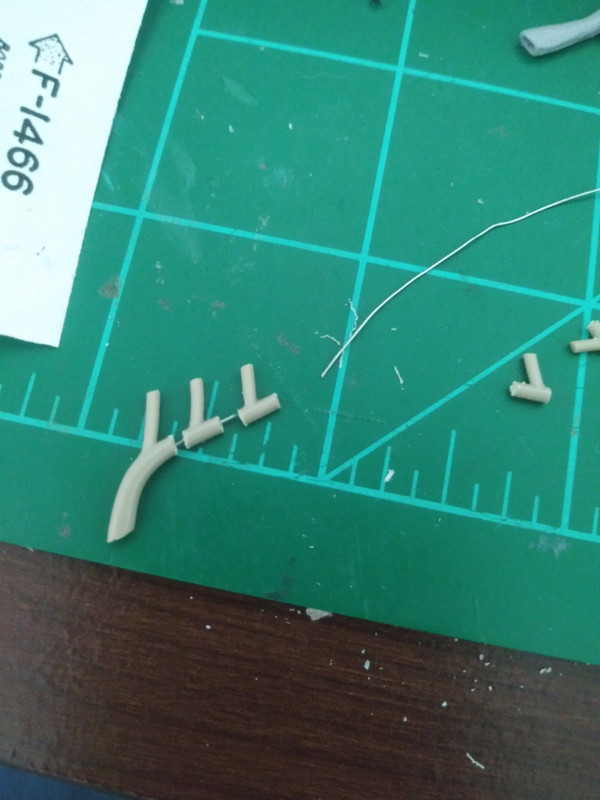

I made five spacers from .25mm thick sheet styrene squares and drilled a hole through the center of each of these. Ironically enough, I used beading wire to string the parts together, very much like stringing a necklace.
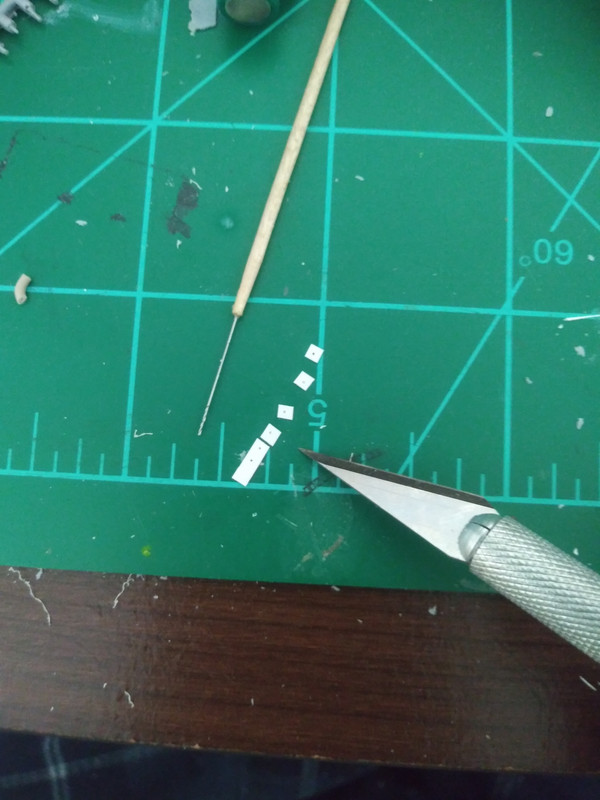

Using styrene cement I pressed all the parts together on the wire, making small adjustments to make sure everything was aligned properly.

Here you can see that the exhaust now fits near perfectly with the larger sized engine block. Success!
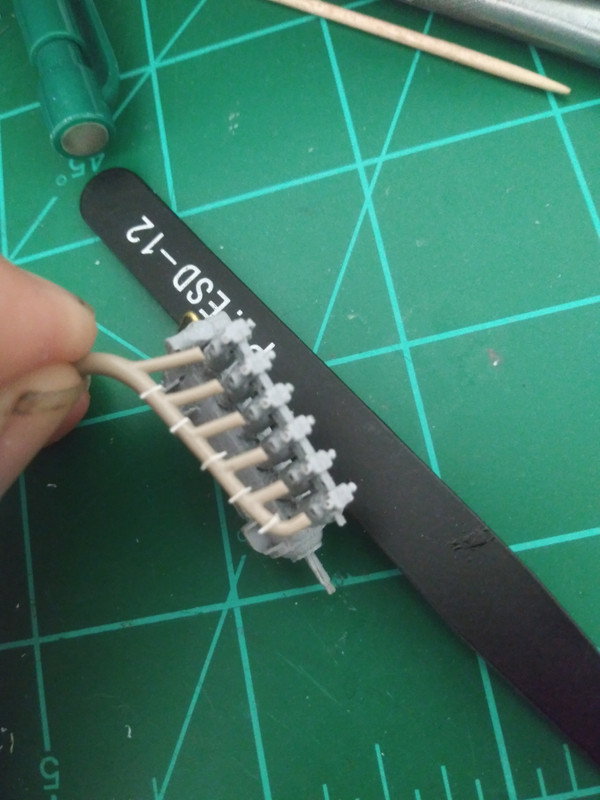
After letting this dry, I used my sprue cutters to trim away the extra material from the spacers and sanded the exhaust to a unified shape. Minor hairline gaps in the assembly were filled with sprue goo and again sanded to shape once cured.
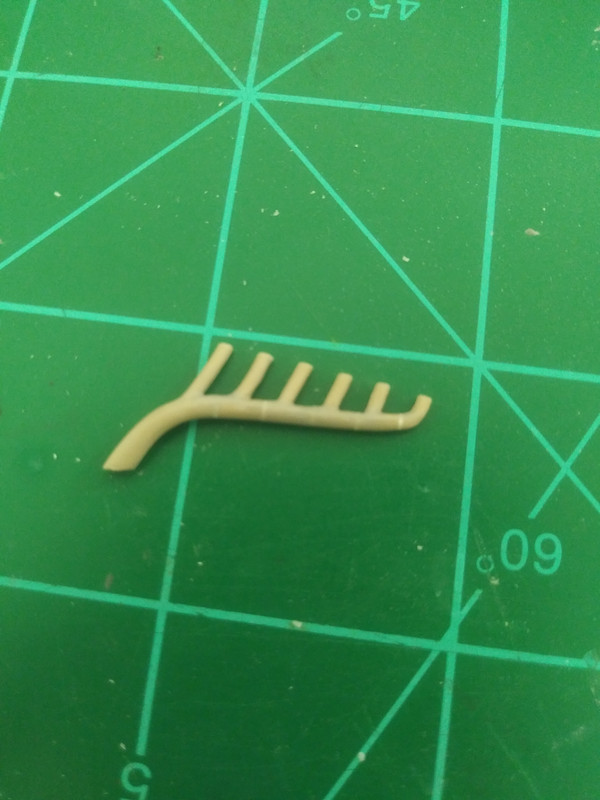

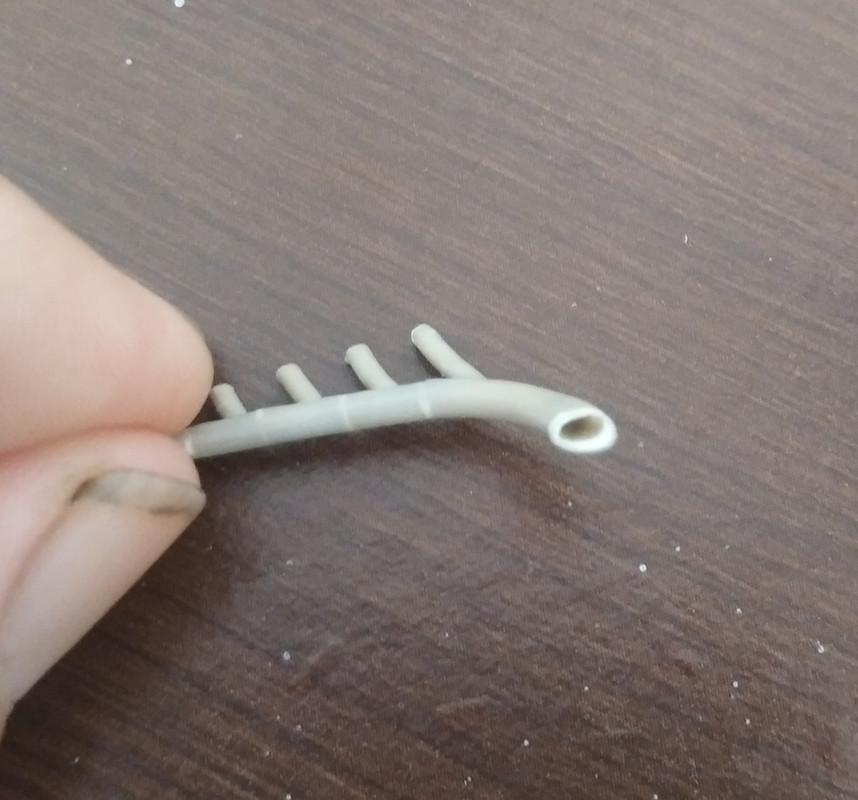
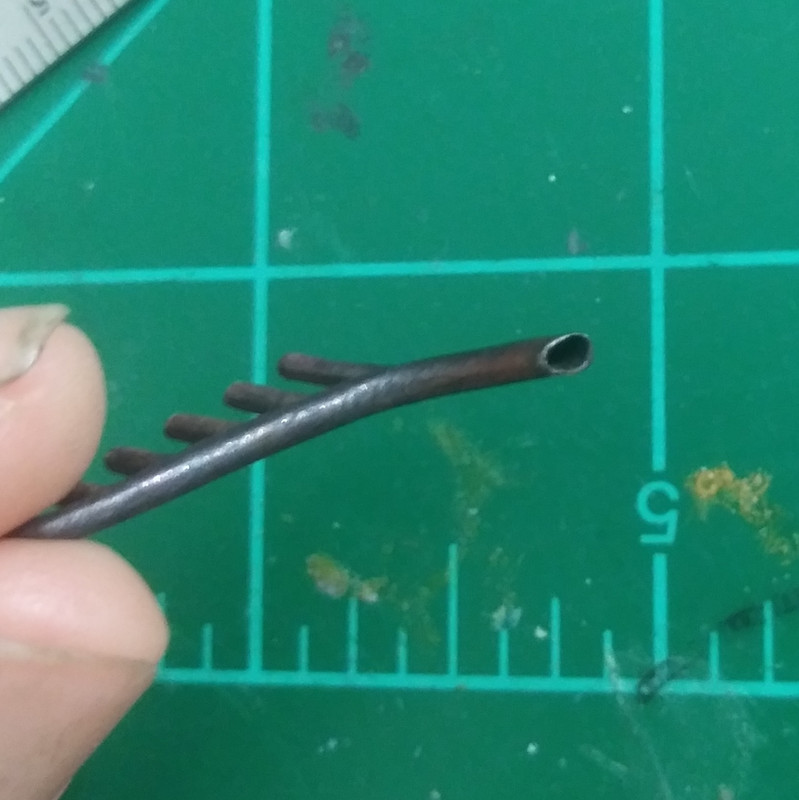
 I also added a piece of styrene approximately 1mm thick to the end of the exhaust to make it proportional with the other added length, trimmed and sanded just as I had done with the spacers.  I used a very thin piece of stretched sprue to add a lip to the exhaust opening. I drilled out and carefully hollowed the opening with various sized drill bits and my xacto knife with a #11 blade. I cleaned up any swarf and dust with the tiniest bit of extra thin glue. Too much glue and you can melt and distort all that work on the hollowed end, so less is definitely more here. I had to repair it a couple times because of this.


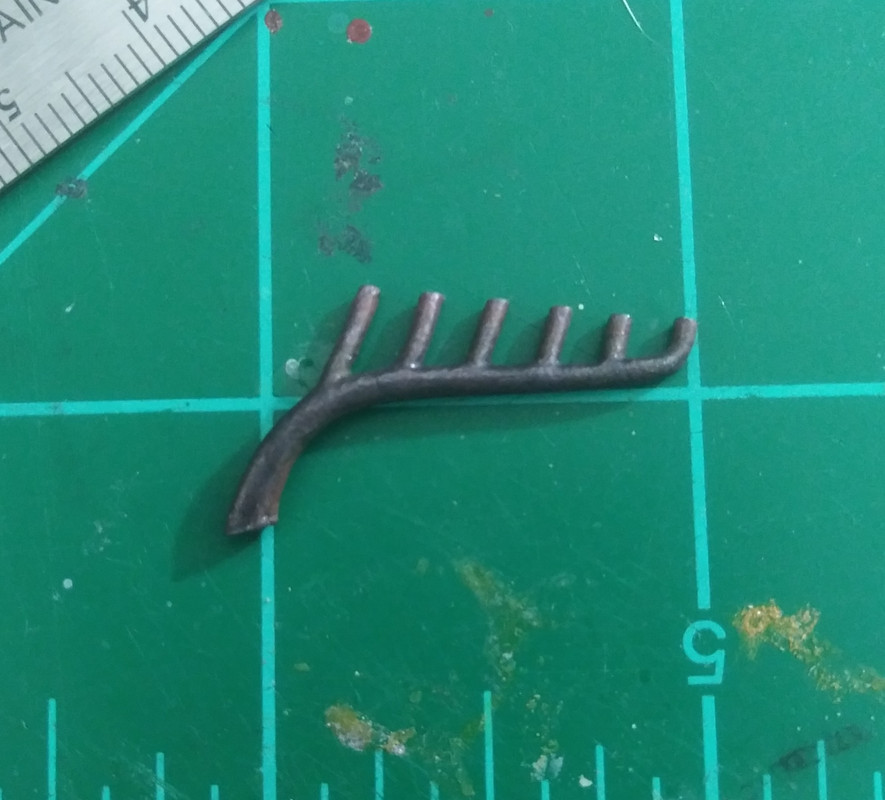
I base coated the exhaust with Stynylrez black primer. Using a drybrush technique, I used Model Master Acryl Jet to give the first addition of color. After that I stippled on burnt iron, a Martha Steward craft paint I found at the local art supply store. I varied these colors back and forth until I was happy with the look I was going for, using close up pictures of the TVAL aircraft as reference. I stippled on very small amounts of highly thinned clear blue, clear red with a fine brush, allowing them to mix slightly here and there, and building up the color with multiple applications. I was going for the sort of discoloration you see on metal from being subjected to high heat. Using the aforementioned base metallic colors, I lightly drybrushed some areas to help unify the colors again. I added a minimum of rust near the exhaust opening and at the base of the stacks where they emerge from the engine. Again, less is more here and references are your friend.
Thanks for looking, more updates in the works.

Chad


« Last Edit: January 29, 2023, 03:57:27 AM by Luftace »

Online Radarman

  • Hero Member
  • *****
  • Posts: 687
Re: 1/48 Eduard Albatros D.Va (Otto Fuchs Jasta 77b)
« Reply #33 on: January 29, 2023, 03:57:17 AM »
Chad,
Thanks for the tutorial. The exhaust looks great.

                                                     Kevin
We are all victims of history!

Offline KiwiZac

  • Global Moderator
  • Hero Member
  • *****
  • Posts: 2623
    • My Linktree
Re: 1/48 Eduard Albatros D.Va (Otto Fuchs Jasta 77b)
« Reply #34 on: January 29, 2023, 06:15:34 AM »
Excellent work Chad!!
Zac in NZ

Offline Luftace

  • Jr. Member
  • **
  • Posts: 56
Re: 1/48 Eduard Albatros D.Va (Otto Fuchs Jasta 77b)
« Reply #35 on: January 29, 2023, 11:54:07 AM »
Thanks much Zac and Kevin! Glad to be posting updates again, hopefully there is still some interest here after such a long delay, more tutorials on the way.

I wanted to dress up the Ammo bins with some extra detail. Using my references, I added a bar to the front of the ammo bins using a length of styrene rod and a section of stretched cotton swab tube.


The spent cartridge belt chutes are missing entirely from the kit so I added these with rectangle styrene stock bent and contorted to shape. This was a bit of a chore bending it into shape, but I am fairly satisfied with it.


Another detail I thought would be really neat is to have the ammunition visible at the top of the feed chutes where it feeds into the Spandaus. Using a razor saw and micro chisel, I carefully carved out a rectangular slot at the top of the feed chutes, cleaning up any burrs afterwards with extra thin cement. To make the linked ammunition rounds, I cut a few dozen pieces of stretched sprue and butted them all together on a piece of tape flat on my work bench. I give them all a quick swipe of extra thin cement and I instantly had a small patch of corrugations. I cut these into strips the same width as the slots in the feed chutes. I glued these into the slots and trimmed off the excess sticking out of the top of the chutes with my sprue nippers. It was only after I did all of this work that I realized that the feed chutes on Albatros scouts were usually fully enclose, having a hinged door that concealed the ammunition as it fed into the guns. Oh well, I'm not gonna fix it now. Atleast I know I will be able to do this for my Fokker D.VII builds later as they did have feed chutes in which you can see the rounds through slots in them.


I tried adding rivet detail to the edges of the bins using a riveting wheel and a pin, but they ended up not being visible at all when completed. Dang.


I modified the firewall by trimming off the very top and adding a piece of .005 sheet styrene. This allowed me to have the top recessed so that I could inlay the support brackets for mounting the Spandaus. These brackets were scratchbuilt with evergreen strip. Initially I cut the firewall too short and had to graft it back on and redo the cut higher up. May be able to make out the puttied seam where I corrected my error, oops!


For painting the ammo bins and chutes, I primed everything with grey Stynelrez. I then slowly build up the aluminum color using a drybrush technique using Model Master Acryl Aluminum. My technique for doing this is to have the brush ever so slightly damp with very little paint. This lets me spread the color more evenly rather than have it clump up or becoming gritty with multiple applications. It takes a bit of practice but it works well for me. I'm just too lazy to load up the airbrush and have to clean it up aftewards for such a small amount of paint to be applied. I still do just as much brush painting as I do airbrushing, usually reserving the airbrush for painting larger areas or multiple parts of the same color in batches. Anywho, after the aluminum was applied, Using a very fine brush, I carefully dabbed on tiny squiggles of Vallejo's oily steel. I was trying to mimic the jewel turned finish seen on some of these items, but alas, like my attempt with the rivets, it was too subtle to be noticed. I will try a different idea next time instead. The ammunition rounds were picked out with clear yellow/orange to give them a brass look since they were already aluminum colored from the initial painting of the bins. Hinges on the ammo bin access door was painted a black grey and the small bar I had added out of styrene rod as well as the gun mount brackets were painted with Life Color grey-green. After a coat of future, I gave the bins an oil wash using raw umber and Payne's grey.


The firewall itself was primed with Stynelrez white. It then received a coat of Model Master Acryl Sand. The framing below the ammo bins were painted with MM Acryl Wood. A coat of Future was then applied and allowed to cure. I used yellow ocre oil paints streaked on with a brush for the woodgrain effect. Few tiny dots here and there of burnt sienna and burnt umber were worked into the ocre to add some more variety. After Drying for a day or so, I gave the wood painted firewall a coat of future slightly tinted with clear orange. The spaces between the framing on the bottom of the firewall below the ammo bins was painted brass since this would have been the rear of the brass fuel tank visible through here. I was too lazy to actually cut out the openings so opted to paint them instead. They were given the same oil wash treatment as the bins. All metal details were further outlined with a sharpened mechanical pencil to hopefully give more definition to it later once closed up and buried inside the fuselage.

The next update will be building the fuel tank.

Chad


Offline Luftace

  • Jr. Member
  • **
  • Posts: 56
Re: 1/48 Eduard Albatros D.Va (Otto Fuchs Jasta 77b)
« Reply #36 on: January 29, 2023, 12:09:09 PM »
One of the prominent omissions from Eduard's Albatros kit is the fuel tank. It is visible enough to be noticed that it is missing so I made my own.


Using 1mm thickness styrene sheet, I first cut a master to the size and shape needed for the main fuel tank as well as the smaller upper tank. The picture will clarify the following, but as you can see, I cut two additional pieces each for both tanks slightly larger than needed from the same 1mm styrene sheet. These were laminated to the front and back of the properly sized template. The only requirements were that the laminated pieces must be level with the bottom of the upper tank and the top of the lower tank so as to preserve the gap between the two tanks, the notches in the side of the master template piece serving as a guide. Once glued into place it is a simple matter of trimming the excess plastic flush with the master template now sandwiched in the middle (my sprue nippers make quick work of this) and smoothing everything out with a sanding stick. See, scratchbuilding doesn't have to be super precise with every single component, it's really quite simple sometimes.


Next came adding the smaller details. The Filler caps and their necks were made from different sizes of Evergreen styrene rod stock (I don't know exactly what sizes, I just eyeballed it) and punched discs from styrene sheet. The gray nuts are from Meng whom sells sheets of different sized nut and bolt heads on styrene sheets intended to be shaved off and used for additional detailing. These would be especially useful for you guys that build in 1/32 scale as these are intended for 1/35 armour models and most are a bit too large for all but a few specific applications in 1/48. The brackets connecting the two tanks were made from strips of sheet styrene. The crimped edge around the face of the top tank was made with stretched sprue, glued around the perimeter a little at a time with extra thin cement. The embossed rivets (bolts, fasteners?) on the front of the tank were made with a jeweler's beading awl. This is the same tool marketed to modelers for embossing rivets, but can be had for much cheaper elsewhere once you know what the original tool is called. I got mine several years ago off of eBay or Amazon for only about $5 as opposed to $40 or so I've seen elsewhere when marketed for scale models. Thought I'd mention that just in case someone might want to know that.

My original plan was to have the fuel tank sit directly onto the rear of the engine mount that extends all the way to the firewall. Turns out, I measured incorrectly for the depth of the fuel tank and it was just a little too tall to sit at the proper height on the engine mount.


 I was faced with two possible solutions. I could remeasure and just trim the tank shorter, or I could cut off the back of the engine mount and build out the rest of the fuel tank. The fuel tank was already completely painted, weathered and attached to the firewall which I had also already meticulously painted with oils and gloss clear coated. So, I did what anyone would do in this situation.


I masked off the wooden firewall and set to sanding, filing and splicing on the rest of the fuel tank with more styrene.

Once surgery was completed, I repainted everything and blended it in as best I could so hopefully it wouldn't be too obvious that it wasn't originally a single unit.

As to the painting, The tank was first sprayed with a coat of Stynelrez grey primer. Then, using a drybrush technique, I carefully built up a coat of Model Master Acryl Aluminum. This was followed by layers of drybrushed Model Master Acryl Brass. Having a silver base coat down before painting brass or copper helps it to "pop" more, be a little more vibrant than just using the color on its own. I learned this technique from the excellent book Stringbag! by Joroen Veen and Flip Hendrickx. Highly recommended reading if you haven't already. After the initial brass color was on, I further expanded on the technique by using very thin layers of clear yellow and clear orange to achieve the color I wanted. The embossed fasteners were carefully painted with aluminum. To represent the soldered joints on the tanks I used pin washes of the same aluminum color highly thinned. After the aluminum washes were dry I tidied things up with another drybrush of brass in some areas where the aluminum wash was just a little too heavy for my tastes. All base colors were finished at this point and the tank was given a coat of Future (yes, I still have some of the original stuff!) and left to cure overnight. This was later given a an oil wash using burnt umber and just a touch of black. The excess was cleaned up with a cotton swab and I was left with the details neatly picked out and a subtle overall grimy patina imparted.


Hope you guys like it so far. I have lots more to post, hopefully sooner than later. Thanks for having a look, feedback always welcome.

Chad

Online Radarman

  • Hero Member
  • *****
  • Posts: 687
Re: 1/48 Eduard Albatros D.Va (Otto Fuchs Jasta 77b)
« Reply #37 on: January 29, 2023, 04:03:02 PM »
Thanks for the next lesson, Chad.
You are following in the footsteps of
some of the other great modelers on
this forum and contributing to the
group knowledge base.

           Happy Modeling,
                          Kevin
We are all victims of history!

Online Brad Cancian

  • Administrator
  • Hero Member
  • ******
  • Posts: 1070
  • "This time I've got you, Red Baron!"
    • Brad's Models
Re: 1/48 Eduard Albatros D.Va (Otto Fuchs Jasta 77b)
« Reply #38 on: January 29, 2023, 06:42:37 PM »
Fantastic work Chad, I continue to take notes :)

I bet once you've done this one, Eduard will surprise us all and announce a new mould Albatros DV with all of the nice internal goodies that their 20+ year old kit doesn't have...

Well... a man can dream....  ;D

Cheers and model on!

BC

Offline RAGIII

  • Hero Member
  • *****
  • Posts: 18840
Re: 1/48 Eduard Albatros D.Va (Otto Fuchs Jasta 77b)
« Reply #39 on: January 30, 2023, 02:24:26 AM »
Outstanding scratch building and detailing on your interior parts! That Tank is amazing!!
RAGIII
"A man has to know his limitations": Harry Callahan

"Don't slop it on" Lynda Geisler

Offline KiwiZac

  • Global Moderator
  • Hero Member
  • *****
  • Posts: 2623
    • My Linktree
Re: 1/48 Eduard Albatros D.Va (Otto Fuchs Jasta 77b)
« Reply #40 on: January 30, 2023, 03:51:12 AM »
More superlative work, I for one really enjoy and appreciate seeing the different stages of a scratched part coming together.

Glad to be posting updates again, hopefully there is still some interest here after such a long delay
Believe me, there is!!
Zac in NZ

Offline WD

  • Hero Member
  • *****
  • Posts: 1101
Re: 1/48 Eduard Albatros D.Va (Otto Fuchs Jasta 77b)
« Reply #41 on: February 01, 2023, 05:22:51 AM »
Beautiful work Chad, all of it. Wonderful stuff sir.

Warren

Offline Allan31

  • Full Member
  • ***
  • Posts: 198
Re: 1/48 Eduard Albatros D.Va (Otto Fuchs Jasta 77b)
« Reply #42 on: February 01, 2023, 11:29:13 AM »
Great stuff so far Chad, keep it coming.
I have this in the stash as well but will not look like yours.
Thanks,
Allan Buttrick

Youth, talent, hard work, and enthusiasm are no match for old age and treachery.

Offline RichieW

  • Hero Member
  • *****
  • Posts: 1966
Re: 1/48 Eduard Albatros D.Va (Otto Fuchs Jasta 77b)
« Reply #43 on: February 25, 2023, 04:42:54 AM »
Apologies for only just coming across this build. My loss entirely, the modelling skills used to detail this kit are other worldly. I will read through again with notebook and pencil to hand. Amazing work!

Richie

Offline pepperman42

  • Hero Member
  • *****
  • Posts: 4436
  • Sergeant, my brown pants.......
Re: 1/48 Eduard Albatros D.Va (Otto Fuchs Jasta 77b)
« Reply #44 on: February 26, 2023, 12:22:34 AM »
I missed this too. Great work!!

Steve