Author Topic: 1:32nd scale Junkers J.1  (Read 4472 times)

Offline Mike Norris

  • Hero Member
  • *****
  • Posts: 2215
  • RAF Old and Bold
    • Mikes WW1 Aircraft Models
1:32nd scale Junkers J.1
« on: July 01, 2022, 07:38:15 AM »
Hi all,
My build of the RAF BE2c is complete, apart from its display case.
So I thought I'd take a break from resin models and rigging.
Therefore the next model will be the Junkers J.1 armoured ground attack aircraft.
This particular aircraft is Serial No: 596/18 at Dessau airfield, Germany, in September 1918.

Mike


Retired - 27 years RAF service then 20 years Military Aerospace Technical Author/editor.

Offline rhwinter

  • Hero Member
  • *****
  • Posts: 1135
Re: 1:32nd scale Junkers J.1
« Reply #1 on: July 01, 2022, 04:04:17 PM »
Looking forward to this one, Mike! Are there decals for this individual plane available or will you make them yourself?
Unfortunately I did not know, I'll once like the J.1, when Wingnut Wings were still alive. So I missed this kit.
Happy modeling!
Richard

Offline Mike Norris

  • Hero Member
  • *****
  • Posts: 2215
  • RAF Old and Bold
    • Mikes WW1 Aircraft Models
Re: 1:32nd scale Junkers J.1
« Reply #2 on: July 01, 2022, 07:26:36 PM »
Hi Richard,
Yes the kit has a decal sheet covering five different aircraft.
I could use these decals for this particular, apart from the serial number, which I'd have to create.
As the aircraft surface is corrugated duraluminium, laying decals can be problematic.
That said, I managed it for the Junkers D.I OK.

Mike


Retired - 27 years RAF service then 20 years Military Aerospace Technical Author/editor.

Offline DaddyO

  • Sr. Member
  • ****
  • Posts: 488
Re: 1:32nd scale Junkers J.1
« Reply #3 on: July 01, 2022, 10:05:22 PM »
Looking forward to this one
(I've got the 72nd Eduard one on the shelf calling me with it's siren song . . . . 'No rigging to be found. . . . ')  ;D

Paul
There cannot be a crisis today, my schedule is full

Offline Mike Norris

  • Hero Member
  • *****
  • Posts: 2215
  • RAF Old and Bold
    • Mikes WW1 Aircraft Models
Re: 1:32nd scale Junkers J.1
« Reply #4 on: July 02, 2022, 07:48:06 AM »
Hi all,
Interesting to note that even 'Wingnut Wings' can get it wrong.
The known gap at the upper wing aileron inboard ends.
Also the instruction manual on page 11 shows assembly of the upper wing outer sections.
The kit supplies wing stiffeners (Parts I1 and I6), which are intended to be fitted into the upper wings outer halves before the halves are joined.
However, the instructions on page 11 do not show or mention these stiffeners.


Mike

EDIT - I was wrong - the stiffeners are for the upper wing centre section (page 8 in the instructions) - not for the outer wing sections.
« Last Edit: July 02, 2022, 07:10:05 PM by Mike 'Sandbagger' Norris »


Retired - 27 years RAF service then 20 years Military Aerospace Technical Author/editor.

Offline rhwinter

  • Hero Member
  • *****
  • Posts: 1135
Re: 1:32nd scale Junkers J.1
« Reply #5 on: July 02, 2022, 05:23:53 PM »
Mike, say, did you find any hint to how and where exactly the downward fireing MG some of the J.1 featured were mounted?

Offline Mike Norris

  • Hero Member
  • *****
  • Posts: 2215
  • RAF Old and Bold
    • Mikes WW1 Aircraft Models
Re: 1:32nd scale Junkers J.1
« Reply #6 on: July 03, 2022, 07:36:46 AM »
Hi all,
The kit supplied upper wing outer sections have an extension at the wing trailing edges.
This is to represent the cover strip for the leading edges of the ailerons.
However, due to the limitations of moulding, these corrugated cover strips are moulded as straight extensions.
In reality, these cover strips were normally unevenly distorted along their entire length, from slight to heavy distortions.
As they were made from corrugated Duraluminium sheet, my assumption is they were probably distorted by being trodden on by maintenance personnel.

To create these distortions, I used the heat from an electrical soldering iron.
The wing was held of the tip of the soldering iron until the styrene showed signs of softening.
I then eased the styrene into a distortion using the ball end of a paper embossing tool.
Then I just moved along the wing repeating the process.

Now onto the infamous gap between the aileron inboard ends and the upper wing centre section,

Mike


Retired - 27 years RAF service then 20 years Military Aerospace Technical Author/editor.

Offline Mike Norris

  • Hero Member
  • *****
  • Posts: 2215
  • RAF Old and Bold
    • Mikes WW1 Aircraft Models
Re: 1:32nd scale Junkers J.1
« Reply #7 on: July 03, 2022, 08:16:20 AM »
Mike, say, did you find any hint to how and where exactly the downward fireing MG some of the J.1 featured were mounted?

The normal armament for Junkers J.1 was a single Parabellum LMG14, fitted to the rotating ring mount in the observers cockpit.
No forward firing weapons were ever fitted.
However, in January 1918, work was carried out on a Junkers J.1 to install two machine guns in the floor of the observers cockpit.
Some sources state the aircraft was Junkers J.1 serial number 816/17, however, photos shown 826/17 with the twin gun fit.
This was started by the Austro-Hungarian Air Service.
The weapons were angled forwards at 45 degrees, the idea being the pilot (who operated the weapons) could watch for the impact of the fired rounds on the ground and be able to position the aircraft to fire on a target.
Also another Junkers J.1 was fitted with a flexible mounted Becker cannon, the work being virtually completed by January 1918.
Trials for both types of weapons installation was scheduled for February 1918.
However, neither was introduced operationally,

Mike 


« Last Edit: July 04, 2022, 07:48:41 PM by Mike 'Sandbagger' Norris »


Retired - 27 years RAF service then 20 years Military Aerospace Technical Author/editor.

Offline rhwinter

  • Hero Member
  • *****
  • Posts: 1135
Re: 1:32nd scale Junkers J.1
« Reply #8 on: July 03, 2022, 04:10:37 PM »
Thanks, Mike! I did not know, the downward fireing MG were not used operationally!

Offline Mike Norris

  • Hero Member
  • *****
  • Posts: 2215
  • RAF Old and Bold
    • Mikes WW1 Aircraft Models
Re: 1:32nd scale Junkers J.1
« Reply #9 on: July 04, 2022, 06:37:16 AM »
Hi all,
The upper wing ailerons are supposed to be close to the outboard trailing edges of the centre section.
Once assembled, there is a 2.5 mm gap where the centre section moulding did not include an extension to meet the ends of the ailerons.
Making inserts to fill the gaps is tricky as the wing surfaces are corrugated.
However, the kit sprues have two parts (24 and 25) which are not used and these are corrugated on on side.
I cut two strips with two corrugations to fit the gaps.
These were cemented into the gap on the top surface of the upper wing.
There is not enough of parts 24 and 25 left to use on the underside of the upper wing.
Therefore I cut inserts from 0.5 mm styrene sheet to fill the gaps then added two 0.5 mm wide styrene rods to represent the corrugations.

Mike

ORIGINAL GAP

UPPER SURFACE INFILL

UNDERSIDE INFILL


Retired - 27 years RAF service then 20 years Military Aerospace Technical Author/editor.

Offline KiwiZac

  • Global Moderator
  • Hero Member
  • *****
  • Posts: 2634
    • My Linktree
Re: 1:32nd scale Junkers J.1
« Reply #10 on: July 04, 2022, 10:06:42 AM »
Excellent work Mike - just like a bought one!
Zac in NZ

Online RAGIII

  • Hero Member
  • *****
  • Posts: 18859
Re: 1:32nd scale Junkers J.1
« Reply #11 on: July 04, 2022, 10:59:18 PM »
Nice fix Mike!
RAGIII
"A man has to know his limitations": Harry Callahan

"Don't slop it on" Lynda Geisler

Offline Mike Norris

  • Hero Member
  • *****
  • Posts: 2215
  • RAF Old and Bold
    • Mikes WW1 Aircraft Models
Re: 1:32nd scale Junkers J.1
« Reply #12 on: July 07, 2022, 01:02:34 AM »
Hi all,
Although the kit supplied engine (Benz Bz.IV) is of good quality, there are details of the engine not included.
1. Cylinders coolant pipe (left side of engine only).
2. Ignition lead support tube (both sides of the engine).
3. Fuel primers (left side of engine cylinders).
4. Carburettor pre-heating gallery.
5. Carburettor pre-heating pipe.
6. Carburettor pre-heating pipe.
7. Carburettor pre-heating supply pipe.
8. Ignition leads (both sides of the engine).
9. Carburettor control rod.
10. Fuel supply connection (possibly).
11. Bleed pipe (possibly).
12. Valve gear push rods (6 each side of the engine).
13. Oil filter and pipe.


I've made a start by cutting away the pre-moulded and flat coolant pipe across the bottom of the cylinders.
This was replaced by 0.8 mm diameter styrene rod inserts.
Also the ignition leads support tubes were made from flattened 0.6 mm diameter brass tube.


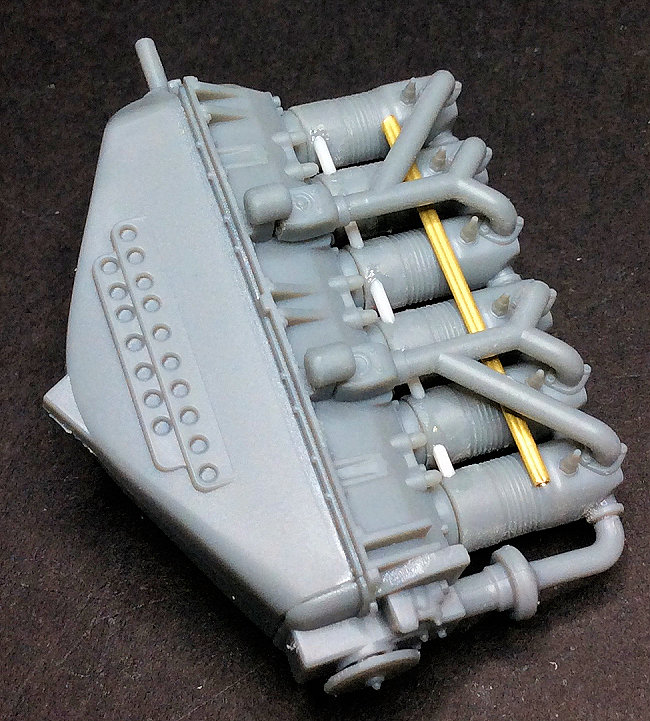
Next up are the cylinder fuel primers,

Mike


Retired - 27 years RAF service then 20 years Military Aerospace Technical Author/editor.

Offline KiwiZac

  • Global Moderator
  • Hero Member
  • *****
  • Posts: 2634
    • My Linktree
Re: 1:32nd scale Junkers J.1
« Reply #13 on: July 07, 2022, 07:51:36 AM »
Fascinating stuff Mike, I'm excited to see the engine - it sounds like a project in itself!
Zac in NZ

Offline Rookie

  • Hero Member
  • *****
  • Posts: 927
  • No guts, no glory...
Re: 1:32nd scale Junkers J.1
« Reply #14 on: July 07, 2022, 08:37:33 AM »
Immaculate research and detailing as ever Mike!

Willem
« Last Edit: August 27, 2022, 07:23:12 PM by Rookie »