Author Topic: 1/32 Royal Aircraft Factory BE 2a  (Read 13474 times)

Offline gedmundson

  • Hero Member
  • *****
  • Posts: 1541
Re: 1/32 Royal Aircraft Factory BE 2a
« Reply #15 on: December 28, 2021, 02:05:33 PM »
That's amazing Stephen - just WOW!
Cheers,
Gary

Bughunter

  • Guest
Re: 1/32 Royal Aircraft Factory BE 2a
« Reply #16 on: January 02, 2022, 03:37:50 AM »
What a great project - I have to follow of course!

Cheers,
Frank

Offline lone modeller

  • Hero Member
  • *****
  • Posts: 5316
Re: 1/32 Royal Aircraft Factory BE 2a
« Reply #17 on: January 07, 2022, 05:59:45 AM »
Evening All

Many thanks to you all for your wonderful reception of this project: I really appreciate the support that you all give to my efforts. Carving the propellor was actually much less difficult than I thought that it might be - and it has proved to be easier than making the engine as I describe below.

I commented above that I intend to use a Proper Plane resin boss but did not provide a picture, so here is one:


Ideally I would like to make one of these, but I do not have the right materials and tools to do so, so I am opting for the [strk]easy[/strk] lazy route.

In between other activities I made the main and gravity fuel tanks from laminated card and painted them:


The filler caps may look large but that is partially an exaggeration caused by the lens, and partially because the originals were actually quite large.

I have shaped the engine block and made the timing cover for the front. All is from laminated card and strip with the circular plate and prop shaft support from rod: not difficult to make but fiddly and time consuming:


"Bolts" were added to the sides and rear of the engine block to represent the joint between the sump and head of the engine, the front was glued to the engine block and all painted in aluminium:


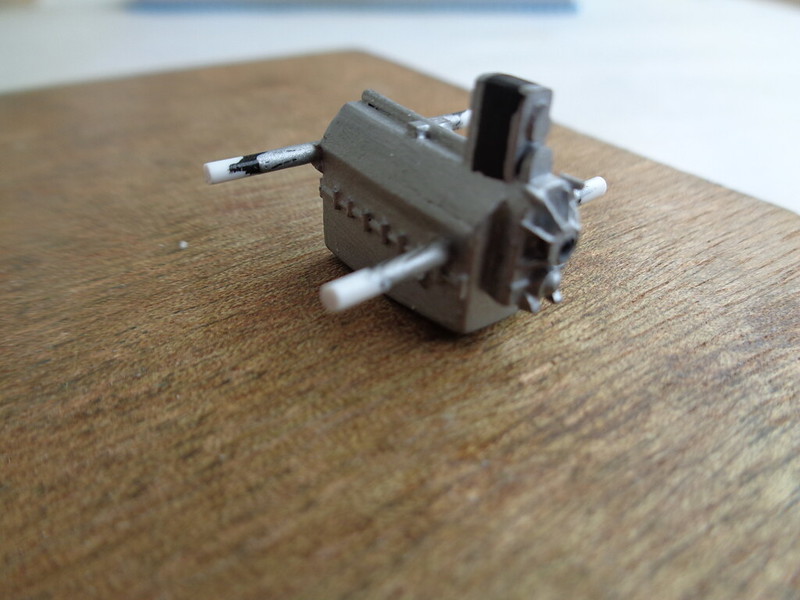
The arms sticking out of the sides are mounts which will rest on the fuselage frame later. The protrusion at the front is the magneto. I have also made a flywheel cut from a disc of card. The disc for the wheel was scribed using a pair of dividers and then the centre was shaped to a cross:


The arms are a little too wide but I cannot thin them much more or they will be so small that they will be too weak to handle.

Finally I am struggling with the cylinders. I have filed down the end of a piece of sprue to make the cylinder shape and then cut each length in turn:


The top of the cylinders was wider than the trunk because the inlet valve was positioned here. To make this wider part I cut and shaped some 60 x 180 thou strip:


The cylinders were bolted to the engine block via 4 long bolts. The bolts passed through cruciform clamps on the top of the cylinders so I shaped the latter from 40 thou card. First I cut a disc of card, then I marked a cross and finally I cut out the arms. On the right of the image is a cylinder with the head and arm in place:


There are still many more details to add before a cylinder is complete but I am having second thoughts about this method as I am not able to represent the cooling fins very well: scribing the plastic with the end of a scalpel is not as effective as I had hoped. In addition I will need to mount a small piece of aluminium strip to the top of one set of cylinders to represent the cowling and cover of the engine. This will need to abut the back plate of the engine which in turn must be made to exactly fit the fuselage frame.... In short I am of the opinion that the final engine assembly, including the bolts, push rods and valve springs, (which I intend to make from copper wire), and other assorted delicacies are best left until I have the fuselage frame and possibly lower wings completed. I can of course change my mind at any time and continue with the engine manufacture and assembly, but for the time being I will start to make ribs for the exposed parts of the wings, and the fuselage structure and interior details.

Thanks for looking.

Stephen.

Bughunter

  • Guest
Re: 1/32 Royal Aircraft Factory BE 2a
« Reply #18 on: January 07, 2022, 07:07:47 AM »
Great work, going the way to use simple tools and careful work to get nice results.

I find it always boring, if many identical pieces are needed, e.g here the to the the cylinders. Have you glued the styrene blades with white glue together, to create them in one go? I used this method with solder and brass plates.

Cheers,
Frank

Offline RAGIII

  • Hero Member
  • *****
  • Posts: 18833
Re: 1/32 Royal Aircraft Factory BE 2a
« Reply #19 on: January 07, 2022, 10:23:33 AM »
Your usual Superb work scratchbuilding details that some of us would find intimidating !
RAGIII
"A man has to know his limitations": Harry Callahan

"Don't slop it on" Lynda Geisler

Offline KiwiZac

  • Global Moderator
  • Hero Member
  • *****
  • Posts: 2623
    • My Linktree
Re: 1/32 Royal Aircraft Factory BE 2a
« Reply #20 on: January 08, 2022, 06:25:27 AM »
I think working on the fuselage first is a smart move - in reality the engine wouldn't be fitted until later, plus it gives you time to plot and scheme your approach to the model version.
I have shaped the engine block and made the timing cover for the front. All is from laminated card and strip with the circular plate and prop shaft support from rod: not difficult to make but fiddly and time consuming:

The timing cover is exquisite - I thought it was a resin piece or from an injected kit. Beautiful work, Stephen!
Zac in NZ

Offline Alexis

  • Hero Member
  • *****
  • Posts: 7947
  • Love the self
Re: 1/32 Royal Aircraft Factory BE 2a
« Reply #21 on: January 08, 2022, 08:07:19 AM »
Just love how you did cylinders , simple but very effective results . Top notch work Stephen  :)


Alexis
Hurra ! , Ich Leben Noch
Body and life is a vessel we use to travel the planet . Femininity is the gift , The miracle comes from what we do with it .

Offline DaveB

  • Hero Member
  • *****
  • Posts: 1005
Re: 1/32 Royal Aircraft Factory BE 2a
« Reply #22 on: January 10, 2022, 07:16:38 PM »
Great work as ever, Steve -

Your engine block is good.  Regarding the cooling fins for the cyinders:

Just a thought, but would it be possible to wrap fine wire around the cylinder to represent them?

Regards

Dave
As we say in fencing, what's the point!

Offline lone modeller

  • Hero Member
  • *****
  • Posts: 5316
Re: 1/32 Royal Aircraft Factory BE 2a
« Reply #23 on: January 15, 2022, 02:51:57 AM »
Evening All,

Thank you all for leaving positive and supportive comments: they are much appreciated.

I have stopped working on the engine for the time being - I am experimenting with some ideas but have nothing worthwhile to show for it. I have also decided that until I am ready to fit the engine to the fuselage frame I do not want to assemble much more because the cylinder head bolts were used to hold part of the cowling in place and I will need to instal part of the cowling at the same time that I put the cylinders in place. If you are confused all will become clear later.

The fuselage will need to be robust to support the weight of the model so I have opted to use brass bar for the longerons and some of the frame. I soldered the sides first using the standard method of holding the parts with pins while solder was applied:


The forward part of the upper longeron was steel tube on the real aircraft so I soldered some brass rod to represent this. With two sides made it was straightforward to join them with some horizontal bracing:


A rudder post was soldered to the rear - again brass rod:


All of the joints have been cleaned with a file: the remaining parts of the frame will be CA'd into place later.

I have started to make the ribs for the wings. One lower wing and half of the upper wing will have the structure exposed so I will need approximately 30 ribs. The ribs closest to the centre had lightening holes, the remainder had slots. I tried 3 times to make the ribs with holes before I got it right... I have also cut one with slots. The image below shows the sequence of manufacture: top - a strip of 40 x 188 thou Evergreen strip, strip cut and shaped and  holes drilled for spars, spar holes cut square, 2 versions of the rib with holes, bottom a rib with slots:


I will take some time to make the ribs and will work on some of the fuselage interior while I do so. I will be visiting family next week so progress will be even more glacial than usual and the next update may be some time away.

Thanks for looking.

Stephen.

Offline KiwiZac

  • Global Moderator
  • Hero Member
  • *****
  • Posts: 2623
    • My Linktree
Re: 1/32 Royal Aircraft Factory BE 2a
« Reply #24 on: January 15, 2022, 05:41:49 AM »
I have stopped working on the engine for the time being - I am experimenting with some ideas but have nothing worthwhile to show for it. I have also decided that until I am ready to fit the engine to the fuselage frame I do not want to assemble much more because the cylinder head bolts were used to hold part of the cowling in place and I will need to instal part of the cowling at the same time that I put the cylinders in place. If you are confused all will become clear later.
That sounds perfectly logical Stephen. Smart move, and the added bonus of not getting too bogged down and perhaps frustrated with figuring out the engine while you could be doing this wonderful work on the airframe.

I will be visiting family next week so progress will be even more glacial than usual and the next update may be some time away.
I for one wait patiently with anticipation. Hopefully you enjoy your time away  :)
Zac in NZ

Offline pepperman42

  • Hero Member
  • *****
  • Posts: 4436
  • Sergeant, my brown pants.......
Re: 1/32 Royal Aircraft Factory BE 2a
« Reply #25 on: January 15, 2022, 10:32:49 PM »
Amazing process!!

Steve

Offline RAGIII

  • Hero Member
  • *****
  • Posts: 18833
Re: 1/32 Royal Aircraft Factory BE 2a
« Reply #26 on: January 16, 2022, 01:29:39 AM »
Excellent work on the frame and wing ribs. You always make this look easy and I know it isn't  8)
RAGIII
"A man has to know his limitations": Harry Callahan

"Don't slop it on" Lynda Geisler

Offline Alexis

  • Hero Member
  • *****
  • Posts: 7947
  • Love the self
Re: 1/32 Royal Aircraft Factory BE 2a
« Reply #27 on: January 16, 2022, 04:21:06 AM »
Frame is progressing wonderful Stephen , brass for this was an perfect choice for structural strength . Wing ribs will take time , but the results will be top notch so this , I look forward too .

Have a wonderful visit with family  :)


Alexis
Hurra ! , Ich Leben Noch
Body and life is a vessel we use to travel the planet . Femininity is the gift , The miracle comes from what we do with it .

Offline lone modeller

  • Hero Member
  • *****
  • Posts: 5316
Re: 1/32 Royal Aircraft Factory BE 2a
« Reply #28 on: February 24, 2022, 06:18:34 AM »
Evening All

A belated thanks to Zac, Steve, Rick and Alexis for your kind and encouraging comments.

I have not posted anything for a while because I have been trying to make ribs for the exposed parts of the wings. I need 23 full sized ribs and 6 smaller ones for the tips. I had made the 23 full sized examples and was in the process of making the remaining 6 when i discovered that I had made a mistake - I had drilled and cut the holes for the spars in the wrong places for the larger ribs - all 23 of them....! Given that each rib takes about 45 minutes to make and I am not in the most motivated of states to make them, I will leave to your imaginations how I felt when I discovered my error. (It will save the mods having to delete this post if I do not write any more about that). At last I have finished the new ribs.... That was not as easy as I had expected either because I managed to spoil/ruin 10 more! In all 60 ribs made fro a total of 23 useable ones. I do not think that I will be attempting another large scale strip down model for some time. These are what the new ones look like - not all of them but you get the idea:


If anyone is wondering why I am making all of the ribs in one go, the reason is to try to maintain a consistent standard. If I were to make a few ribs, make something else and then start making ribs again I find that it is difficult to remember what has/has not been made/finished, and to keep a consistent standard of parts. I have also been experimenting making my own wicker seats but have not had much success there either so I may resort to some Barracuda resin examples instead.

I have been sent two printed engines from Beto: they are superb - I may use one of them but equally I may continue to try to scratch build one using the printed engines as a template. This is no disrespect to Beto's work - it is just that I would like to be able to scratch build as much of this model as possible. I am also experimenting with using some wood for interior parts - hopefully I can now focus on those next and start to make real progress rather than going around in circles and repeating errors...

Thanks for looking.

Stephen.

Offline kensar

  • Hero Member
  • *****
  • Posts: 2505
  • Reshaping the world - one piece at a time.
Re: 1/32 Royal Aircraft Factory BE 2a
« Reply #29 on: February 24, 2022, 07:30:16 AM »
At least you are making forward progress now.  And kudos for making everything from scratch!