Author Topic: Something Completely Different: Oertz W6 Flying Schooner  (Read 7898 times)

Offline Alexis

  • Hero Member
  • *****
  • Posts: 7947
  • Love the self
Re: Something Completely Different: Oertz W6 Flying Schooner
« Reply #30 on: July 31, 2021, 10:16:47 AM »
Coming along really nice Stephen  :)


Alexis
Hurra ! , Ich Leben Noch
Body and life is a vessel we use to travel the planet . Femininity is the gift , The miracle comes from what we do with it .

Offline William Adair

  • Sr. Member
  • ****
  • Posts: 271
Re: Something Completely Different: Oertz W6 Flying Schooner
« Reply #31 on: July 31, 2021, 04:36:05 PM »
Your soldering skills are amazing!

Offline Marklo

  • Newbie
  • *
  • Posts: 8
Re: Something Completely Different: Oertz W6 Flying Schooner
« Reply #32 on: July 31, 2021, 07:43:32 PM »
Lovely work, particularly the soldering; I struggled with it in 1/48 and said never again :) Although I’m now contemplating making an internal frame for a 1/72 Fokker Dr1, which I’m going to (try to) super detail.

Online RAGIII

  • Hero Member
  • *****
  • Posts: 18839
Re: Something Completely Different: Oertz W6 Flying Schooner
« Reply #33 on: August 01, 2021, 12:18:08 AM »
Amazing variety of Modeling techniques all superbly executed!
RAGIII
"A man has to know his limitations": Harry Callahan

"Don't slop it on" Lynda Geisler

Offline kensar

  • Hero Member
  • *****
  • Posts: 2505
  • Reshaping the world - one piece at a time.
Re: Something Completely Different: Oertz W6 Flying Schooner
« Reply #34 on: August 01, 2021, 01:53:41 AM »
Nice work with the soldering iron, Stephen.
Please do consider another way to hold the work piece if milling again.  Better safe than sorry.

Looking forward to following along here.  ;)

Bughunter

  • Guest
Re: Something Completely Different: Oertz W6 Flying Schooner
« Reply #35 on: August 01, 2021, 02:18:21 AM »
Wow Stephen, Wow and Wow!
The hull looks great now and your soldered framework too! You know, I simply love soldered parts.

This will a absolute "einzigartig" (german; which means unique, awesome and singular at once).

Cheers,
Frank

Offline lone modeller

  • Hero Member
  • *****
  • Posts: 5317
Re: Something Completely Different: Oertz W6 Flying Schooner
« Reply #36 on: August 07, 2021, 01:43:02 AM »
Evening All

Thank you Richie, Alexis, William, Mark, Rick, Ken and Frank for your support and generous comments - they are very helpful indeed.

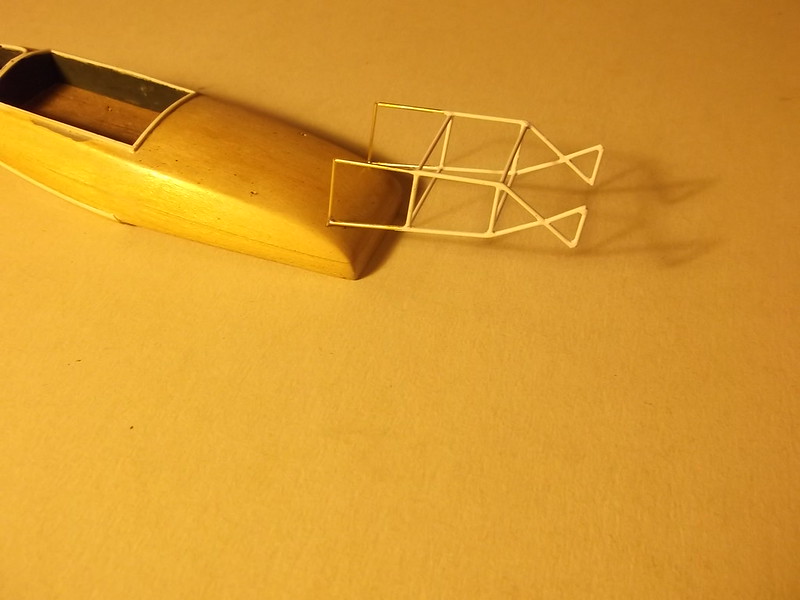
As Frank in particular and the rest liked the soldering in my last post, I decided that I would do some more. The propellors on this aircraft were supported on two booms and were connected to the engines by drive shafts. The booms were braced by a rather elaborate construction which was placed over the engines: the whole is a rather intricate structure with lots of small pieces. I thought that I might try to make the whole assembly from brass rod until I looked carefully at some of the joints - and then changed my mind. I will make the propellor supports and the rear of the cage from brass rod to give the structure strength, but much of the bracing over the engines I will fill in with plastic rod as I will have to assemble it in situ and soldering that would be impractical. If you are a bit bemused, all will become clear at a later stage of construction. So for now I have made the propellor supports from brass rod as per the tail boom:


These have since been primed with the tail unit parts shown in the last post.

The wings caused me some problems. There are 4 of them and I originally cut them form 30 thou card which had been bent in boiling water in a piece of drain pipe. The lower rear wing is in 3 sections as the outer panels are very slightly swept back. Similarly the upper wings are in two parts because the leading edge is not straight. The lower front wings were simply cut from card. All sections were sanded to give a slight aerofoil shape and ribs glued in place: these were 10 x 20 thou Evergreen strip applied with liquid cement. The strips were sanded and then 500 grade Mr Surfacer filler was applied to the edges and the whole sanded again. The rear wings were fine, but when tested the front lower pair had too much curve and would not sit firmly on the top of the hull and give sufficient contact to ensure that when glued in place they would stay there. I also looked at the photos of the aircraft and saw that the aerofoil on the front pair of wings, especially the upper one, was almost nil. So I cut a second set of front wings from 30 thou card, applied the ribs and filler, sanded them twice and tried again. This time I found that the lower wings just did not have enough strength to be sure that they would not sag at the tips when the upper wing and struts were placed on them. So I made a third pair..... from laminated 20 thou card which had not been bent in hot water. This time I managed to get wings which may not be 100% accurate in terms of aerofiol section, but they will have the strength and surface area to stay in place and not bend (I hope!)


The upper pair are the front wings and the lower pair are the rear wings.

I have lined the interior of the engine compartment and front cockpit with 10 thou card but as I have no idea about what the interior was like I am using modellers license and following Marklo's suggestion that there was a floor made of wood to help support the engines at the correct level. I made up a floor from pieces of stripwood laminate. I also made up the platform for the trailer which the aircraft was carried on at the same time. This was also stripwood and the beams obechi. Both the floor and platform were stained with a wash of Revell brown 381 acrylic:


I checked that the tail boom will fit properly into the rear of the hull. This was useful as I was able to use the structure to make sure that when I cut the horizontal tail surface it will exactly fit:


I have started to make the engines but have only laminated plastic for the blocks and cut rod for the cylinders - construction, detailing and painting will be shown next time.

Thanks for looking.

Stephen.

Offline kensar

  • Hero Member
  • *****
  • Posts: 2505
  • Reshaping the world - one piece at a time.
Re: Something Completely Different: Oertz W6 Flying Schooner
« Reply #37 on: August 07, 2021, 02:35:43 AM »
The hull (fuselage?) is turning out very nicely already!  I like all the wood tones.

Offline Alexis

  • Hero Member
  • *****
  • Posts: 7947
  • Love the self
Re: Something Completely Different: Oertz W6 Flying Schooner
« Reply #38 on: August 07, 2021, 02:38:38 AM »
This is getting good now !

Alexis
Hurra ! , Ich Leben Noch
Body and life is a vessel we use to travel the planet . Femininity is the gift , The miracle comes from what we do with it .

Offline bobs_buckles

  • Hero Member
  • *****
  • Posts: 3733
  • Freedom isn't free.
    • Bobs Buckles
Re: Something Completely Different: Oertz W6 Flying Schooner
« Reply #39 on: August 07, 2021, 03:28:41 AM »
Super work, Stephen  :o


https://www.bobsbuckles.co.uk/

Last Minute Man Of Faith

Bughunter

  • Guest
Re: Something Completely Different: Oertz W6 Flying Schooner
« Reply #40 on: August 07, 2021, 06:09:39 AM »
It already looks as elegant as an Italian motorboat!
Wonderful, a joy to follow.

Cheers,
Frank

Offline RichieW

  • Hero Member
  • *****
  • Posts: 1966
Re: Something Completely Different: Oertz W6 Flying Schooner
« Reply #41 on: August 07, 2021, 09:02:21 PM »
Great to see this again Stephen, getting to see the model underway for real last week was a real joy. No photograph can do justice to the delicacy and precision of your impeccable craftsmanship although it does look great in the photos too.

Richie

Online RAGIII

  • Hero Member
  • *****
  • Posts: 18839
Re: Something Completely Different: Oertz W6 Flying Schooner
« Reply #42 on: August 07, 2021, 11:16:31 PM »
Terrific progress Stephen. As always your work is incredible!
RAGIII
"A man has to know his limitations": Harry Callahan

"Don't slop it on" Lynda Geisler

Offline DaveB

  • Hero Member
  • *****
  • Posts: 1005
Re: Something Completely Different: Oertz W6 Flying Schooner
« Reply #43 on: August 09, 2021, 10:27:19 PM »
As others have already said, Steve -

Great work and progress.  Look forward to seeing your next update, mate.

Regards

Dave
As we say in fencing, what's the point!

Offline lone modeller

  • Hero Member
  • *****
  • Posts: 5317
Re: Something Completely Different: Oertz W6 Flying Schooner
« Reply #44 on: August 13, 2021, 06:03:17 AM »
Evening All,

Thanks to all of you who have dropped by - your very generous comments are always most welcome.

I promised that I would reveal all about the engines in this post. As usual they were made from laminated card for the sumps, rod for the cylinders and thin rod and wire for the pipes, conduits and exhausts which make these engines. I started by laminating some plastic card and cutting lengths of 80 thou rod for the cylinders:


File the laminated card to shape and glue the rod on one edge to make up the basic engine form:


I used photographs of the real engines to add the various pipes and pieces to the sides and tops of the cylinders, and some breather units to the side of the sump. The sumps were painted in aluminium and the cylinders black. Other parts were largely aluminium:


This machine started life without wing tip floats, but I want to represent it later in its career when floats were fitted, so I laminated some more card and when that was dry, filed a pair of floats to shape:

[

I wanted to fix the rear lower wing to the boom structure and realised that I had made a mistake: I had not drilled holes in the wing and passed the brass rod upright through the wing before I completed the soldering. Grrrr. The solution was simple enough but required some time and fiddly work. I decided to cut the leading upright off completely and make a new one after I had drilled the necessary holes in the wing. However brass rod conducts heat readily and there is not very much length between the joints which are to be soldered and the plastic of the wing. Without protection for the plastic damage could result, but at the same time the ends of the new upright have to be held against the ends of the existing frame. The solution was to pin the frame to the balsa block and solder the lower joints without the wing: this meant that I could heat the brass and not have to worry about melting plastic. Now I could gently ease the upper ends of the boom upright through the holes in the wing and slide the wing to the base of the boom structure, leaving the upper joint free. Once again all was secured to the wood base with pins and the wing insulated with wet tissue paper. The upper two joints were soldered and the plastic of the wing was undamaged:


Now the wing could be slid into place against the top of the boom and secured with CA:


This shows the old, removed leading upright pieces in front of the new parts which have been secured to the wing:


The horizontal tail surfaces were cut from 30 thou card and the edges filed and sanded to give an aerofoil appearance:


I will now try to secure the lower front wings to the hull so that I can start painting and decorating.

Thanks for looking.

Stephen.