Author Topic: 1/72 Siemens Schuckert DDr 1  (Read 6812 times)

Online RAGIII

  • Hero Member
  • *****
  • Posts: 18839
Re: 1/72 Siemens Schuckert DDr 1
« Reply #30 on: December 06, 2020, 08:39:43 AM »
I am gobsmacked as always by your work. How you get all of this together Amazes Me No End!
RAGIII
"A man has to know his limitations": Harry Callahan

"Don't slop it on" Lynda Geisler

Offline William Adair

  • Sr. Member
  • ****
  • Posts: 271
Re: 1/72 Siemens Schuckert DDr 1
« Reply #31 on: December 06, 2020, 01:09:48 PM »
Looking good!  Fascinating aircraft too.  It looks like it might fly just as successfully backwards as it did forwards.   ;D

Online Rookie

  • Hero Member
  • *****
  • Posts: 927
  • No guts, no glory...
Re: 1/72 Siemens Schuckert DDr 1
« Reply #32 on: December 13, 2020, 08:24:29 PM »
Beautiful work!

Must be a nightmare though to get the wings and struts alligned...

Willem

Offline lone modeller

  • Hero Member
  • *****
  • Posts: 5317
Re: 1/72 Siemens Schuckert DDr 1
« Reply #33 on: December 14, 2020, 12:51:56 AM »
Evening All,

Thank you Kevin, Frank, Torbiorn, Rick, William and Willem for the very kind comments. William it might have been as successful flying backwardsas forwards as it crashed on its maiden flight. Perhaps the pilot had pointed it in the wrong direction!

Progress has been interrupted again by life, but I have at last mounted the top wing - with some expected difficulty. I eventually adopted the method of fixing the outer struts first by placing the top wing upside down on the tray, adding drops of liquid cement into the holes and placing the main structure on to the wing. While things were still moveable I slipped liquid cement on to the tops of the remaining struts using the tip of a scalpel blade to reduce the risk of smear on the wing surface. Finally I added some liquid cement to all of the strut joints and left the whole thing overnight to harden.


I have started to make the booms - these will be from florists wire. The ends of the upper booms were bent at the rear end so I have already done this in preparation prior to fixing them to the wings:


The next step will be to fix the booms and tail unit prior to adding all of the supporting strut work which will be from plastic rod.

Thanks for looking.

Stephen.
« Last Edit: December 14, 2020, 01:05:18 AM by lone modeller »

Offline Alexis

  • Hero Member
  • *****
  • Posts: 7947
  • Love the self
Re: 1/72 Siemens Schuckert DDr 1
« Reply #34 on: December 14, 2020, 08:03:19 AM »
Excellent job on getting the top wing wing mounted , she is taking shape wonderfully so far Stephen and I'm looking forward on seeing how the booms turn out .


Terri
Hurra ! , Ich Leben Noch
Body and life is a vessel we use to travel the planet . Femininity is the gift , The miracle comes from what we do with it .

Bughunter

  • Guest
Re: 1/72 Siemens Schuckert DDr 1
« Reply #35 on: December 15, 2020, 12:09:50 AM »
Good luck with the tail booms!
I think the alignment is not an easy task, but you managed the wings - now there are no limits for you.

Cheers,
Frank

Offline kensar

  • Hero Member
  • *****
  • Posts: 2505
  • Reshaping the world - one piece at a time.
Re: 1/72 Siemens Schuckert DDr 1
« Reply #36 on: December 15, 2020, 01:05:48 AM »
Great job getting all those wings together, Stephen.  This does not look like an easy build by any means.  The tail structure is very complicated.

Offline William Adair

  • Sr. Member
  • ****
  • Posts: 271
Re: 1/72 Siemens Schuckert DDr 1
« Reply #37 on: December 15, 2020, 06:03:17 PM »
Fantastic progress.  I just realised it wasn't 1/48 scale too.   :D

Offline lone modeller

  • Hero Member
  • *****
  • Posts: 5317
Re: 1/72 Siemens Schuckert DDr 1
« Reply #38 on: December 21, 2020, 10:59:53 PM »
Evening All

Thanks Terri, Frank, Ken and william for your comments. I think that fitting the top wing was the biggest hurdle in this build - fixing the booms and supporting structures by contrast has proved to be straightforward.

I attached the booms to the wings using rapid setting epoxy. I had thought of using superglue but in the past I have had disasters when it came to attaching booms to wings so I avoided that method. I filed shallow grooves in the wings using a round file: this was rotated so that I could avoid hitting the rear of the struts. The upper boom was attached first with the horizontal tail surface set between the rear end of the booms - this was held in place with superglue:


When the epoxy has set after 24 hours I put in the upper cross strut between the booms to help give this part of the assembly strength:


Please note that in the above image the model has been inverted onto an upper view of the plan, so that the rear of the lower wing is visible behind the model. The angle of the camera also distorts the view and makes it appear as if the alignment is wrong when it fact it is not. The lower booms were epoxied into place with the rudders: the booms were again attached to the wing with epoxy and the rudders with superglue, thus holding the assembly in place while the epoxy set. To get the correct angle of the lower booms to the wing I used a simple jig to hold the rear of the boom at the correct height:


With the booms, horizontal tail surface and rudders in place and set, it was time to start adding the remaining struts which held the tail lattice together by measuring and cutting plastic rod to fit. All of the struts are of 30thou plastic rod: where they attach to the metal booms I used superglue, the central vertical strut was held with liquid plastic cement:
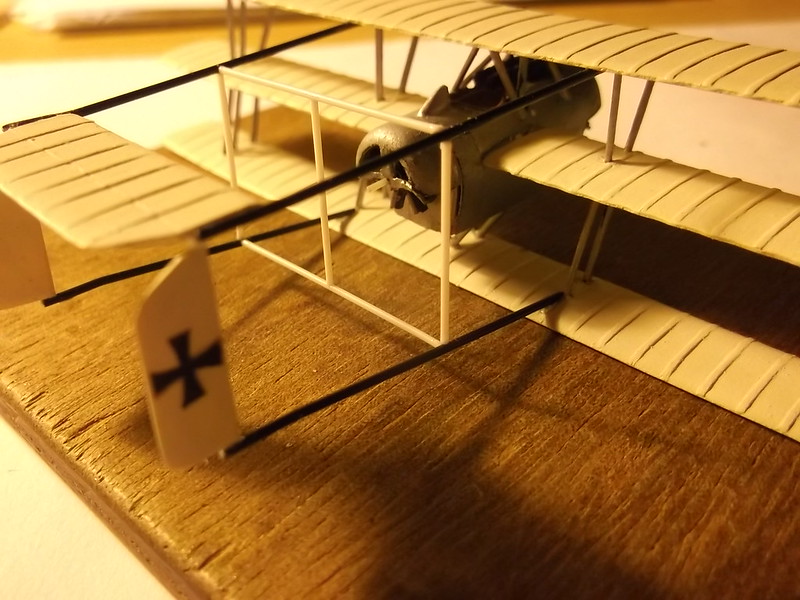


The remaining rear strut assembly was added in the same way as described above:


Now I have to paint the struts and booms and add the undercarriage before I start the rigging.

Thanks for looking.

Stephen.
« Last Edit: December 21, 2020, 11:10:18 PM by lone modeller »

Online RAGIII

  • Hero Member
  • *****
  • Posts: 18839
Re: 1/72 Siemens Schuckert DDr 1
« Reply #39 on: December 22, 2020, 12:18:39 AM »
Sorry for My absence from your build. It seems I missed quite a bit Stephen! Your assembly of the wings and booms is fantastic! This one is really taking shape beautifully !
RAGIII
"A man has to know his limitations": Harry Callahan

"Don't slop it on" Lynda Geisler

Bughunter

  • Guest
Re: 1/72 Siemens Schuckert DDr 1
« Reply #40 on: December 22, 2020, 12:52:50 AM »
Very cleanly done, looks all straight and in the correct angle!
I hope the glued connections are robust enough for rigging and transport.

Cheers,
Frank

Offline Alexis

  • Hero Member
  • *****
  • Posts: 7947
  • Love the self
Re: 1/72 Siemens Schuckert DDr 1
« Reply #41 on: December 23, 2020, 01:17:28 PM »
Tail end shape up excellent Stephen , rigging should be fun , fair amount on this bird .

Terri
Hurra ! , Ich Leben Noch
Body and life is a vessel we use to travel the planet . Femininity is the gift , The miracle comes from what we do with it .

Online Rookie

  • Hero Member
  • *****
  • Posts: 927
  • No guts, no glory...
Re: 1/72 Siemens Schuckert DDr 1
« Reply #42 on: December 23, 2020, 07:36:44 PM »
What an unusual bird this is, and beautyfully built!

Willem

Offline Alexis

  • Hero Member
  • *****
  • Posts: 7947
  • Love the self
Re: 1/72 Siemens Schuckert DDr 1
« Reply #43 on: January 10, 2021, 09:31:17 AM »
How goes the battle with the rigging Stephen ? Haven't tangle your self up have you ?


Alexis
Hurra ! , Ich Leben Noch
Body and life is a vessel we use to travel the planet . Femininity is the gift , The miracle comes from what we do with it .

Offline lone modeller

  • Hero Member
  • *****
  • Posts: 5317
Re: 1/72 Siemens Schuckert DDr 1
« Reply #44 on: January 19, 2021, 10:32:33 PM »
Evening All,

Thanks Rick, Alexis, Willem and Frank for dropping by. 

I have been struggling to finish this one for a number of reasons, all of which have sapped energy or caused distractions, hence the long time between the last post and this one. However this is now finished and pictures will appear in completed models shortly.

I put the undercarriage in place first: the wheels were made from discs of card with rod for tyres. The legs were cut and shaped from card, as were the tail skids. I carved the propellors from thick card too - usually I use wood but the small size of these and my inability to focus for any length of time caused me to use plastic instead as this was easier. The props were painted.

Rigging was straightforward except for the wings. Here the wires passed through the centre wing and were attached at the ends of the outer and inner struts. Getting the wires to line up correctly on the top and bottom of the wings was trying to say the least. I did not drill holes because that would have been even more tricky - I had had enough problems with the struts! The booms may look complicated but i fact they were relatively simple - simply cross bracing between the corners, and all went smoothly.

So here is the finished item at last - another odd type in my collection of odd types!


Thanks for looking.

Stephen.
« Last Edit: January 19, 2021, 10:36:48 PM by lone modeller »