Author Topic: 1/32 Avro 504 scratchbuild #4  (Read 21574 times)

Offline lone modeller

  • Hero Member
  • *****
  • Posts: 5300
Re: 1/32 Avro 504 scratchbuild #4
« Reply #75 on: November 03, 2020, 04:20:06 AM »
Thanks for the info on the instruments Ken. I must write again that they are eye-wateringly good.

Stephen.

Offline gbrivio

  • Hero Member
  • *****
  • Posts: 1681
Re: 1/32 Avro 504 scratchbuild #4
« Reply #76 on: November 03, 2020, 06:58:41 AM »
Superb interior work, highly realistic.
Ciao
Giuseppe

Offline kensar

  • Hero Member
  • *****
  • Posts: 2503
  • Reshaping the world - one piece at a time.
Re: 1/32 Avro 504 scratchbuild #4
« Reply #77 on: November 04, 2020, 10:37:54 PM »
I appreciate your comments, Stephen and Giuseppe.
It's the first eye-watering comment I've received!

I have the top rear of the fuselage attached now and waiting for the oil paint on the cockpit surrounds to dry.
I'll soon have to go back to the wings to add rib tape to the bottom surfaces and start test fitting them to the fuse.

Thanks for following along, everyone.

Online PrzemoL

  • Hero Member
  • *****
  • Posts: 4853
  • There was Eru... and he made first the Ainur...
    • Przemysław Litewka
Re: 1/32 Avro 504 scratchbuild #4
« Reply #78 on: November 04, 2020, 10:48:13 PM »
No idea how I missed this masterpiece build... Great that it was mentioned in the Roden new releases thread.

Magic, magic....

It will surely be a valuable source of info, almost a photographic walkaround, for those building the future Roden 504 model - next year?  ;)
Ash nazg durbatuluk, ash nazg gimbatul,
Ash nazg thrakatuluk, agh burzum-ishi krimpatul.

Offline kensar

  • Hero Member
  • *****
  • Posts: 2503
  • Reshaping the world - one piece at a time.
Re: 1/32 Avro 504 scratchbuild #4
« Reply #79 on: November 06, 2020, 02:04:41 AM »
Thank you for the kind comments, Przemol.

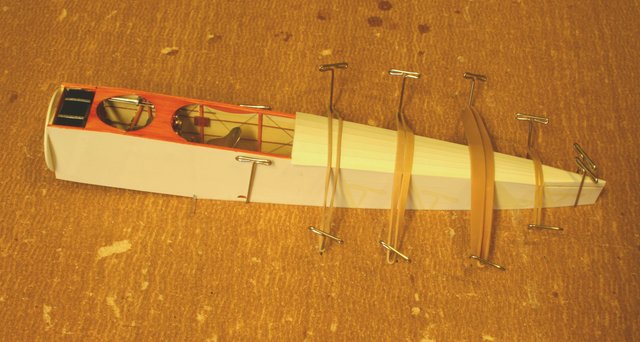
I have the turtledeck installed on the fuselage now and was continuing with other parts of the fuse, moving up to the cowling area.


I have had this idea for quite a while now and decided to try it - engine turning.
I used a Dremel drill press accessory and a Dremel tool that is made for sharpening chain saw blades.  It is a 1/8" round stone with a flat end.  In scale it makes 4" circles, which is rather large, but it's the smallest stone of this shape I could find.


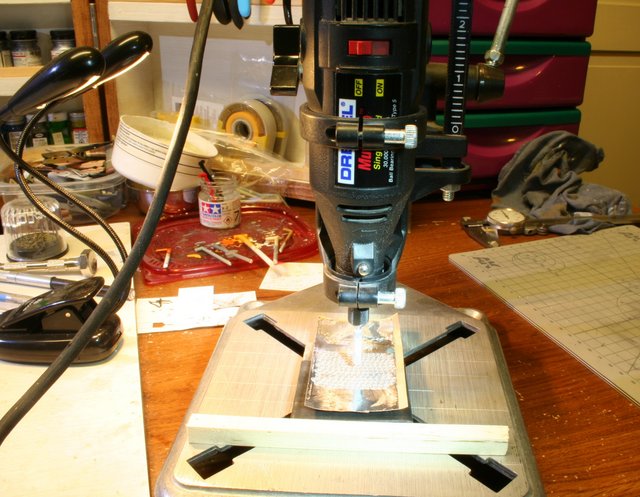
I am using HVAC aluminum tape to do the engine turning on.  This will go on the firewall of the 504.  Beneath the aluminum tape is a piece of bicycle inner tube stretched around an aluminum plate.  This gives the tape some 'give' and makes a more even pattern.  The aluminum tape is taped to the aluminum plate with the bike tube on it (this is not shown in the pictures).  I clamped a piece of wood on the base to use as a guide to make straight rows of the pattern, moving the piece over after each impression.  The wood guide is repositioned for each row of impressions.


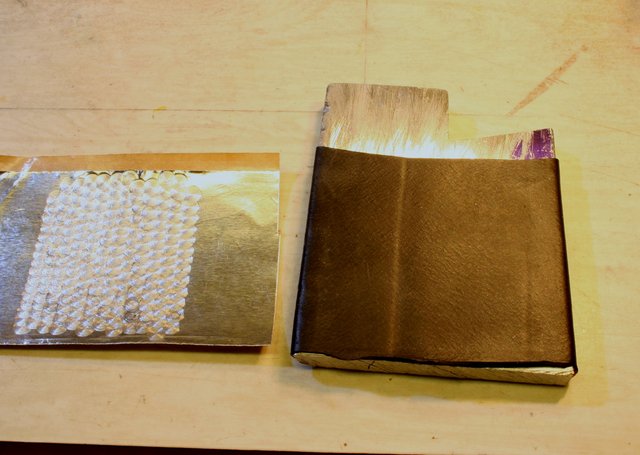
I screwed up a few times and had to reposition the piece to cover enough area.


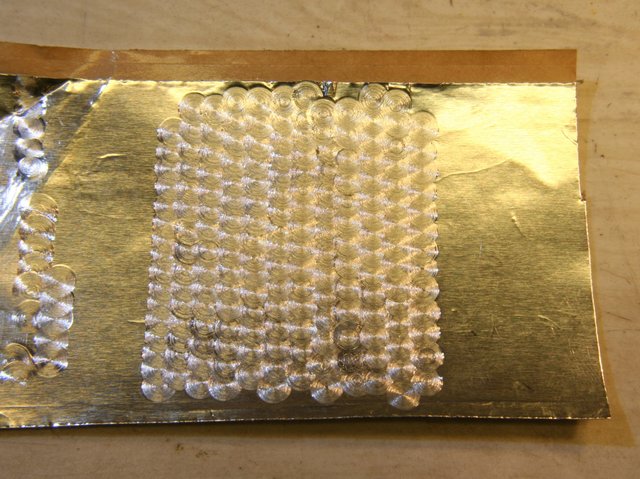
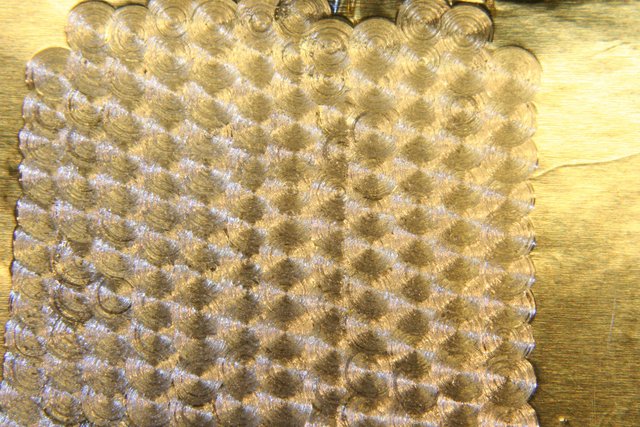
I think it looks pretty good for the effort I put into it, especially since it will go on the firewall and not be very visible.  Next time, I will use my mill with its X - Y table to get more precise positioning of the impressions.

Offline Rookie

  • Hero Member
  • *****
  • Posts: 925
  • No guts, no glory...
Re: 1/32 Avro 504 scratchbuild #4
« Reply #80 on: November 06, 2020, 02:38:42 AM »
It looks great Ken, and very cleverly conceived!

Thanks for sharing another scratchbuild secret.

Learning all the time!

Willem

Online RAGIII

  • Hero Member
  • *****
  • Posts: 18793
Re: 1/32 Avro 504 scratchbuild #4
« Reply #81 on: November 10, 2020, 04:39:34 AM »
Impressive work as always Ken. The turned aluminum looks great!
RAGIII
"A man has to know his limitations": Harry Callahan

"Don't slop it on" Lynda Geisler

Offline Alexis

  • Hero Member
  • *****
  • Posts: 7947
  • Love the self
Re: 1/32 Avro 504 scratchbuild #4
« Reply #82 on: November 14, 2020, 04:02:59 PM »
I like how the effect turned out Ken , very convincing indeed.


Terri
Hurra ! , Ich Leben Noch
Body and life is a vessel we use to travel the planet . Femininity is the gift , The miracle comes from what we do with it .

Bughunter

  • Guest
Re: 1/32 Avro 504 scratchbuild #4
« Reply #83 on: November 14, 2020, 05:57:30 PM »
Ken, that metal work is great, may be a bit strong.
I tried this on a smaller scale with a felt polisher, but it was not as successful as your method.

Cheers,
Frank

Offline Monty

  • Hero Member
  • *****
  • Posts: 1643
Re: 1/32 Avro 504 scratchbuild #4
« Reply #84 on: November 14, 2020, 06:46:11 PM »
Amazing work on this classic, Ken! I'm enjoying your approach to unique solutions... Regards, Marc.

Offline kensar

  • Hero Member
  • *****
  • Posts: 2503
  • Reshaping the world - one piece at a time.
Re: 1/32 Avro 504 scratchbuild #4
« Reply #85 on: November 15, 2020, 02:06:51 AM »
Thanks for stopping by, everyone.
The machine turning is quite bright, but I must conclude that this is close to how it looks.  However, in scale, and after some time in the field with use and aging, it probably became quite dull colored.  Nothing some flat clear wont fix.

In the meantime, I've been working on the fuse.  I have pre-shaded it and started putting some color coats of paint on it.


Offline lone modeller

  • Hero Member
  • *****
  • Posts: 5300
Re: 1/32 Avro 504 scratchbuild #4
« Reply #86 on: November 17, 2020, 03:55:34 AM »
Apologies Ken for not being more observant - I am being distracted frequently at present.

The turned aluminium is very good indeed - very original idea to get the effect. The fuselage is also looking very good - a winner in the making here.

Stephen.

Offline William Adair

  • Sr. Member
  • ****
  • Posts: 271
Re: 1/32 Avro 504 scratchbuild #4
« Reply #87 on: November 17, 2020, 10:32:59 PM »
The fuselage is looking great.  I really like your method of pinning the pieces to the board.  That looks very handy indeed. 

Offline kensar

  • Hero Member
  • *****
  • Posts: 2503
  • Reshaping the world - one piece at a time.
Re: 1/32 Avro 504 scratchbuild #4
« Reply #88 on: November 18, 2020, 01:36:12 AM »
Thanks for commenting Stephen.  There is a lot of things to be distracted about these days.
William, this is a RC plane building technique I have used.  Thanks for stopping by.

I'll post a picture of the fuse in its current painted state when I get a chance.  Work is getting in the way.  :P


Offline kensar

  • Hero Member
  • *****
  • Posts: 2503
  • Reshaping the world - one piece at a time.
Re: 1/32 Avro 504 scratchbuild #4
« Reply #89 on: November 18, 2020, 09:58:17 AM »
A small update - fuselage painting

A test fit of the wooden panels for the top of the fuse.  The early 504s have this type of cockpit surrounds.


Preshading on the fuselage.  I'm using the picture of the 504 below as a guide.  It appears the forward part of the fuse is in shadow inside, with the re-enforcing tapes making bright lines, but on the rear, after the cockpit, the structure casts shadows and appear darker than the covering.


After color coats.