Author Topic: Airfix Fairey Battle, as it perhaps should have been!  (Read 3491 times)

Offline IanB

  • Hero Member
  • *****
  • Posts: 2440
Airfix Fairey Battle, as it perhaps should have been!
« on: May 22, 2020, 10:20:30 PM »
Hi folks,
I mentioned in my FE8 thread that I've been away on "other" subjects for a while, here is one of them. I'm building the old Airfix Fairey Battle and updating it to try to get it as accurate as I can. I've been at it for a couple of years now, on and off, so i won't post everything that I've done, but here's a link so you can check it out if you want.

Here's the full build

https://www.britmodeller.com/forums/index.php?/topic/235033270-an-airfix-classic-the-fairey-battle-receives-some-tlc/

Today's post follows. I'll keep this up to date here from now on.

Since I had sorted (I hope!) the canopy issues, and I had the FE8 in the booth today, this happened...


Getting there!

There's really only the undercarriage and bomb bays to complete so I might as well get some paint on. I say "only" but of course the undercarriage has to be made first!


Ian

Online lcarroll

  • Administrator
  • Hero Member
  • ******
  • Posts: 8554
Re: Airfix Fairey Battle, as it perhaps should have been!
« Reply #1 on: May 23, 2020, 12:00:26 AM »
Ian,
     A "real modelling" project for certain! I just scanned through your log on the other site, quite the makeover indeed and a lot of impressive work. I'll enjoy following along from here.
Cheers,
Lance

Online lone modeller

  • Hero Member
  • *****
  • Posts: 5320
Re: Airfix Fairey Battle, as it perhaps should have been!
« Reply #2 on: May 23, 2020, 08:45:02 AM »
I have been wondering where this had got to as all had gone quiet for a time. This really is a labour of love - but it will be worth it when it is finished. But you have to admit that a pusher is more satisfying in the end!

Stephen.

Offline IanB

  • Hero Member
  • *****
  • Posts: 2440
Re: Airfix Fairey Battle, as it perhaps should have been!
« Reply #3 on: May 24, 2020, 01:38:49 AM »
Many thanks Lance, welcome aboard!
You're not going to let go on the pushers are you Stephen!  ;D There will be more, don't worry, but I find this kind of build just as satisfying. Turning a terrible kit into an accurate model I find very rewarding.

As a follow on to yesterday, I spent a few hours today cutting out bits of masking tape I ended up with this


Although this is going to be an even numbered aircraft (P2332) having looked at available pics it looks as though it had the "B" scheme, so that's what I've gone with. It would have been much easier and quicker to do the "A" as that's what the drawings are in the Huntley book. I got around it by copying the drawings to scale, then drawing the pattern outlines on the back Masking tape was stuck on the back and cut to the shape giving me a mirror image to use.


It looks like more paint tomorrow!


Thanks for looking in and stay safe!


Ian

Offline IanB

  • Hero Member
  • *****
  • Posts: 2440
Re: Airfix Fairey Battle, as it perhaps should have been!
« Reply #4 on: May 25, 2020, 01:32:14 AM »
I was right! However things didn't go quite according to plan. When I opened the bottle of Misterkit Dark Earth it was almost past it - a crust on it and VERY lumpy. I added some Tamiya thinners and attacked it with my electric stirrer, then did the same again another half a dozen times or more. Finally the paint dripped off the stirrer and I thought I'd give it a try. Saved - and as a bonus I now have almost twice as much in the bottle, that's how much thinner it took!

It came out pretty well...


I know, I know. You don't want to see those pics, you want to see THSESE


Pretty chuffed with that, especially given the state of the paint! As per the colour notes in Ian Huntley's book the colours around the canopy were the same regardless of which pattern was used. They are: decking under the canopy Dark Earth, canopy frame Green, Pilot's windshield Dark Earth, Pilot's canopy half and half. He didn't state how it was split so I did it diagonally so the front and rear both match the adjoining framework.

 However there were a couple of areas that needed further attention. The masking tape lifted the paint from the selotape on the right wing landing light


and on the same wing, at the trailing edge on the green bit seen in the above pic, there was a nasty blemish that I had somehow missed, both when in primer, and after the green was done. It was only visible under harsh light from one angle, but it looked horrible! Needless to say i sanded it down, masked off the brown on that wing and wrapped the rest of the aircraft in clingfilm, then resprayed those two areas. All good now!


Not sure if I'll do black yet or not. I may wait until the pitot is fitted, but if I add that now I'll knock it off. Then again, I may just go ahead while I have my painting head on and do it!


Thanks for looking in. Stay safe!


Ian

Offline IanB

  • Hero Member
  • *****
  • Posts: 2440
Re: Airfix Fairey Battle, as it perhaps should have been!
« Reply #5 on: June 10, 2020, 04:37:17 AM »
This really hasn't been my week! I realised too late that I had masked of windows in the rear gunner's compartment that were not on the later aircraft, so I decided to correct that. Whilst I was at it, I adjusted a small patch on the tailplane that I had masked incorrectly, and raised the demarcation line under the canopy slightly. 


Here's how I had masked the windows. Masking was removed and a smear of PPP was applied to eliminate the frames.


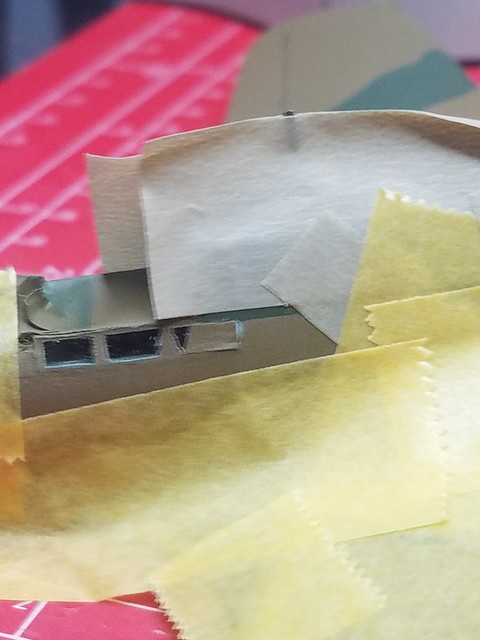
and the error on the tailplane


The interior colour was sprayed, then the brown, then.....AAAARGH! The green had gone solid and I didn't have anything similar! I searched online and found an article mentioning that Vallejo US Dark Green 893 was a perfect match for RAF Dark Green so i went online and ordered a pot from Mumzworld, a local kids, toy, and hobby store who for some reason stock a huge range of Vallejo products!


That arrived a couple of days ago so it was duly sprayed. Unfortunately the Misterkit green was obviously NOT an exact match, but it was very close! I masked out the brown and feathered the new colour in. It is barely noticeable and I will put it down to "field repairs"! I thought I had pics but apparently not, sorry!


So on to today. I decided to mask off the camo ready for the black.


If I do have to relocate I don't want the canopy masking on for months in a hot container so the plan is to get all the painting and decaling done, then finish the bomb bays and undercarriage.


Then on to detailing the prop.

I had already cleaned it up and added some putty to clean up the shape.


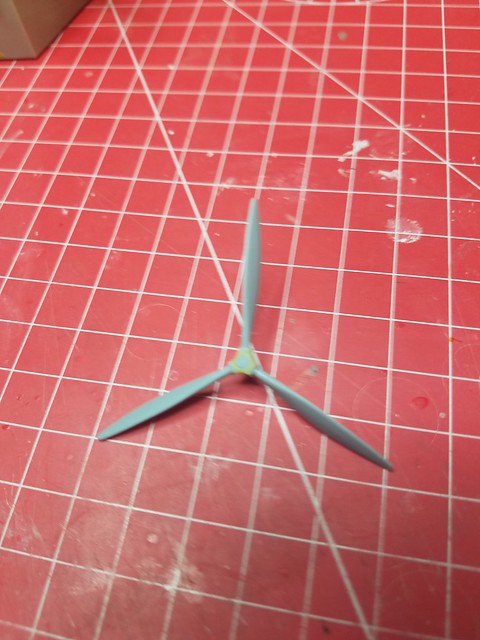
I have now added 6 tiny pieces of .015" rod to represent the hub bolts, and a piece of 2.5mm rod for the hub.


Tomorrow, when that's properly set, I'll round off the front edge of the hub slightly and add the counter weights. That should see the prop ready for paint too.


That's it for tonight, thanks for looking in, and stay safe!


Ian

Offline jeroen_R90S

  • Hero Member
  • *****
  • Posts: 1060
Re: Airfix Fairey Battle, as it perhaps should have been!
« Reply #6 on: June 10, 2020, 04:41:34 AM »
It sure takes perisistence to get this to the finish line! Best of luck!

Offline IanB

  • Hero Member
  • *****
  • Posts: 2440
Re: Airfix Fairey Battle, as it perhaps should have been!
« Reply #7 on: June 11, 2020, 04:38:58 AM »
As mentioned in my last post. I was going to finish the prop detailing. I started by drilling the hub and adding a piece of .5mm brass rod which was then filed back. I was going to add the counter weights by sticking punched out circles of plastic sheet to PE. That was a silly idea as there is no way I can get them to look in scale.


 So the PE was done away with and I simply glued the 1.2mm discs of sheet to the hub. After a coat of black I'm pretty pleased with how it looks

(I did take a pic, but for some strange reason it won't upload!) I now try to check after every pic whether the pic I took is in the memory, and still sometimes they disappear!


Needless to say I also sprayed the rest of the underside using Misterkit RAF Night. I'm pretty pleased with the way it looks at the moment, enough variation with the airbrush passes to stop it being bland.


Pics were also taken of the other bits and pieces but they too have been eaten. The "other bits" included bomb bay doors. radiator door, and wheel hubs.


Thanks for looking in, and stay safe!


Ian

Offline Dave Brewer

  • Hero Member
  • *****
  • Posts: 513
Re: Airfix Fairey Battle, as it perhaps should have been!
« Reply #8 on: June 11, 2020, 10:28:50 AM »
Quite the modelling odyssey Ian,certainly repaying all your effort!
Cheers,
Dave.

Offline RAGIII

  • Hero Member
  • *****
  • Posts: 18843
Re: Airfix Fairey Battle, as it perhaps should have been!
« Reply #9 on: June 12, 2020, 02:00:11 AM »
This one is looking superb. Excellent recovery on the paint glitches on the wing!
RAGIII
"A man has to know his limitations": Harry Callahan

"Don't slop it on" Lynda Geisler

Offline IanB

  • Hero Member
  • *****
  • Posts: 2440
Re: Airfix Fairey Battle, as it perhaps should have been!
« Reply #10 on: June 12, 2020, 04:25:33 AM »
Thanks Dave & Rick, much appreciated!

Right then,

Here's the pic that refused to upload yesterday. Prop completed.


Or so I thought. Fortunately after the comments about the prop diameter I decided to double check. Crap.

I did correct it, but instead of amending the radius to 26.5mm I had corrected the prop blade length to that. Which meant it was still 2mm too long on each blade!

Of course I had a little think then chopped the ends off! It is now correct!


Then came more black! The tail needed a little more, as did the edges around the underside of the nose and the wheel wells. Oh, and the now shortened prop!


So here is how she looks now, complete with black bottom, plus the extras that refused to be photographed yesterday.


Of course it didn't go perfectly. Once again the masking tape pulled off the paint over the landing lights. Fortunately only on the brown side!


and this is totally inexplicable. How did I allow this to happen?


]


It really wouldn't have been any more effort to have allowed the green to extend all the way down. Now I will have to respray the green to eliminate the brown line at the junction with the black. Careless.


Anyway, all in all a very productive day!


Thanks for looking in, and stay safe!


Ian

Online lone modeller

  • Hero Member
  • *****
  • Posts: 5320
Re: Airfix Fairey Battle, as it perhaps should have been!
« Reply #11 on: June 12, 2020, 06:28:14 AM »
I have missed some of these updates Ian: just re-read this thread and have to write that as usual you are making some huge improvements to the model. The propellor is a minor work of art - all those tiny delicate pieces but what a difference. they make. The paintwork is also of a very high standard indeed - this will be a super model when complete.

Stephen.

Offline Borsos

  • Hero Member
  • *****
  • Posts: 3321
Re: Airfix Fairey Battle, as it perhaps should have been!
« Reply #12 on: June 12, 2020, 04:24:50 PM »
What a great job on one of the best looking planes of ww2. I am still waiting for a good kit of the Battle in 1:32 (I think I‘ll be old and grey...). I have the Classic Airframe Kit in 1:48 and I have seen many build models. Yours in 1:72 is on par with them, if not better!
Andreas
"Deux armées aux prises, c'est une grande armée qui se suicide."
Barbusse.
"Ein Berg in Deutschland kann doch einen Berg in Frankreich nicht beleidigen. Oder ein Fluß oder ein Wald oder ein Weizenfeld."
Remarque.

Offline IanB

  • Hero Member
  • *****
  • Posts: 2440
Re: Airfix Fairey Battle, as it perhaps should have been!
« Reply #13 on: June 13, 2020, 04:33:04 AM »
Thanks Stephen and Andreas, much appreciated!

The adjustments to the brown and green have now been sorted.


She has also had a coat of gloss where the decals will go. Is it just me, or is Modelmaster gloss not really gloss at all? I never can get a shine out of it!


The prop is also now finished. I did lose one of the counter weights, but, believe it or not, I found it lying on my cutting mat!


The decal sheet I have is the Xtradecal 12 Sqn sheet, and I will be doing P2332 PH-F which was shot down on the Albert canal raid at Vroenhoven on 12th My 1940. The crew, F/O Norman M Thomas, Sgt BTP Carey, and Cpl TS Campion, all survived and were taken prisoner . Unfortunately the sheet has no decals for the underwing roundels, which were applied to AASF Aircraft before the raids took place.

 I have a Battle Of Britain Xtradecal sheet with underwing roundels of the correct size which I will use, but the blue is far darker and may not show up well against the night undersurfaces. Why can't the colours be consistant from sheets made by the same company? Doesn't make sense to me. I will also have to alter the fuselage codes as pics quite clearly show that this aircraft had elongated letters. These pics are readily available on the net. Again, a little research goes a long way!


Decals next then!


Thanks for looking in and stay safe!


Ian

Offline IanB

  • Hero Member
  • *****
  • Posts: 2440
Re: Airfix Fairey Battle, as it perhaps should have been!
« Reply #14 on: June 13, 2020, 11:01:52 PM »
Right folks, she now has an identity! I had a feeling that the tail stripes would crack as there was a crease across them. I was right and I couldn't save them so they'll have to be painted. The "F"s also broke but I managed to save those.

One question to the experts though - I have applied the upper wing roundels as supplied, but I have a feeling they should be Type A1 (if that's the correct designation for the standard red/white/blue with equal yellow ring added) as the notes in Ian Huntley's book all refer to that type. When would they have been changed to the red/blue as I've used? Bear in mind I'm depicting the aircraft as used in May 1940 on the Albert canal raids.


Thanks for looking in, and stay safe!


Ian