Author Topic: Macchi M-5  (Read 51036 times)

Offline Mike Norris (UK)

  • Hero Member
  • *****
  • Posts: 2477
  • RAF Old and Bold
    • Mikes WW1 Aircraft Models
Re: Macchi M-5
« Reply #75 on: January 12, 2020, 02:31:40 AM »
Hi Louis,
Yes I think it is the control column assembly under the pilots seat - thanks,

Mike


Retired - 27 years RAF service then 20 years Military Aerospace Technical Author/editor.

Offline Mike Norris (UK)

  • Hero Member
  • *****
  • Posts: 2477
  • RAF Old and Bold
    • Mikes WW1 Aircraft Models
Re: Macchi M-5
« Reply #76 on: January 12, 2020, 07:02:21 AM »
Hi all,
I've cut away the centre foot board and rear cross member on the hull floor. This allows the control column to be positioned more realistically, otherwise it would be too close to the seat.
Also allows fitting of the 'V' shaped seat support.
A notch was cut into the centre cross member on the hull floor to allow the torque bar of the control column to be adhered to the hull floor (better support)
These changes will allow the control column to be positioned further away from the front of the pilot's seat,

Mike

« Last Edit: January 13, 2020, 04:23:27 AM by Mike 'Sandbagger' Norris »


Retired - 27 years RAF service then 20 years Military Aerospace Technical Author/editor.

Offline RAGIII

  • Hero Member
  • *****
  • Posts: 19688
Re: Macchi M-5
« Reply #77 on: January 13, 2020, 01:17:12 AM »
Excellent work on the pit changes! I am looking forward to seeing it painted and detailed!
RAGIII
"A man has to know his limitations": Harry Callahan

"Don't slop it on" Lynda Geisler

Offline Mike Norris (UK)

  • Hero Member
  • *****
  • Posts: 2477
  • RAF Old and Bold
    • Mikes WW1 Aircraft Models
Re: Macchi M-5
« Reply #78 on: January 13, 2020, 02:52:38 AM »
Hi all,
I've modified the pilot's foot boards and seat support to:
Cut away the centre foot board and rear cross member on the hull floor. This allows the control column to be positioned more realistically, otherwise it would be too close to the seat.
Added more lightening holes in the seat back, as per the official drawing.
Added the 'V' shaped support (made from thick paper) below the seat. This also housed the control column torque tube, aileron control bell crank and aileron control pulley and control cables.
Added nail head indentations to the foot board to cross member joints.

Mike


« Last Edit: January 13, 2020, 04:20:32 AM by Mike 'Sandbagger' Norris »


Retired - 27 years RAF service then 20 years Military Aerospace Technical Author/editor.

Offline RAGIII

  • Hero Member
  • *****
  • Posts: 19688
Re: Macchi M-5
« Reply #79 on: January 13, 2020, 02:56:35 AM »
Awesome details as always!
RAGIII
"A man has to know his limitations": Harry Callahan

"Don't slop it on" Lynda Geisler

Offline pepperman42

  • Hero Member
  • *****
  • Posts: 4503
  • Sergeant, my brown pants.......
Re: Macchi M-5
« Reply #80 on: January 13, 2020, 11:29:52 AM »
Great work on a tough one!! Think I will stick to my Fly/Hippo 1/48th

Steve

Offline RLWP

  • Hero Member
  • *****
  • Posts: 1494
  • Bodger
Re: Macchi M-5
« Reply #81 on: January 13, 2020, 07:47:21 PM »
Hmm, that seat looks a bit chunky, Mike. Presumably the original was made from ply or sheet metal

I would either countersink the holes from the back to thin the edges and reprofile the top, or just cut a replacement from card

Richard
Hendon for flying - the fastest way to the ground!

Offline Mike Norris (UK)

  • Hero Member
  • *****
  • Posts: 2477
  • RAF Old and Bold
    • Mikes WW1 Aircraft Models
Re: Macchi M-5
« Reply #82 on: January 13, 2020, 08:22:01 PM »
Hi Rich,
There's still a lot of detail to do for the cockpit area, including thinning and roll edging the seat as well as adding the bulk head seat fixing at the top of the seat.
Also the seat needs to have the access for the seat belts to pass through, as the kit instructions show them positioned over the sides of the seat, not through it,

Mike


Retired - 27 years RAF service then 20 years Military Aerospace Technical Author/editor.

Offline Mike Norris (UK)

  • Hero Member
  • *****
  • Posts: 2477
  • RAF Old and Bold
    • Mikes WW1 Aircraft Models
Re: Macchi M-5
« Reply #83 on: January 14, 2020, 06:57:01 AM »
Hi all,
Pilot's seat modified:

Thickness of seat back reduced.
Seat belt slots added.
Seat back rolled edge added (0.4 mm lead wire.

Mike


Retired - 27 years RAF service then 20 years Military Aerospace Technical Author/editor.

Offline Robin

  • Sr. Member
  • ****
  • Posts: 386
Re: Macchi M-5
« Reply #84 on: January 14, 2020, 08:41:53 AM »
A keen eye for detail and the skills to make it work...wonderful. :)

Robin
Found my mojo and clipped it's wings, so it won't fly away.

Offline RAGIII

  • Hero Member
  • *****
  • Posts: 19688
Re: Macchi M-5
« Reply #85 on: January 14, 2020, 08:55:33 AM »
You don't miss a thing! Lovely!!
RAGIII
"A man has to know his limitations": Harry Callahan

"Don't slop it on" Lynda Geisler

Offline AndRoby67

  • Sr. Member
  • ****
  • Posts: 278
Re: Macchi M-5
« Reply #86 on: January 15, 2020, 12:07:32 AM »
Hi!
Everything is near to perfection!
The seat of the M.5, again, came from the Macchi experience in building Nieuport 11 & 17 under license.
Many compliments!
Roberto

Offline Mike Norris (UK)

  • Hero Member
  • *****
  • Posts: 2477
  • RAF Old and Bold
    • Mikes WW1 Aircraft Models
Re: Macchi M-5
« Reply #87 on: January 15, 2020, 06:33:18 AM »
Roberto (AndRoby67) and Louis (Huberlu),
Do either of you have any information on the propeller fitted to the Macchi M.5, especially good photographs?

Mike


Retired - 27 years RAF service then 20 years Military Aerospace Technical Author/editor.

Offline Mike Norris (UK)

  • Hero Member
  • *****
  • Posts: 2477
  • RAF Old and Bold
    • Mikes WW1 Aircraft Models
Re: Macchi M-5
« Reply #88 on: January 16, 2020, 06:26:56 AM »
Hi all,
The rear edge of the cockpit rim was fitted with shoulder padding which is not in the kit.
I represented this padding using 'Milliput' putty. Once it has fully cured I'll clean it up.

The photo-etch supplied with the kit has part 19, which is intended to represent a curved support for the top of the pilot’s seat, although I could not find any references to this type of seat support.
However photographs do show a fixture connecting the top, rear edge of the seat to the rear bulkhead of the cockpit.
I represented this fixing using 0.5 plastic rod.

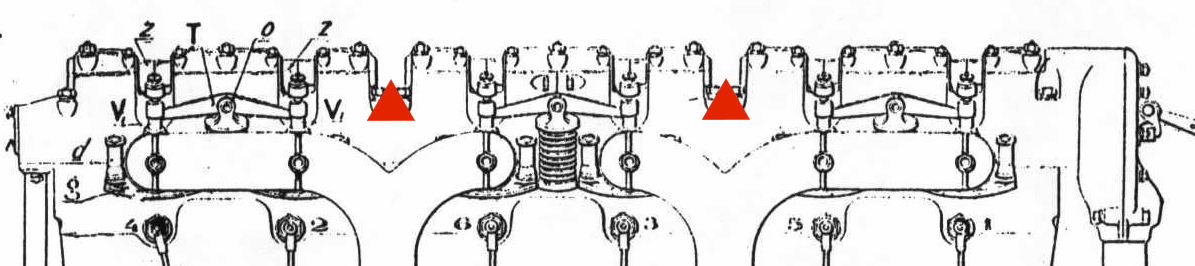
The inlet and exhaust valves on the 'Isotta Fraschini' V4B engine are operated by an overhead shaft.
The kit shaft is moulded as one shaft. The actual engine had three separate shafts.
Also the shaft mounting to the engine do not align.
I'll correct by cutting away the mountings from the shaft then drill out the three segments and insert brass tubes.

Mike


Retired - 27 years RAF service then 20 years Military Aerospace Technical Author/editor.

Offline RLWP

  • Hero Member
  • *****
  • Posts: 1494
  • Bodger
Re: Macchi M-5
« Reply #89 on: January 17, 2020, 04:24:20 AM »


I do like the single spring for two valves, very neat

Richard
Hendon for flying - the fastest way to the ground!