Author Topic: Pegasus Etrich Taube, 1:72  (Read 12164 times)

Offline lone modeller

  • Hero Member
  • *****
  • Posts: 5316
Re: Pegasus Etrich Taube, 1:72
« Reply #15 on: April 23, 2021, 03:48:36 AM »
You have much more patience and skill than me Ian with this 3D printing. I wish you luck because the possibilities that it offers are immense and certainly much easier than trying to make one from scratch.

Stephen.

Bughunter

  • Guest
Re: Pegasus Etrich Taube, 1:72
« Reply #16 on: April 23, 2021, 04:29:03 AM »
Very interesting new ways are available in our hobby now!
Looks promising, good luck!

Cheers,
Frank

Offline RAGIII

  • Hero Member
  • *****
  • Posts: 18833
Re: Pegasus Etrich Taube, 1:72
« Reply #17 on: April 23, 2021, 06:37:52 AM »
I admire you guys that are on the cutting edge of Modeling!
RAGIII
"A man has to know his limitations": Harry Callahan

"Don't slop it on" Lynda Geisler

Offline hrcoleman66

  • Sr. Member
  • ****
  • Posts: 275
Re: Pegasus Etrich Taube, 1:72
« Reply #18 on: April 23, 2021, 08:25:08 AM »
I just purchased an Anycubic Photon resin printer.  Yet to fire it up in anger though.

Cheers,

Hugh

Offline IanB

  • Hero Member
  • *****
  • Posts: 2439
Re: Pegasus Etrich Taube, 1:72
« Reply #19 on: April 23, 2021, 09:20:21 PM »
Thanks for the feedback folks! It's a little daunting at first but I'm surprised at how quickly I've picked up the basics (with reference to lots of videos of course!).
Have fun with the printer Hugh! That's the easy part though!

When I said I was happy with that last version, it was of course only temporary! Lying in bed last night I suddenly realised that I hadn't added any supports for the rocker arms. That led to closer examination of photos this morning.  Another thing that had not occurred to me yesterday was that I had added the upper cylinder coolant channel across the whole width, whereas of course it is only an inlet one side and an outlet on the other. The valves sit in between and I couldn't put those in the right place unless I redesigned that too. So I decided to chop its head off!

  I redesigned the top end and did the chamfer before cutting away bits. That worked much better. The angle on the face where inlet and exhaust fit is better too.

Here's how it looks now.


Much better!

And on top of that it has really helped me find my way around Fusion a lot better. This redesign took far less time than the original did. Now I have to try to figure out how to do the crankcase. All I've used so far is drawing circles and rectangles, extruding them then amending the 3d shapes I'm left with. The crankcase will involve plotting my own points in 3 dimensions.


I may be some time.....


Ian

Offline Beto

  • Full Member
  • ***
  • Posts: 179
Re: Pegasus Etrich Taube, 1:72
« Reply #20 on: April 25, 2021, 05:50:19 PM »
Think about the crankcase like a model ship's hull: Make a series of ribs and skin them, and model only one half of the part, then mirror it and add any asymmetrical features if present on the original. Hope this helps.

Offline IanB

  • Hero Member
  • *****
  • Posts: 2439
Re: Pegasus Etrich Taube, 1:72
« Reply #21 on: April 28, 2021, 10:17:34 PM »
Thanks Beto!
I think I've figured it out now, see below!

Right then, having spent numerous hours playing around in sculpt mode in Fusion I think I now have a grasp of the basics. To start with it was extremely frustrating as it seemed that even though I was doing it (I thought) exactly as in the videos, I kept getting error messages.  I kept watching the videos and reading Fusions own training notes and every once in a while there was a "eureka" moment! After a few of those it became easier and I can now find my way around fairly quickly. Having said that it still sometimes comes back to bite me sometimes as I can't find a way to do something simple because of the way I constructed things earlier! There is usually an alternative to get the same result though (or delete it and redo that part correctly!) so I'm getting on reasonably now. All in all it's becoming fun now instead of frustrating so I must be moving in the right direction!


Here's the result of the last few days' "playing around". It took me a while to work out how I wanted to do it and I decided to start with the known quantities - I only have a side view sketch. So I overlaid the cylinders I'd already done (and then had to resize them!) and made up the cylinder mating face. That was copied that for the crankcase joint, and expanded as necessary. Adding a cone at the front helped with the sizes since I could match that exactly to the profile view.

 Today I have been refining the shape of the crankcase join, adding the notches for the mounts and resizing it a few times as I noticed a couple of errors. I have to keep reminding myself not to get too obsessive with measurements, I'm only talking about 0.1mm or less for some of the adjustments, but I want it to "look right" once done so I think it's worth the effort.


Anyway, a couple of pics from this morning and this evening.


The nose cone was also done today but I didn't take a pic before I added it.


Thanks for looking in, and since it's my birthday today I'm going for a beer or two. (Not that I wouldn't anyway, but it's an even better excuse than usual!)


Ian

Offline Alexis

  • Hero Member
  • *****
  • Posts: 7947
  • Love the self
Re: Pegasus Etrich Taube, 1:72
« Reply #22 on: April 28, 2021, 10:44:22 PM »
HAPPY BIRTHDAY IAN


Enjoy your beer and rise a glass for us  ;)


Alexis
Hurra ! , Ich Leben Noch
Body and life is a vessel we use to travel the planet . Femininity is the gift , The miracle comes from what we do with it .

Offline WD

  • Hero Member
  • *****
  • Posts: 1096
Re: Pegasus Etrich Taube, 1:72
« Reply #23 on: April 29, 2021, 08:45:51 AM »
Wow, you're a brave man, Pegasus kits aren't easy builds. Not impossible, just not easy. You're doing some amazing work IMHO.

WD

Offline lone modeller

  • Hero Member
  • *****
  • Posts: 5316
Re: Pegasus Etrich Taube, 1:72
« Reply #24 on: April 29, 2021, 08:53:41 AM »
Happy birthday Ian. And you have something to celebrate with those images and the nose cone. Excellent work being done here - and much more than I could ever do.

(Do you know of the cartoon of the man with a large hammer standing over his computer? Well it was drawn from a photograph - I was the man!!)

Stephen.

Offline andonio64

  • Hero Member
  • *****
  • Posts: 1685
  • There's no hurry
Re: Pegasus Etrich Taube, 1:72
« Reply #25 on: April 29, 2021, 08:09:51 PM »
Happy birthday Ian!

Offline IanB

  • Hero Member
  • *****
  • Posts: 2439
Re: Pegasus Etrich Taube, 1:72
« Reply #26 on: September 12, 2022, 03:09:54 AM »
Hi all.
I have just finished another small project - the RPM Model T Ford Ambulance in 1:72 (of course!), where I 3d printed wheels, suspension, rear body panels, and steering wheel. Pics will be posted tomorrow in RFI.

Now that is done and dusted it's time to resurrect this one. I took it out of the box today and gave it a good looking at. I have decided that tomorrow I will start on getting the fuselage profile correct.

Thanks for looking in!

Ian

Offline IanB

  • Hero Member
  • *****
  • Posts: 2439
Re: Pegasus Etrich Taube, 1:72
« Reply #27 on: September 13, 2022, 02:03:47 AM »
I gave the fuselage another good hard looking at and didn't get far. My problem is that plans for the Etrich version are scarce and those I have don't seem to match. The fuselage is quite a bit deeper than the plans, but overall it looks right when comparing to photos. I have adjusted the slope between the two cockpits a little and will leave it at that for now. My focus then changed to the wings. A lot more sanding was carried out to get the edges to suitable thickness and adjust the airfoil section to my liking, then it was working out where all the holes should go.


Tools for the day.


I've drawn on the 2 spars, and drilled holes for the support beam underneath, along with the holes for rigging that beam, both fore and aft. That needed 3 holes right on the leading edge and 3 on the rear spar. All those wires will go through the wing as they are on both upper and lower surfaces so can be done as one line for each. Those holes therefore go through the wing. The ones for the braces will be blind holes. I will leave the holes for the wing warping until after I've finished marking out the ribs and scalloping the trailing edge. Ribs for the warping section will be added, probably with thin plastic rod. In reality they were bamboo inserts stuck into the rear of the ribs. The fabric was single layer on those sections but there was no lip as seen on a Caudron for instance, so once the ribs are on, the step between the main wing and the warping section will be faired in.


Thanks for looking in, sorry there's only one pic! (Only one wing done so far too, I need to rest my eyes!)


Ian

Offline lone modeller

  • Hero Member
  • *****
  • Posts: 5316
Re: Pegasus Etrich Taube, 1:72
« Reply #28 on: September 13, 2022, 04:34:13 AM »
Progress is progress Ian, and this is a bit of a dog of a kit. However when you have finished with it, it will be a gem.

Stephen.

Offline IanB

  • Hero Member
  • *****
  • Posts: 2439
Re: Pegasus Etrich Taube, 1:72
« Reply #29 on: September 15, 2022, 02:51:19 AM »
Thanks Stephen, I am enjoying it (so far) though!

The last two days have been spent patiently poring over photos and drawings, trying to work out what goes where. I did manage to come up with a basic plan of the rigging from the king post and lower brace (not sure what its specific name is). This is what I've come up with:


That will help me plan the rigging a bit better as a lot of wires can be used both above and below the wings as one piece running through.  I always try to minimize the number of separate pieces of rigging and will use one hole for multiple pieces when able.

The other tasks have been correcting the cockpits and working on the wings. The cockpits, as you may recall were not accurate for the aircraft I am modelling.

This is what we get in the kit - I have already made a start of raising the front edge of the rear cockpit here.


The front cockpit is too shallow and the rear needed to be more curved, and higher at the front. I started on the rear by cutting and bending the plastic to raise it slightly, then used Mr Dissolved Putty, dabbed on with a toothpick, to build up the rear edge.


After it had dried properly it was carefully filed down with a half round jewelers file. It needed two or three applications to get the right shape but eventually it got there. This stuff is really usufel for this type of work. I will also use it to re establish the cockpit edge padding which was too heavy anyway, but had to be removed.


This shows the final shape of the rear


and this one is after I had deepened the front cockpit. I also reduced the padding here too.


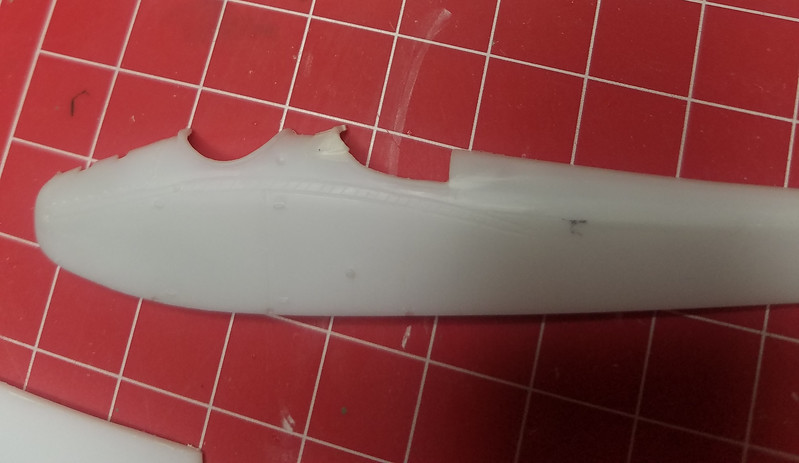
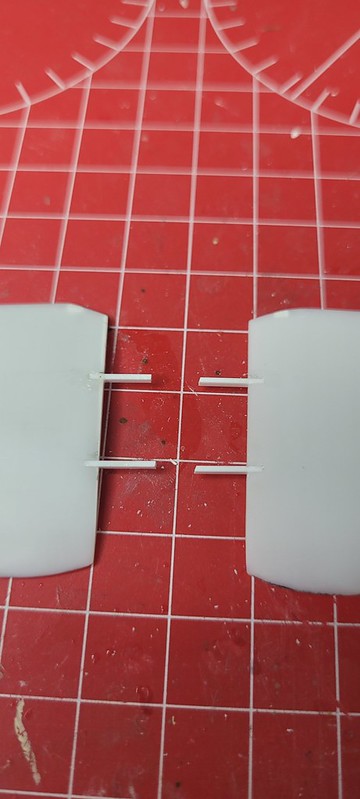
Some thought then had to be given to wing mounting. I decided to cut two slots into the inner edge of the wing and insert small lengths of .75 x 1mm rod to represent the spars. The slots would give extra strength to the joint as I don't think 2 butt joints (one to the wing and one to the fuselage) would work.


For the fuselage end, I carefully marked out where the spars were attached, (they were bolted on, and did not run through - at least the rear one was, as it is right in the middle of the pilot's cockpit). The King Post and mounting point for the "bridge" under the wings were both lined up with the front spar, so those were also marked out. Holes were drilled to mount the king post, and immediately below those I drilled for the spar holes. I started with .3mm, then .5mm and finally .75mm, carefully making sure between each enlargement that the holes were still lined up. Those holes were carefully enlarged with a no.11 blade to a rectangle of .75 x 1mm so the spars could pass through. Once the front ones were done, a spot of black marker on the end of the rear spar left a handy mark to show where I needed to drill the second hole.

 Pegasus kindly added a moulded in shape on the fuselage where the wing was intended to be mounted - not useful for its intended purpose as the wing doesn't but against it, but useful for getting the angle of the wing and helping align the rear spar holes! You can see the marked out holes on the pic above.

This is the front marked up - you can see the filled dimple where the kit King Post was to be mounted - too far back!


I think that works! I will trim the spars to length later, I will be able to hide the joint in the rear cockpit as there will be a brace added from the cockpit side where the spar mounts down to the seat mounting.

Not too much to show physically for two days work although it was interspersed with visits to get PCR tests done. Yesterday's was negative, if today's is too, I can return to work on tomorrow, although I'm booked off. That will be very helpful as I'm due to fly to the US next Tuesday for training and haven't had a chance to get anything prepared yet!

As I say, not much physical advancement, but a huge step forward in the basic prep and planning and the most critical part - the wing mounting - is done.


Thanks for looking in!


Ian