Author Topic: Pegasus Etrich Taube, 1:72  (Read 12233 times)

Offline IanB

  • Hero Member
  • *****
  • Posts: 2441
Pegasus Etrich Taube, 1:72
« on: October 17, 2019, 05:25:53 AM »
This will be my next project, once I have finished the Heinkel 111 and Fairey Battle. Here is a quick look at what it might involve......
This is the kit...


It's very basic and there will be a lot of corrections and alterations required, not the least of which will be the replacement of the tail surfaces and possibly the trailing edges of the wings as well. The plastic is VERY soft and not good to work with so replacement may be the better option over correction. The gates are huge and will need very careful removal, and the wings are too thick, so as stated above, I may need to remove the rear edges at the minimum, maybe even scratch the entire wings. The white metal parts are very good so that will be a big help.


Thanks for looking in!


Ian
« Last Edit: October 18, 2019, 04:28:41 PM by IanB »

Offline lone modeller

  • Hero Member
  • *****
  • Posts: 5320
Re: Pegasus Etrich Taube, 1:72
« Reply #1 on: October 17, 2019, 06:03:38 AM »
I made one of these a long time ago - before I started scratch building, and as you write the plastic is very soft and the tail and trailing edges of the wings are much too thick. I also had problems with the undercarriage legs and the engine fit was not good.  Today I would scratch build one as it would be easier....!

However in your hands I can see an excellent model on the horizon so I will be looking forward to seeing how you turn it into a little winner. An excellent subject BTW.

Stephen.

Offline RAGIII

  • Hero Member
  • *****
  • Posts: 18843
Re: Pegasus Etrich Taube, 1:72
« Reply #2 on: October 17, 2019, 06:56:44 AM »
It looks as though you are taking on yet another challenging build! I am sure you will Master this one and come up with results as beautiful as ever!
RAGIII
"A man has to know his limitations": Harry Callahan

"Don't slop it on" Lynda Geisler

Offline AndRoby67

  • Sr. Member
  • ****
  • Posts: 278
Re: Pegasus Etrich Taube, 1:72
« Reply #3 on: October 17, 2019, 07:21:32 AM »
I have same kit in my stash....
Bought many years ago with the idea to realize the Taube of Ten. Giulio Gavotti in Lybia 1911, the first airplane that made bombing of "enemies" from the sky.
We italians have this sad record....
Anyway, I agree with you about the weak points of the kit, so I will follow your build try to "stole" some tricks...
Roberto

Offline Alexis

  • Hero Member
  • *****
  • Posts: 7947
  • Love the self
Re: Pegasus Etrich Taube, 1:72
« Reply #4 on: October 17, 2019, 11:22:05 AM »
Right on Ian , following along ....


Terri
Hurra ! , Ich Leben Noch
Body and life is a vessel we use to travel the planet . Femininity is the gift , The miracle comes from what we do with it .

Offline IanB

  • Hero Member
  • *****
  • Posts: 2441
Re: Pegasus Etrich Taube, 1:72
« Reply #5 on: April 11, 2020, 02:55:07 AM »
Evening all!

Since today I put paint on the other 2 kits I'm working on, I decided to do a little more on this one.

I had already done some work on the tail and wings, which for some reason I didn't post so I'll update that too.

For the tail, the kit parts are very thick. The vertical parts were thinned easily enough by sanding and I'm happy with those.


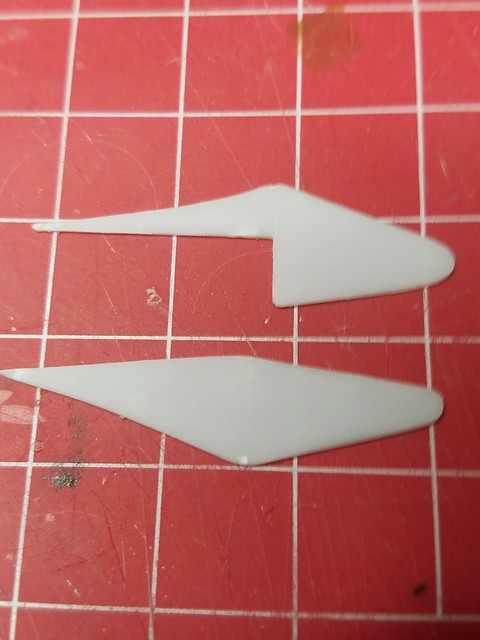
But the horizontal stabilizer is beyond saving. Even if it wasn't, the way the kit is designed gives a very awkward joint towards the front, with the foremost part being cast as part of the fuselage. I decided to make another part from plastic sheet stock. The fuselage moulding was removed and a new part (ok, 4, but only the last one was any good) was made.


There's also a kink towards the front of the kit part, but I don't see that on pics or plans of the Etrich version, so I won't include it.


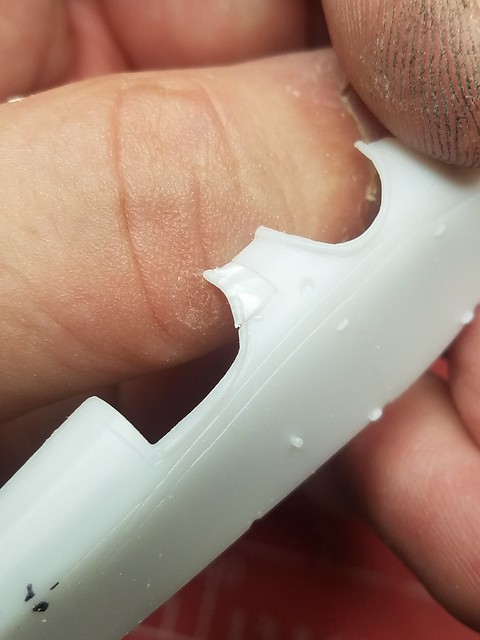
The wing trailing edges have been drastically thinned and sanded to shape. I'll add the scallops once I've marked out the ribs. Today I looked again at the wings and realised that the kit parts are designed to butt against the fuselage, with a nice curve at the joining edge.


Very nicely done, but incorrect, as shown in photos in the Datafile which clearly show a lack of shadows where the gap between wing and fuselage exists. So the ends were sanded flat, which then showed that one was shorter than the other! It also revealed that the  rib extension on the front to support the landing gear is too far outboard so that will have to be removed and replaced too.


Here's the extension fitted to the root end, it will be sanded to shape and correct length once dry.


There are also, unfortunately, some adjustments needed on the fuselage. Most noticeably between the cockpits. The panel there, over the fuel tank, is not flat on top but slopes downwards from both cockpits to give a shallow V in the middle. The kit also has the front of the rear cockpit too low, and the back lower corner as a sharp angle, which it isn't on the aircraft I'm modelling. Cutting the front off the rear cockpit, bending it, (the plastic is very soft on this kit), and regluing it has resolved most of the forward issues, it will be tidied up finally once it's all together. The rear edge will be looked at later.


[


[


Finally for today, I found a white metal prop in the spares box and cleaned that up. For some reason this kit doesn't have one, although it has a lot of other white metal parts!


A big improvement!


One last question. Does anyone have a photo of the induction (right) side of a Benz BzII 6 cylinder engine? There is a good cutaway of the left (exhaust) side on the web but I haven't found any detail of the other side, or any details of how it was mounted with the cooling tank etc fitted.


Thanks for looking in, and stay safe!


Ian

Offline lone modeller

  • Hero Member
  • *****
  • Posts: 5320
Re: Pegasus Etrich Taube, 1:72
« Reply #6 on: April 11, 2020, 03:07:23 AM »
Good to see that you have started this one Ian. I found the plastic to be very soft and some parts did not fit at all well. The engine is basic and also a poor fit in my experience. However as I have already written you are going all the way to turn this into a decent model. Good to see another early type being modelled too - better than most post 1916 types!

PS the rigging is fun - especially that outboard of the wing pylons!!

Stephen.

Offline RAGIII

  • Hero Member
  • *****
  • Posts: 18843
Re: Pegasus Etrich Taube, 1:72
« Reply #7 on: April 11, 2020, 03:21:44 AM »
Great to see progress on this build Ian! What you have done so far is top rate modelling at it's best!
RAGIII
"A man has to know his limitations": Harry Callahan

"Don't slop it on" Lynda Geisler

Offline AndRoby67

  • Sr. Member
  • ****
  • Posts: 278
Re: Pegasus Etrich Taube, 1:72
« Reply #8 on: April 14, 2020, 11:04:25 PM »
Great suggestion for building this kit.
I will continue to be a "thief" of your work!
Roberto

Offline Old Man

  • Hero Member
  • *****
  • Posts: 600
Re: Pegasus Etrich Taube, 1:72
« Reply #9 on: April 17, 2020, 11:01:15 PM »
Hope to see more of this, Sir!

I have had one of these on the shelf for years, and never could quite figure out what to do with it.

You are blazing quite a trail here.

Offline IanB

  • Hero Member
  • *****
  • Posts: 2441
Re: Pegasus Etrich Taube, 1:72
« Reply #10 on: April 22, 2021, 08:00:15 PM »
I hadn't realised it had been nearly a year since I looked at this! Having said that, I am not getting back into it properly just yet, but since I have no work at the moment and I'm waiting for supplies to continue with the Mercedes SSKL build, I decided to look again at the engine. There were a number of options open to me, including modifying the kit supplied part, but none were really up to it. I even started to scratchbuild one using 2mm plastic rod. That at least gave me an accurate piece to use for measurements.

 Since in the past year I have acquired a 3d printer, and I have more vac kits in the stash which will need a Benz Bz.II, I decided to use the opportunity to learn a little more about 3d design.

Progress has been slow! I spent almost the entire day yesterday trying to figure out how to cut a 45 degree angle on half the cylinder for the inlet and exhaust!

Finally this morning I found a way to do it and then progress was made!

I now have the cylinder done. I'll either print that 6 times, or copy it and print the engine in one piece. Not sure yet on how I'll do that.


Anyway, here is the result of the last 2 days banging my head on the desk.....


I'm not sure if the springs will print or not - the entire thing excluding the springs is only 5.5mm tall However, if they do, I have some spare rockers from a Small Stuff engine that should work!!


Thanks for looking in!


Ian

Offline IanB

  • Hero Member
  • *****
  • Posts: 2441
Re: Pegasus Etrich Taube, 1:72
« Reply #11 on: April 22, 2021, 09:20:51 PM »
I decided I wasn't happy with that, so I've modified the head. It's still not quite right as I can't figure out how to get an even chamfer all the way around from head to cylinder, but at this scale I think it will do.


Ian
« Last Edit: April 22, 2021, 09:45:08 PM by IanB »

Offline Beto

  • Full Member
  • ***
  • Posts: 179
Re: Pegasus Etrich Taube, 1:72
« Reply #12 on: April 22, 2021, 10:20:43 PM »
Very good effort!!! - Sadly, I'm sure the valve springs will not print in 1/72 scale. To print the 6 cylinders, simply duplicate or copy/paste the one you have and arrange them over a rectangular piece, align them and you are done. You could add before printing the part the induction and exhaust pipes, as well as the carb and magnetos.

Offline Alexis

  • Hero Member
  • *****
  • Posts: 7947
  • Love the self
Re: Pegasus Etrich Taube, 1:72
« Reply #13 on: April 22, 2021, 10:48:23 PM »
Well , looks like you will get lots of enjoyment on this project .


Alexis
Hurra ! , Ich Leben Noch
Body and life is a vessel we use to travel the planet . Femininity is the gift , The miracle comes from what we do with it .

Offline IanB

  • Hero Member
  • *****
  • Posts: 2441
Re: Pegasus Etrich Taube, 1:72
« Reply #14 on: April 22, 2021, 11:04:38 PM »
That's the plan Beto. I'm not decided yet on whether to print the cylinders, induction pipes, and crankcase together or separately, but they will all be printed. The exhausts will be brass tube.

Ian