Author Topic: Aviatik 'Berg' D.I  (Read 30678 times)

Offline DR-I Ace

  • Newbie
  • *
  • Posts: 16
Re: Aviatik 'Berg' D.I
« Reply #120 on: December 27, 2019, 08:41:07 AM »
Truly spectacular work all 'round, Mike!
Cheers,
Bud

100% agreement !!

Ed

Offline WD

  • Hero Member
  • *****
  • Posts: 1366
Re: Aviatik 'Berg' D.I
« Reply #121 on: December 27, 2019, 09:23:38 AM »
This build is just so awesome all the way 'round!

WD

Offline gbrivio

  • Hero Member
  • *****
  • Posts: 1682
Re: Aviatik 'Berg' D.I
« Reply #122 on: December 27, 2019, 08:17:06 PM »
Great work and a great, captivating livery.
Ciao
Giuseppe

Offline Juan

  • Hero Member
  • *****
  • Posts: 2474
  • All gave some, some gave all.
Re: Aviatik 'Berg' D.I
« Reply #123 on: December 27, 2019, 10:28:06 PM »
Blown away by your work.  Looks fantastic.

Offline kensar

  • Hero Member
  • *****
  • Posts: 2513
  • Reshaping the world - one piece at a time.
Re: Aviatik 'Berg' D.I
« Reply #124 on: December 27, 2019, 10:42:07 PM »
Great detail work, Mike.  One can see how the tail skid works.

Offline Mike Norris (UK)

  • Hero Member
  • *****
  • Posts: 2477
  • RAF Old and Bold
    • Mikes WW1 Aircraft Models
Re: Aviatik 'Berg' D.I
« Reply #125 on: December 28, 2019, 04:57:04 AM »
Hi all,
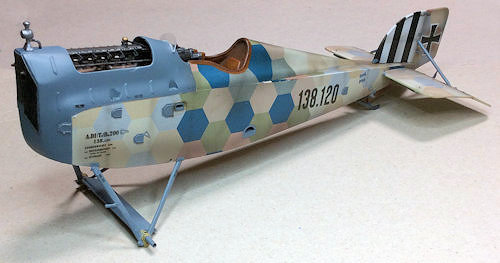
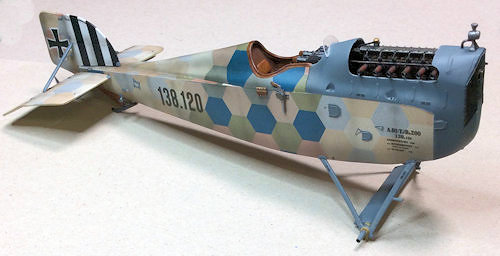
I've now added all of the necessary photo-etch parts to the fuselage and lower wing halves.
Also the main undercarriage, a windscreen (which wasn't supplied in the kit) and a flare pistol and cartridge rack (not supplied in the kit, but often carried on this aircraft).
The whole lot has been sealed with a semi-matte lacquer, ready for a 'Flory Models' clay weathering wash.

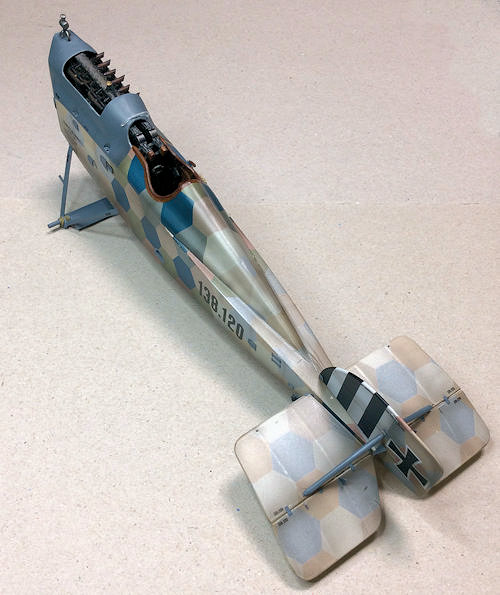
I've still got to add a small pipe to the radiator condenser assembly and two cross bracing cable at the rear of the engine bay. These will be attached to the underside of the upper wing centre section.
Also the propeller shaft access hole.

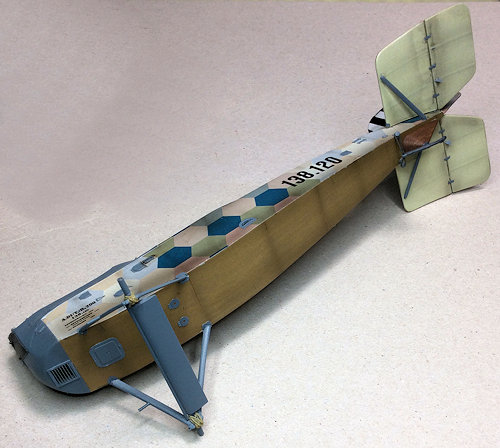
Then it's onto pre-rigging and fitting the wings

Mike


Retired - 27 years RAF service then 20 years Military Aerospace Technical Author/editor.

Offline Edgar

  • Full Member
  • ***
  • Posts: 172
Re: Aviatik 'Berg' D.I
« Reply #126 on: December 28, 2019, 06:41:09 AM »
This is simply the best Berg D.I  I have ever seen!!
« Last Edit: December 28, 2019, 07:04:11 AM by Edgar »

Offline Alexis

  • Hero Member
  • *****
  • Posts: 8019
  • Love the self
Re: Aviatik 'Berg' D.I
« Reply #127 on: December 28, 2019, 11:10:11 AM »
Outstanding mike ! :)


Terri
Hurra ! , Ich Leben Noch
Body and life is a vessel we use to travel the planet . Femininity is the gift , The miracle comes from what we do with it .

Offline Jorgo

  • Sr. Member
  • ****
  • Posts: 457
Re: Aviatik 'Berg' D.I
« Reply #128 on: December 28, 2019, 09:41:12 PM »
Congratulations on that gem!

Jörg

Offline RAGIII

  • Hero Member
  • *****
  • Posts: 19688
Re: Aviatik 'Berg' D.I
« Reply #129 on: December 28, 2019, 11:29:43 PM »
Everything done to the fuselage has paid off and really looks Gorgeous!
RAGIII
"A man has to know his limitations": Harry Callahan

"Don't slop it on" Lynda Geisler

Offline Mike Norris (UK)

  • Hero Member
  • *****
  • Posts: 2477
  • RAF Old and Bold
    • Mikes WW1 Aircraft Models
Re: Aviatik 'Berg' D.I
« Reply #130 on: December 29, 2019, 04:53:36 AM »
Hi all,
Just a few minor additions.
The upper wing was cross braced from the top of the rear cabane struts to the bottom of the opposite rear cabane struts.
These are not detailed in the kit. I've drilled holes for adding the cross bracing through the cockpit front decking later in the build.
The 'ProperPlane' Knoller-Jaray propeller has a 2.0 mm diameter tube added for mounting into the fuselage.
The small pipe on the top of the radiator condenser assembly has also been added, using 0.4 mm diameter Nickel-Silver tube.

Now it's onto weathering with clay wash, pre-rigging the wings and fitting them, which I know already will give me problems with alignment!!

Mike


Retired - 27 years RAF service then 20 years Military Aerospace Technical Author/editor.

Offline gedmundson

  • Hero Member
  • *****
  • Posts: 1751
Re: Aviatik 'Berg' D.I
« Reply #131 on: December 29, 2019, 07:16:42 AM »
Fantastic work, Mike. Your weathering and fading effects are particularly of note.
Cheers,
Gary

Offline Mike Norris (UK)

  • Hero Member
  • *****
  • Posts: 2477
  • RAF Old and Bold
    • Mikes WW1 Aircraft Models
Re: Aviatik 'Berg' D.I
« Reply #132 on: December 31, 2019, 05:27:37 AM »
Hi all,
I've applied the 'Flory Models' Dark Dirt clay wash to give a 'subtle' grimy look - I added a few drops of washing up liquid to break the surface tension of the wash to help it spread more over the model. The wash wash applied by brush.
Once the required amount was wiped away with a very slightly damp tissue and brush, I sealed it all with 'Alclad' Semi-Matte (ALC-312) lacquer.
I've also prepared the rigging and control lines.

The next step is to install the pre-rigged lines and fit the wings, so as to be able to complete the rigging.

Mike


Retired - 27 years RAF service then 20 years Military Aerospace Technical Author/editor.

Offline Robin

  • Sr. Member
  • ****
  • Posts: 386
Re: Aviatik 'Berg' D.I
« Reply #133 on: December 31, 2019, 06:25:35 AM »
Scary first photo. :o

Great result though!

Robin :)
Found my mojo and clipped it's wings, so it won't fly away.

Offline lcarroll

  • Administrator
  • Hero Member
  • ******
  • Posts: 8656
Re: Aviatik 'Berg' D.I
« Reply #134 on: December 31, 2019, 07:30:44 AM »
    Great effect with the wash Mike, I really like the results, just enough to make it look "used". Yet another "Winner" from your talented hands, and a type not often seen.
Cheers,
Lance