Author Topic: Completed: 1/72 scratch build Caproni Ca 5 Group Build After Build  (Read 12452 times)

Offline Manni

  • Hero Member
  • *****
  • Posts: 1768
    • Der Militärmodellbauer
Re: 1/72 scratch build Caproni Ca 5
« Reply #45 on: July 15, 2019, 03:11:41 PM »
Really beautiful shape. the Caproni looks better and better with each update. Perfect tribute for Des.
Bye,
Manni
"Ich hab' da mal was vorbereitet.": Jean Pütz
"Warum noch mehr Bausätze?!?": meine Frau

Offline NinetythirdLiberator

  • Hero Member
  • *****
  • Posts: 1589
Re: 1/72 scratch build Caproni Ca 5
« Reply #46 on: July 22, 2019, 03:22:00 PM »
Speechless over here...simply amazing!
Dan

Bughunter

  • Guest
Re: 1/72 scratch build Caproni Ca 5
« Reply #47 on: July 23, 2019, 07:02:29 AM »
Stephen, what a beautiful model - so elegant!

Cheers,
Frank

Offline lone modeller

  • Hero Member
  • *****
  • Posts: 5317
Re: 1/72 scratch build Caproni Ca 5
« Reply #48 on: July 28, 2019, 07:39:54 AM »
Evening All,

Thank you so much Rick, Terri, Ken, Juan, Roberto, Manni, Dan and Frank for your generous comments I really appreciate comments from modellers who regularly display huge talent on this site.

Roberto: the plans which I am using came from the following source: http://drawingdatabase.com/caproni-ca-5/ There seem to be several sites that have this particular 3 view diagram.

The colour scheme which I have used is based on an illustration in K. Munson's Bombers 1914 - 1919, p. 82-83. I chose this subject almost at random as I wanted to make something larger than a single engined machine and decided that as I do not have any Italian aircraft in my collection, and as far as I am aware there is no kit of this aircraft in God's Own Scale, this would be a suitable subject.

Stephen.

Offline lone modeller

  • Hero Member
  • *****
  • Posts: 5317
Re: 1/72 scratch build Caproni Ca 5
« Reply #49 on: July 28, 2019, 07:45:00 AM »
Evening All,

Progress has been slow recently - once again life has conspired to prevent me from doing much lately, but I have now managed to paint and decorate the model. I used acrylics for the main components and based the camouflage on a photograph of a Ca 5 in flight and the drawing in Munson's Bombers 1914 - 1919. The serial on the nose was made from an old transfer sheet that I have had for more years than I care to remember - fortunately they showed no sign of deterioration despite their age. The roundels and rudder stripes were hand painted.


I am afraid that the lack of progress in the last couple of weeks and knowing what awaits in the near future means that I will not be able to finish this in time for the end of the GB, so I am going to have to ask Dave to move this to the Scratch builds section of this site.

Thanks for looking.

Stephen.
« Last Edit: August 03, 2019, 03:57:08 AM by lone modeller »

Offline kensar

  • Hero Member
  • *****
  • Posts: 2505
  • Reshaping the world - one piece at a time.
Re: 1/72 scratch build Caproni Ca 5
« Reply #50 on: July 28, 2019, 08:42:53 AM »
Some significant progress, Stephen.
I wouldn't rush it just to get it done for the group build.

Group build glory is temporary.  Completed model glory is forever.  (sort of)

Offline Brad Cancian

  • Administrator
  • Hero Member
  • ******
  • Posts: 1072
  • "This time I've got you, Red Baron!"
    • Brad's Models
Re: 1/72 scratch build Caproni Ca 5
« Reply #51 on: July 28, 2019, 08:43:48 AM »
This is a magnificent build Stephen, it's looking great with some paint on!

Cheers,

BC

Offline Alexis

  • Hero Member
  • *****
  • Posts: 7947
  • Love the self
Re: 1/72 scratch build Caproni Ca 5
« Reply #52 on: July 28, 2019, 11:25:56 AM »
Stephen , you did a awesome job on hand painting the camo . I have done this type on WW 2 subjects and it is time consuming , well done sir ! :)


Terri
Hurra ! , Ich Leben Noch
Body and life is a vessel we use to travel the planet . Femininity is the gift , The miracle comes from what we do with it .

Offline aliluke

  • Hero Member
  • *****
  • Posts: 510
Re: 1/72 scratch build Caproni Ca 5
« Reply #53 on: July 28, 2019, 11:34:01 AM »
Sorry for not commenting earlier Stephen. Such an ambitious project and beautifully rendered at a tiny scale. Missing the deadline for the GB ain't a big deal and certainly doesn't take away from an incredible build by you to date.

Cheers
Alistair
It ain't a hobby if you have to hurry.

Offline NinetythirdLiberator

  • Hero Member
  • *****
  • Posts: 1589
Re: 1/72 scratch build Caproni Ca 5
« Reply #54 on: July 28, 2019, 03:14:04 PM »
Stephen...

This one is so awesome.  Worth the wait and to take your time.  Can't wait to see it all done at some point!

Dan

Offline Juan

  • Hero Member
  • *****
  • Posts: 2456
  • All gave some, some gave all.
Re: 1/72 scratch build Caproni Ca 5
« Reply #55 on: July 28, 2019, 11:06:31 PM »
Looking great Stephen, like what you are doing.

Offline RAGIII

  • Hero Member
  • *****
  • Posts: 18842
Re: 1/72 scratch build Caproni Ca 5
« Reply #56 on: July 29, 2019, 12:45:37 AM »
Really Looking Fantastic Stephen! That has to be one of the coolest camo schemes from WW1 and you have done it beautifully!
RAGIII
PS: I will certainly continue to follow once the thread is transferred!!
"A man has to know his limitations": Harry Callahan

"Don't slop it on" Lynda Geisler

Offline ermeio

  • Hero Member
  • *****
  • Posts: 913
Re: 1/72 scratch build Caproni Ca 5
« Reply #57 on: July 29, 2019, 04:18:47 AM »
Excellent, stephen
The colours are most convincing

Offline Mike Norris

  • Hero Member
  • *****
  • Posts: 2212
  • RAF Old and Bold
    • Mikes WW1 Aircraft Models
Re: 1/72 scratch build Caproni Ca 5
« Reply #58 on: July 30, 2019, 05:47:52 AM »
Stephen,
I take my hat off to you - this has been an awesome scratch build thus far.
Scratch building is probably most difficult part of our hobby, so with your obvious skills, we can all expect a great model when it's finished,

Mike


Retired - 27 years RAF service then 20 years Military Aerospace Technical Author/editor.

Offline lone modeller

  • Hero Member
  • *****
  • Posts: 5317
Re: 1/72 scratch build Caproni Ca 5
« Reply #59 on: August 04, 2019, 06:52:23 AM »
Evening All,

My thanks to all of you who have dropped by and left kind and encouraging comments - I really appreciate them all.

I have started on the fun bit, ie. putting in some of the struts ready to mount the top wing. I learned a long time ago that trying to fit upper wings on to multiple struts requires a bit of planning, and that the wrong way to do it is to try to fix all of the struts into one wing and then attach the other: that is the direct road to a mess or worse. Instead I try to attach the outermost pairs of struts on the wings and if the wing is big, (as in this case), one or two inner ones. This way the individual struts can be easily aligned to fit their respective holes if necessary, and sufficient support is provided to make a strong structure which can be gently handled while the remaining struts are inserted one at a time. It also reduces mess, (ie glue all over wing surfaces), damaged paintwork, bad language and the risk of high blood pressure. In other words it works with few, if any, problems....

I am going to rig this monster with clear thread because there are too many attachment points in difficult places for the rigging for me to be able to use rolled copper wire. Thread will also have the advantage of strengthening the completed structure. However before I started to add the struts I put on the pipe from the nacelle engine to the nose radiator on the port (left) side of the fuselage: this was a piece of 30 thou rod bent to shape and attached to the top rear of the engine block. Now I could drill out the holes in the fuselage and insert the threads for the rigging of the cabane struts and the inner wing bays. Next I dry fitted the forward innermost bay struts which were inserted within the engine boom just behind the radiators:


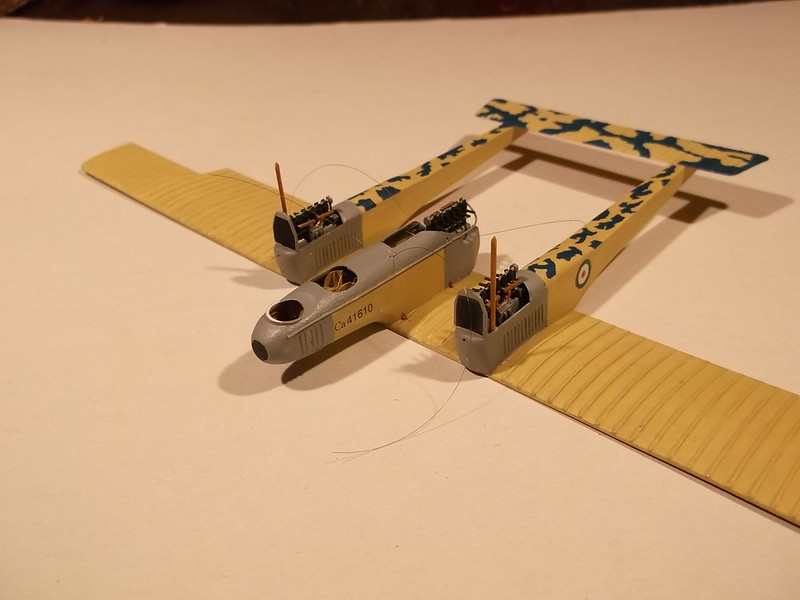
Having decided that they were in the correct position a dab of glue on one end and a rapid insertion into place followed. Next the four outermost wing struts were glued to the lower wing and the assembly inverted and gently lowered on to the underside of the top wing. A rapid assembly jig ensured that the two wings were correctly aligned and the model supported while the struts dried out overnight:


In the morning the jig could be carefully dismantled and the assembly turned back to a normal upright position ready for the addition of the remaining struts. That procedure will follow in due course and the results shown on a later post, but for now this is how the model stands:


 If you have been, thanks for looking.

Stephen.
« Last Edit: August 05, 2019, 03:57:34 AM by lone modeller »