Author Topic: Completed: 1/72 scratch build Caproni Ca 5 Group Build After Build  (Read 12673 times)

Offline lone modeller

  • Hero Member
  • *****
  • Posts: 5322
Evening All,

I am entering this group build in the hope that I will be able to complete this by the deadline, even though we are already a couple of months into the build. Life is not being very conducive to modelling at present and does not look like it is going to change in the near future, but even if I do not make the deadline, I will continue and finish it on another part of this site. Many of you will be aware that I have already dedicated another model to Des' memory, but could not enter it to this GB because I had already started it. This will be my second tribute to a truly great modeller.

If you do not know what the Caproni Ca 5 looked like here are a couple of links:

https://www.alamy.com/italian-caproni-ca5-bomber-plane-ww1-image66158621.html

https://1000aircraftphotos.com/Contributions/SmithGaryL/8921.htm

It was a trimotor bomber designed in 1917 to replace the successful Caproni Ca 3 which was used by the Italians to bomb targets in Austria. This required the aircraft to fly long distances including over the Alps, so a third engine was considerd to be desirable in case one of them malfunctioned on the long flights. Unfortunately the engines chosen to power the Ca 5 were not particularly reliable, so although the airframe was sound, the aircraft was rather less so and the Ca 3 soldiered on beside its successor to the end of the war. However the type remained in service until the early 1920's and was used by the Americans.

I cannot find any kit of this machine which makes it an ideal subject for a scratch build to Des' memory. Interesting features of the type include the engines, triple tail unit, twin booms a platform for the rear gunner above the engine, and double wheeled undercarriage: markings seem to have been relatively straightforward too so can be easily made at home.

There is some reference material on this type - certainly enough to be able to make a reasonably accurate model, although as usual with WW1 types, colours are interpreted in different ways in the sources.

I have assembled my kit: styrene sheet of various thicknesses, strip, rod, wood, and other materials as needed as the build progresses. I have started by marking up the fuselage nacelle on a block of wood and am ready to start carving:


and I have cut some styrene sheet for the wings. These are quite thick so to get the thickness and aerofoil section I am trying out an idea. I have cut a piece of 30 thou card which has been bent in hot water and laminated this with a strip of 20 thou card which was laid over the top. The 30 thou strip was wide enough to extend to the rear spar, and then a strip of 20 thou card and 10 thou card was laid along the trailing edge of the 30 thou card. Here are the strips before they were glued together:


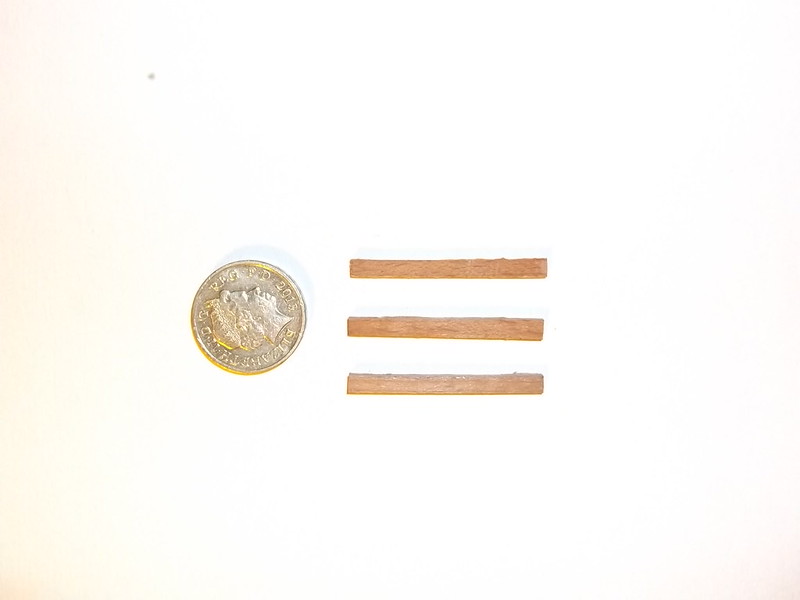
The underside  will be sanded and filled to give the aerofoil section and any joints smoothed over with filler: hopefully if there are any remaining marks these will not be visible because they will be under the wings. Finally I have cut some wood ready to be carved into propellors:


Thanks for looking.

Stephen.
« Last Edit: September 12, 2019, 02:13:26 AM by lone modeller »

Offline NinetythirdLiberator

  • Hero Member
  • *****
  • Posts: 1590
Re: 1/72 scratch build Caproni Ca 5
« Reply #1 on: April 13, 2019, 09:54:15 AM »
Man, Stephen...I can't wait to see this one shape up!  Lovely choice...

Cheers,
Dan

Offline Juan

  • Hero Member
  • *****
  • Posts: 2457
  • All gave some, some gave all.
Re: 1/72 scratch build Caproni Ca 5
« Reply #2 on: April 13, 2019, 10:25:17 AM »
All the best to you Stephen, great subject that I am sure Des is smiling down on.

Offline Alexis

  • Hero Member
  • *****
  • Posts: 7947
  • Love the self
Re: 1/72 scratch build Caproni Ca 5
« Reply #3 on: April 13, 2019, 11:19:15 AM »
Looking forward on following along on this one . Great subject matter !


Terri
Hurra ! , Ich Leben Noch
Body and life is a vessel we use to travel the planet . Femininity is the gift , The miracle comes from what we do with it .

Offline gbrivio

  • Hero Member
  • *****
  • Posts: 1682
Re: 1/72 scratch build Caproni Ca 5
« Reply #4 on: April 13, 2019, 02:43:52 PM »
Great subject, wish you all the best in this challanging build.
Ciao
Giuseppe

Online RAGIII

  • Hero Member
  • *****
  • Posts: 18845
Re: 1/72 scratch build Caproni Ca 5
« Reply #5 on: April 13, 2019, 08:18:38 PM »
Great choice of subject Stephen. As always I will follow your build closely! Terrific start
RAGIII
"A man has to know his limitations": Harry Callahan

"Don't slop it on" Lynda Geisler

Offline kensar

  • Hero Member
  • *****
  • Posts: 2505
  • Reshaping the world - one piece at a time.
Re: 1/72 scratch build Caproni Ca 5
« Reply #6 on: April 14, 2019, 10:15:08 PM »
Good to see another scratchbuild.  Looks to be an ambitious project.
I'm interested in seeing how the wing construction works out.

Offline lone modeller

  • Hero Member
  • *****
  • Posts: 5322
Re: 1/72 scratch build Caproni Ca 5
« Reply #7 on: April 28, 2019, 07:39:20 AM »
Evening All,

Thank you Dan, Juan, Terri, Giuseppe, Rick and Ken for your encouraging comments. I will try to do my best to get this finished on time but if the last couple of weeks are a portent I may not be able to do so because lttle progress has been made as life has got in the way and really slowed me down. However I have managed to complete one wing after much sanding, filling, sanding, more filling, more sanding....you get the idea I am sure.


I know that this is not the most exciting photo of a wing but I cannot get one to show just how smooth the surface is. However it does show that I have succeeded in getting the curvature right. Anyway I have got to do all of this again because like all true aeroplanes, this one had TWO wings!

I have also carved the fuselage nacelle and moulded and cut out the halves. I just wanted to be able to have something to show for a lot of work and I could carve this while I was waiting for filler on the wing to dry out. Here are the moulds for the nacelle - old fashioned push/plunge moulding I am afraid - none of that super-high-tech vacuform stuff from me!


And here are the two halves with the male mould:


There will be quite a lot to do on these because there is a large area of the interior which will be visible - the only problem is that there is very little published on what it all looked like, so I am going to base the details on the earlier Ca 3 and use modeller's license for the rest! There were also cooling gills on the nose and a radiator in the front end, plus the rear gunner's position - quite enough to be getting on with....when life permits.

Thanks for looking.

Stephen.

Online RAGIII

  • Hero Member
  • *****
  • Posts: 18845
Re: 1/72 scratch build Caproni Ca 5
« Reply #8 on: April 28, 2019, 10:34:59 PM »
Your work is looking excellent to date. I am sure you will do an outstanding job in Imagineering the interior  8)
RAGIII
"A man has to know his limitations": Harry Callahan

"Don't slop it on" Lynda Geisler

Offline andonio64

  • Hero Member
  • *****
  • Posts: 1685
  • There's no hurry
Re: 1/72 scratch build Caproni Ca 5
« Reply #9 on: May 07, 2019, 07:43:10 PM »
OMG!
:-O

Offline Dirigible-Al

  • Hero Member
  • *****
  • Posts: 530
Re: 1/72 scratch build Caproni Ca 5
« Reply #10 on: May 08, 2019, 03:14:25 AM »
Hello Stephen
You don't half pick em. A Caproni Ca 5!! This is going to look awesome.
Alan.
I heard that it all started when a bloke called Archie Duke shot an ostrich 'cause he was hungry!

Offline ermeio

  • Hero Member
  • *****
  • Posts: 913
Re: 1/72 scratch build Caproni Ca 5
« Reply #11 on: May 08, 2019, 06:50:53 AM »
excellent, Stephen


Offline lone modeller

  • Hero Member
  • *****
  • Posts: 5322
Re: 1/72 scratch build Caproni Ca 5
« Reply #12 on: May 16, 2019, 07:32:52 AM »
Evening All,

Thanks Rick, Andonio, Alan and Ermeio for your encouraging comments: I really appreciate your support. Thank you too Ermeio for the very interesting photograph of a Ca 5 - I have not seen this and it shows parts of the structure which I had guessed would be there, although I did not know the exact details of course.

I have based my interior on the photograph supplied by Ermeio and the Ca 3 and other contemporary large aircraft: I do not claim full authenticity for this part but then I doubt whether anyone else can. In any event most of what I have added will be barely seen but at least there is something in the cockpits.

The cockpit interior for the pilots was scratched from card and the floor was modelled as slats rather than a solid floor. The control wheels were mde from rod and a simple control console made with throttles. Similarly the rear gunner's position was basic - a seat and floor:


Unfortunately I forgot to photograph the interior of the fuselage sides to show the structure which I had made from 10 x 20 thou strip and some thin rod. Some of the detail in the rear cockpit can just about be seen in one of the photos below. The fuselage is now closed and looks like this:


The next step will be to add the gun ring to the nose position and the radiator and cooling gills to the nose area.

Thanks for looking.

Stephen.

Offline PrzemoL

  • Hero Member
  • *****
  • Posts: 4888
  • There was Eru... and he made first the Ainur...
    • Przemysław Litewka
Re: 1/72 scratch build Caproni Ca 5
« Reply #13 on: May 16, 2019, 07:35:00 AM »
Wow, what an ambitious project, Stephen. Fingers crossed.
And great work so far!
Ash nazg durbatuluk, ash nazg gimbatul,
Ash nazg thrakatuluk, agh burzum-ishi krimpatul.

Offline kensar

  • Hero Member
  • *****
  • Posts: 2505
  • Reshaping the world - one piece at a time.
Re: 1/72 scratch build Caproni Ca 5
« Reply #14 on: May 16, 2019, 10:02:40 PM »
Fine progress, Stephen.  Good detail for such a small scale.