Author Topic: COMPLETED - 'Skeletal' Fokker D.VII  (Read 22286 times)

Online RAGIII

  • Hero Member
  • *****
  • Posts: 18794
Re: Fokker pair 2
« Reply #90 on: May 14, 2019, 06:44:23 AM »
Love the padding! I will have to try some of the options like you have used for the leather! Tail assembly looks great and like you say it also looks fragile  8)
RAGIII
"A man has to know his limitations": Harry Callahan

"Don't slop it on" Lynda Geisler

Offline kensar

  • Hero Member
  • *****
  • Posts: 2503
  • Reshaping the world - one piece at a time.
Re: Fokker pair 2
« Reply #91 on: May 14, 2019, 09:44:38 PM »
 8)

Like Juan said, it just gets better and better.

Offline Mike Norris

  • Hero Member
  • *****
  • Posts: 2202
  • RAF Old and Bold
    • Mikes WW1 Aircraft Models
Re: Fokker pair 2
« Reply #92 on: May 17, 2019, 02:18:07 AM »
Hi all,
Well the fuselage is completed, apart from fitting the engine exhaust and the propeller.
The Rudder and Elevator control runs have been connected with the turnbuckles under the pilot's seat.
Also the tail plane to fin bracing cable.
The entire fuselage has been weathered and sealed.

So now it's on to the lower wing, followed by scratch building the skeletal undercarriage assembly, which unfortunately is not available as a 3D printed part.


Mike


« Last Edit: May 17, 2019, 02:27:14 AM by sandbagger »


Retired - 27 years RAF service then 20 years Military Aerospace Technical Author/editor.

Online RAGIII

  • Hero Member
  • *****
  • Posts: 18794
Re: Fokker pair 2
« Reply #93 on: May 17, 2019, 02:55:06 AM »
Stunning work!
RAGIII
"A man has to know his limitations": Harry Callahan

"Don't slop it on" Lynda Geisler

Offline pepperman42

  • Hero Member
  • *****
  • Posts: 4431
  • Sergeant, my brown pants.......
Re: Fokker pair 2
« Reply #94 on: May 17, 2019, 11:15:20 PM »
Amazing!!

Steve

Offline Mike Norris

  • Hero Member
  • *****
  • Posts: 2202
  • RAF Old and Bold
    • Mikes WW1 Aircraft Models
Re: Fokker pair 2
« Reply #95 on: May 18, 2019, 02:57:49 AM »
Hi all,
The 3D printed lower wing is detailed enough, but as normal there are details that can be added to make it more authentic.
Early production Fokker D.VII aircraft were fitted with bracing tapes that were routed across the wings between the front and rear wing spars and between the rear wing spar and the wing trailing edge.
These tapes were routed in a diagonal ‘zig-zag’ form, up and over each wing rib.
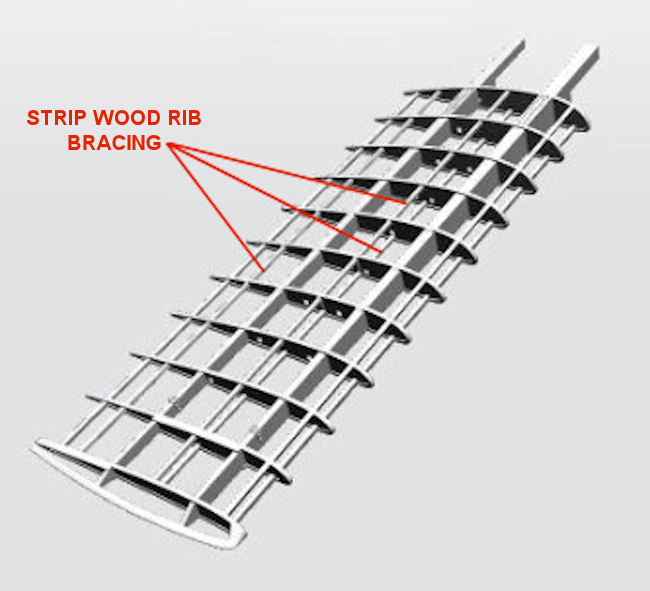
However later production aircraft were fitted with 10 mm square strip wood as replacements for the earlier tapes.
The 3D printed wings represent the later, strip wood version.
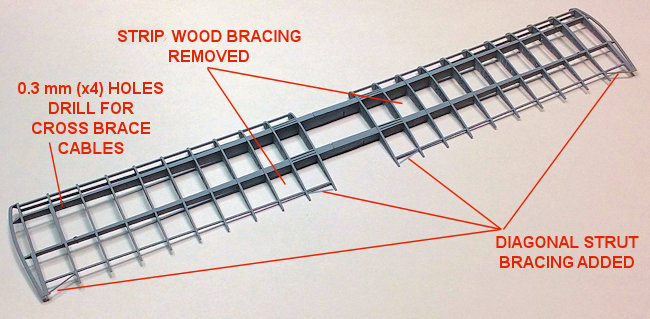
Although these strip wood struts can be left to make the model build easier, I've chosen to remove the wings strip wood struts and represent the earlier bracing tapes.

In addition, the two wing halves, when test joined at the centre section spars, showed a higher than expected dihedral angle.
Therefore I had to shave away material from the spars to achieve the correct angle.

Finally the leading edges of both wings were fitted with 'saw tooth' plywood fairings, which will need to be scratch made, as will the trailing edge support wire for attaching the linen covering.

So far:
Spars adjusted.
Strip wood bracing removed.
Diagonal bracing struts added to inner and outer trailing edges.
Holes drilled at the wing strut attachment points for attaching the wings internal cross bracing cables.
Wings scrapped clean of wax support material, assembled and primed.

The upper wing, which is in three sections, will require similar treatment.

Mike


Retired - 27 years RAF service then 20 years Military Aerospace Technical Author/editor.

Offline Alexis

  • Hero Member
  • *****
  • Posts: 7947
  • Love the self
Re: Fokker pair 2
« Reply #96 on: May 18, 2019, 11:00:56 AM »
Love it !


Terri
Hurra ! , Ich Leben Noch
Body and life is a vessel we use to travel the planet . Femininity is the gift , The miracle comes from what we do with it .

Offline Juan

  • Hero Member
  • *****
  • Posts: 2455
  • All gave some, some gave all.
Re: Fokker pair 2
« Reply #97 on: May 18, 2019, 11:16:39 AM »
Going the extra mile does not begin to credit what you are doing.

Offline Whiteknuckles

  • Hero Member
  • *****
  • Posts: 1332
Re: Fokker pair 2
« Reply #98 on: May 18, 2019, 12:13:43 PM »
Absolutely wonderful work :)

Andrew
Eternal Apprentice

Online RAGIII

  • Hero Member
  • *****
  • Posts: 18794
Re: Fokker pair 2
« Reply #99 on: May 18, 2019, 09:42:25 PM »
Continuing to be a lesson in adding detail! Beautiful.
RAGIII
"A man has to know his limitations": Harry Callahan

"Don't slop it on" Lynda Geisler

Offline Mike Norris

  • Hero Member
  • *****
  • Posts: 2202
  • RAF Old and Bold
    • Mikes WW1 Aircraft Models
Re: Fokker pair 2
« Reply #100 on: May 19, 2019, 02:03:48 AM »
Hi all,
The leading edge plywood 'saw tooth' fairing is tricky to do, but can be done.
Structure drawing of 1/72 scale resized by 160%, then printed, cut out and used as a template on 0.2 mm thick plastic card.
The fairing is test fitted and adjusted where necessary then secured in position using thin CA adhesive.
Starting on the top of the front wing spar then once set, rolling the wing over the fairing and applying adhesive at the same time.,

Mike


Retired - 27 years RAF service then 20 years Military Aerospace Technical Author/editor.

Online RAGIII

  • Hero Member
  • *****
  • Posts: 18794
Re: Fokker pair 2
« Reply #101 on: May 19, 2019, 08:03:27 AM »
Have I said Brilliant Modeling Yet?
RAGIII
"A man has to know his limitations": Harry Callahan

"Don't slop it on" Lynda Geisler

Offline Mike Norris

  • Hero Member
  • *****
  • Posts: 2202
  • RAF Old and Bold
    • Mikes WW1 Aircraft Models
Re: Fokker pair 2
« Reply #102 on: May 21, 2019, 07:15:29 AM »
Hi all,
The lower wing is nearing completion.
It's been painted with 'Tamiya' base coat then oils for wood effect.
Internal wing bracing with turnbuckles added.
Leading edge 'transportation 'bump stops' added.
Internal double bracing 'zig-zag' tapes installed (instead of the original 'strip wood' struts, which were removed).

I still have the trailing edge wire to install (for attaching the wings linen covering).
Also the final weathering will need to be added


Mike


Retired - 27 years RAF service then 20 years Military Aerospace Technical Author/editor.

Online RAGIII

  • Hero Member
  • *****
  • Posts: 18794
Re: Fokker pair 2
« Reply #103 on: May 21, 2019, 07:28:55 AM »
Gorgeous!
RAGIII
"A man has to know his limitations": Harry Callahan

"Don't slop it on" Lynda Geisler

Offline Mike Norris

  • Hero Member
  • *****
  • Posts: 2202
  • RAF Old and Bold
    • Mikes WW1 Aircraft Models
Re: Fokker pair 2
« Reply #104 on: May 22, 2019, 02:56:37 AM »
Hi all,
The lower wing is finished now, with the trailing edge wire fitted and overall 'dumbing down' carried out using 'Alclad' Light Sheen lacquer mixed with 'Tamiya' Smoke (X19). 

So now it's on to scratch making the undercarriage fairing and axle assembly (not available as a 3D printed part),

Mike


« Last Edit: May 22, 2019, 03:04:52 AM by sandbagger »


Retired - 27 years RAF service then 20 years Military Aerospace Technical Author/editor.