Author Topic: COMPLETED - 'Skeletal' Fokker D.VII  (Read 22250 times)

Offline RAGIII

  • Hero Member
  • *****
  • Posts: 18793
Re: Fokker pair 2
« Reply #75 on: May 07, 2019, 09:00:28 PM »
The ply decking looks great!
RAGIII
"A man has to know his limitations": Harry Callahan

"Don't slop it on" Lynda Geisler

Offline Mike Norris

  • Hero Member
  • *****
  • Posts: 2196
  • RAF Old and Bold
    • Mikes WW1 Aircraft Models
Re: Fokker pair 2
« Reply #76 on: May 07, 2019, 10:57:06 PM »
Hi all,
The fuselage bottom cross bracing is done, which completes the fuselage bracing.
Also the tail skis has been fitted, with 0.125 mm copper wire suspension springs and 0.2 mm lead wire retention cable.

Now it's onto making the cockpit surround padding and fit the two modified 'Gaspatch' machine guns with their synchronization cables,


Mike


Retired - 27 years RAF service then 20 years Military Aerospace Technical Author/editor.

Offline RAGIII

  • Hero Member
  • *****
  • Posts: 18793
Re: Fokker pair 2
« Reply #77 on: May 07, 2019, 10:59:17 PM »
Awesome work on the skid. Looks like it would work like the real one!
RAGIII
"A man has to know his limitations": Harry Callahan

"Don't slop it on" Lynda Geisler

Offline Mike Norris

  • Hero Member
  • *****
  • Posts: 2196
  • RAF Old and Bold
    • Mikes WW1 Aircraft Models
Re: Fokker pair 2
« Reply #78 on: May 09, 2019, 06:11:05 AM »
Hi all,
I realized that the fuselage rear decking panel was incorrect.
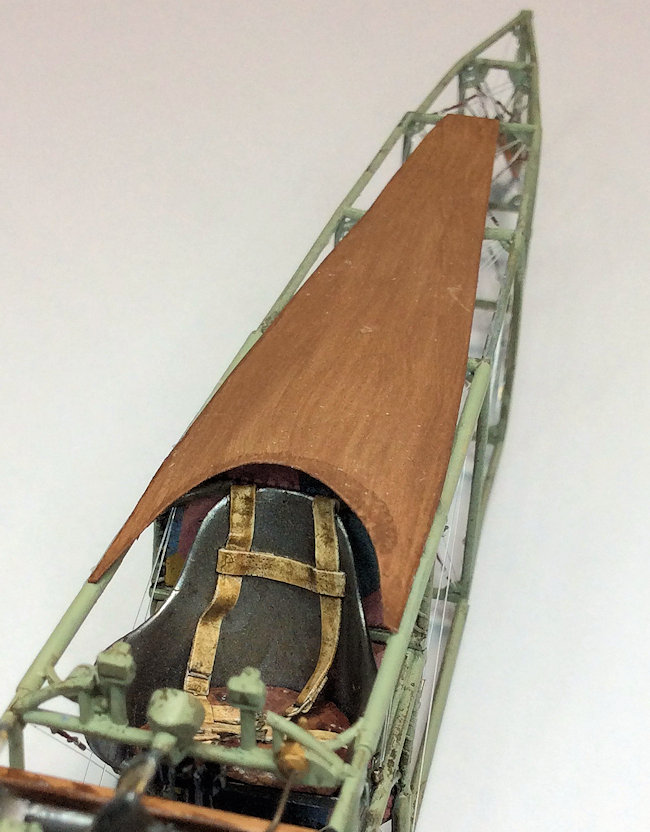
I made it such that the front edge butted up against the rear of the pilot's seat support frame.
In fact the decking seems to have passed over the seat frame, forming the rear cockpit surround, then onto the top of the cockpit side frames.
After several tries and five broken bracing wires, I think it's just about there now.

Now onto making the padded rim to fit around the cockpit rear decking and after that, the machine guns,

Mike


Retired - 27 years RAF service then 20 years Military Aerospace Technical Author/editor.

Offline RAGIII

  • Hero Member
  • *****
  • Posts: 18793
Re: Fokker pair 2
« Reply #79 on: May 09, 2019, 06:57:59 AM »
Much Improved! Sometimes I pass on saying something feeling it would have a negative impact but I did notice that the panel looked a bit short on the front  8) Excellent correction!
RAGIII
"A man has to know his limitations": Harry Callahan

"Don't slop it on" Lynda Geisler

Offline Mike Norris

  • Hero Member
  • *****
  • Posts: 2196
  • RAF Old and Bold
    • Mikes WW1 Aircraft Models
Re: Fokker pair 2
« Reply #80 on: May 09, 2019, 07:31:40 AM »
Hi Rick,
Please do comment if you see an obvious error.
Especially on something complex like this build as it would be tricky to go back to correct if I've gone too far,

Mike


Retired - 27 years RAF service then 20 years Military Aerospace Technical Author/editor.

Offline RAGIII

  • Hero Member
  • *****
  • Posts: 18793
Re: Fokker pair 2
« Reply #81 on: May 09, 2019, 07:55:34 AM »
Hi Rick,
Please do comment if you see an obvious error.
Especially on something complex like this build as it would be tricky to go back to correct if I've gone too far,

Mike

Will do, but in a PM  ;D
RAGIII
"A man has to know his limitations": Harry Callahan

"Don't slop it on" Lynda Geisler

Offline gbrivio

  • Hero Member
  • *****
  • Posts: 1681
Re: Fokker pair 2
« Reply #82 on: May 10, 2019, 04:40:31 AM »
No rigging on a Fokker D. VII, they said. Makes this plane a lot easier to build, they said...  :)
Great pics of a wonderful build!
Andreas

My thought, exactly... Most amazing build so far.
Ciao
Giuseppe

Offline AROTH

  • Full Member
  • ***
  • Posts: 121
Re: Fokker pair 2
« Reply #83 on: May 10, 2019, 10:14:46 AM »
Your work is completely beyond anything I ever dreamed of. Makes me want to sell all of my 50+ years of WWI aviation stuff and take up bird watching, or needlepoint.     :D

Offline Juan

  • Hero Member
  • *****
  • Posts: 2455
  • All gave some, some gave all.
Re: Fokker pair 2
« Reply #84 on: May 10, 2019, 11:29:36 AM »
Wow, gets better and better.

Offline Mike Norris

  • Hero Member
  • *****
  • Posts: 2196
  • RAF Old and Bold
    • Mikes WW1 Aircraft Models
Re: Fokker pair 2
« Reply #85 on: May 11, 2019, 04:23:28 AM »
Hi all,
Both machine guns are now fitted along with their synchronization flexible drives.
These drives are connected between the bottom of the gun breech blocks and the gun synchronization mechanism, fitted to the rear of the engine cam shaft,

Mike


Retired - 27 years RAF service then 20 years Military Aerospace Technical Author/editor.

Offline RAGIII

  • Hero Member
  • *****
  • Posts: 18793
Re: Fokker pair 2
« Reply #86 on: May 11, 2019, 04:28:31 AM »
More outstanding detail!
RAGIII
"A man has to know his limitations": Harry Callahan

"Don't slop it on" Lynda Geisler

Offline Alexis

  • Hero Member
  • *****
  • Posts: 7947
  • Love the self
Re: Fokker pair 2
« Reply #87 on: May 11, 2019, 10:33:14 AM »
 :) :) :) :) :) :)


Terri
Hurra ! , Ich Leben Noch
Body and life is a vessel we use to travel the planet . Femininity is the gift , The miracle comes from what we do with it .

Offline Mike Norris

  • Hero Member
  • *****
  • Posts: 2196
  • RAF Old and Bold
    • Mikes WW1 Aircraft Models
Re: Fokker pair 2
« Reply #88 on: May 14, 2019, 02:57:37 AM »
Hi all,
I've added the padding rim around the fuselage decking panel and onto the top of the cockpit side frames.
This was done using 2.0 mm diameter plastic tube which was sanded to form a grip for painting.
Then it was slit along one side and located over the decking and secured in position with thin CA adhesive.
Finally it was primed, painted 'Humbrol' leather (62) and 'Tamiya' Hull Red (XF9), sealed then given a clay wash and finally sealed with 'Alclad' Light Sheen (ALC-311).


Mike


Retired - 27 years RAF service then 20 years Military Aerospace Technical Author/editor.

Offline Mike Norris

  • Hero Member
  • *****
  • Posts: 2196
  • RAF Old and Bold
    • Mikes WW1 Aircraft Models
Re: Fokker pair 2
« Reply #89 on: May 14, 2019, 06:05:22 AM »
Hi all,
Tail unit assembled from the 3D printed parts.
Very fragile once separated from the support frame, so should prove interesting.
The elevator was missing the inboard trailing edge profile, presumably missed during printing process.
Therefore I had to make the profiles using 0.8 mm brass tube.

Mike


« Last Edit: May 14, 2019, 09:05:38 PM by sandbagger »


Retired - 27 years RAF service then 20 years Military Aerospace Technical Author/editor.