Author Topic: Special Hobby 1/48 SPAD VII  (Read 17756 times)

Offline uncletony

  • Hero Member
  • *****
  • Posts: 4350
    • Aircraft In Pixels
Re: Special Hobby 1/48 SPAD VII
« Reply #30 on: August 15, 2012, 01:03:26 PM »
Great update Antonio!

Wish I had a good idea for fitting the chin piece. Whatever you end up doing, it should be worth it -- the PE chin detail  really looks the part.

Good luck!


Offline Whiteknuckles

  • Hero Member
  • *****
  • Posts: 1334
Re: Special Hobby 1/48 SPAD VII
« Reply #31 on: August 15, 2012, 04:42:40 PM »
Some great work there Antonio - your 'little fish' are looking good.
Together they'll make a great bird ;) ;D

Andrew
Eternal Apprentice

Offline Chris Johnson

  • Hero Member
  • *****
  • Posts: 1959
Re: Special Hobby 1/48 SPAD VII
« Reply #32 on: August 16, 2012, 03:40:44 AM »
I really enjoy threads like this one with construction images where I can see how different modellers approach their builds. I never fail to learn something along the way. Keep the updates coming Antonio!

Cheers,

Chris
You can have it good; You can have it fast; you can have it cheap. Pick any two, but all three are impossible.

Offline Dal Gavan

  • Sr. Member
  • ****
  • Posts: 469
Re: Special Hobby 1/48 SPAD VII
« Reply #33 on: August 16, 2012, 09:26:55 AM »
That's coming along really well, Antonio.

As for the chin brass, can you split the piece into four panels and remove some brass from those areas (see below)?  It will change the look of the panel a bit, but if you can't remove any more brass from the edges that may be the only solution.

Cheers.

Dal.

Offline andonio64

  • Hero Member
  • *****
  • Posts: 1687
  • There's no hurry
Re: Special Hobby 1/48 SPAD VII
« Reply #34 on: August 16, 2012, 03:40:38 PM »
Yes Dal, I agree with you that's the solution, at the moment no ither operation comes to my mind...
Thanks

Offline GAJouette

  • Hero Member
  • *****
  • Posts: 3579
  • " Beware of the Spanish Inquisition"
Re: Special Hobby 1/48 SPAD VII
« Reply #35 on: August 18, 2012, 12:17:11 AM »
  Antonio,
Excellent work on the brass cheeks my old friend,they're a great addition to the over all appearance of the model. Dal's solution to the chin piece does seem to be a valid solution and surely worth looking in to. I believe that somewhere on the old Aerodrome forum there's a thread dealing with the Special Hobby SPAD VII and the Part PE detail set perhaps taking a look there would be helpful to you. I'd give you the link but I no longer have access to the forum . Keep up the outstanding work my old friend,it's truly a joy to be following this excellent thread.
Highest Regards,
Gregory Jouette
" What Me Worry"

Offline andonio64

  • Hero Member
  • *****
  • Posts: 1687
  • There's no hurry
Re: Special Hobby 1/48 SPAD VII
« Reply #36 on: August 18, 2012, 02:55:28 AM »
Thanks Gregory, I saw that thread some time ago and If I'm not wrong it was a 32 scale, I will check it again... Thanks for recalling the wip to  me.

Offline andonio64

  • Hero Member
  • *****
  • Posts: 1687
  • There's no hurry
Re: Special Hobby 1/48 SPAD VII
« Reply #37 on: August 18, 2012, 03:23:39 AM »
I found the thread indicated by Gregory,
(http://www.theaerodrome.com/forum/models/52787-1-48-spad-vii-c1-special-hobby-part-pe.html)
and the fellow had exactly the same problem as me (see his picture below), and the scale is in 48.
He trimmed the PE part and soldered the vents, then putting the brass on the plastic the fuselage opened in the middle because the PE part is too big.
It still seems the only way to go is to divide the PE part in 4 chunks and trim them one by one.

« Last Edit: August 18, 2012, 04:25:40 AM by andonio64 »

Offline andonio64

  • Hero Member
  • *****
  • Posts: 1687
  • There's no hurry
Re: Special Hobby 1/48 SPAD VII
« Reply #38 on: August 19, 2012, 06:47:39 AM »
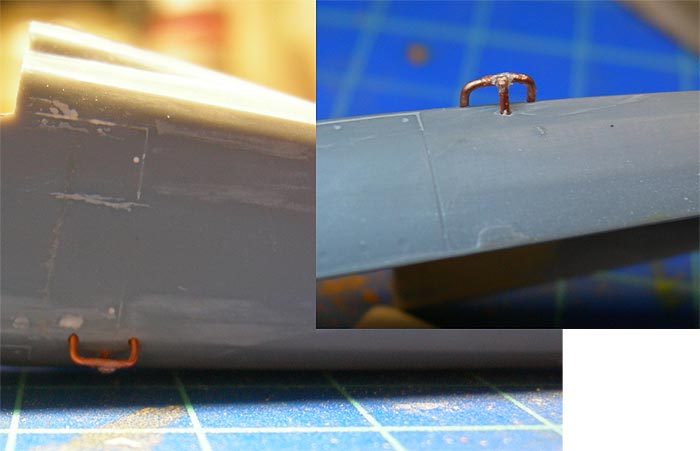
BTW I will take care of the chin panel after I close the fuselage, in the meantime I went on with the work: here is the step to climb into the cockpit, made with a 0,5 mm copper rod


Then I had to decide where to drill the fuselage to prepare a starting point for the rigging going from the base of the lower wings to the top of the outer struts, so I drew a line joining the holes where the struts will go, up to the fuselage side.
More or less that will be the place to drill.


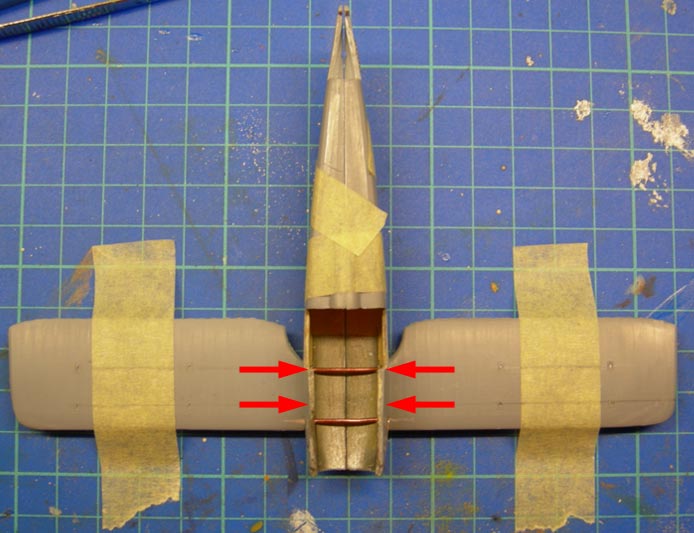
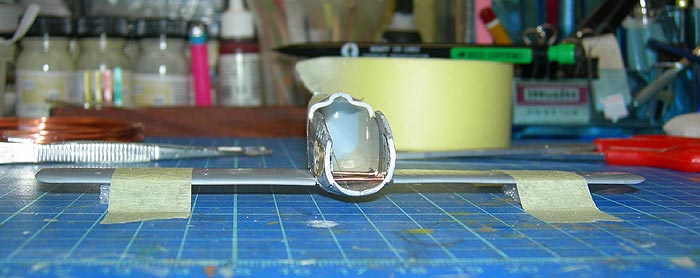
I took this occasion to cut to length the copper rod that will hold the lower wings and checked the wings are in a straight line.


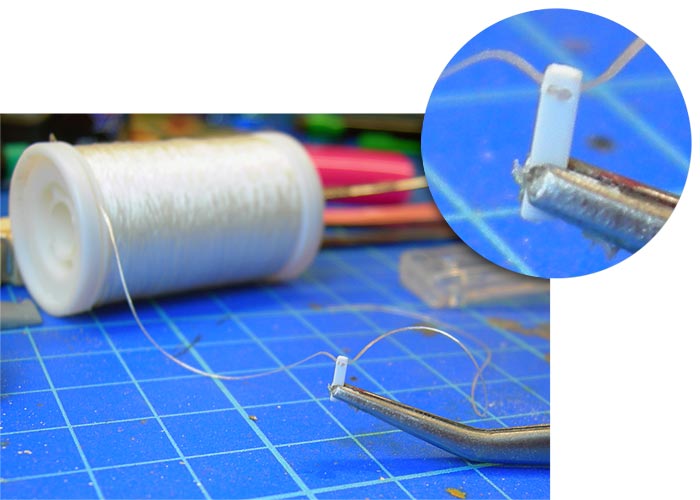
To prepare an anchor point on the fuselage for the double rigging going up towards the external struts I decided to follow the Starflyer idea: Cut a styrene strip (1 mm wide 0.5 mm thick) and drill 2 0.3 mm holes in it


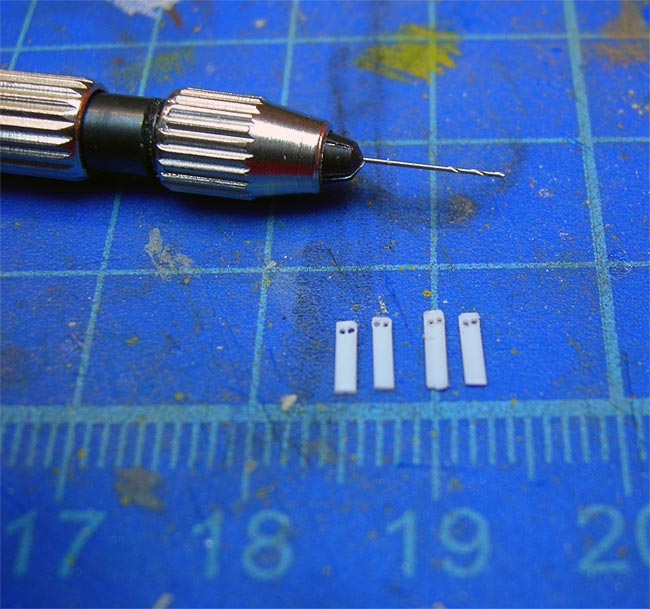
This is how the thread goes through the holes:


Then I cut 8 pieces (3 mm long) of nickel pipe (0.6 mm OD - 0.4 mm ID) to simulate the turnbuckles:


To fix the far end of the line beneath the upper wing I will use Bob Von Buckle's method n.2
http://www.bobsbuckles.co.uk/how_to_buckle.html

Any suggestion?

Antonio
« Last Edit: August 19, 2012, 06:51:38 AM by andonio64 »

Offline Dal Gavan

  • Sr. Member
  • ****
  • Posts: 469
Re: Special Hobby 1/48 SPAD VII
« Reply #39 on: August 19, 2012, 01:00:52 PM »
I like that idea for the twinned rigging lines, Antonio.  The build's coming along nicely.

Dal.

Offline andonio64

  • Hero Member
  • *****
  • Posts: 1687
  • There's no hurry
Re: Special Hobby 1/48 SPAD VII
« Reply #40 on: September 06, 2012, 07:37:42 PM »
Thank you Dal!

Yes I know, I am making very slow progresses! Although this is partially true, I went on working on the pieces above the engine adding a PE panel and carving some new panel lines.
Most of the recent work has been on the tail: divided mobile from fixed parts, inserted pins on the pieces to fix them to each other, scratch building of the control horns where the control cables coming out of the fuselage are hooked to the rudder.

Then the drill bit 0,3 mm I was using got broken and I had no spares left, so I had to order a new set.

Pics will be posted ASAP!!!!!

Offline Adam

  • Hero Member
  • *****
  • Posts: 647
Re: Special Hobby 1/48 SPAD VII
« Reply #41 on: September 06, 2012, 11:50:46 PM »
Antonio.
I’m new on this forum, so I’m reading every thread from cover to cover.
Yours struggle with struts in cockpit and PE motors cover is fantastic.

Regards.
Adam

Offline GAJouette

  • Hero Member
  • *****
  • Posts: 3579
  • " Beware of the Spanish Inquisition"
Re: Special Hobby 1/48 SPAD VII
« Reply #42 on: September 07, 2012, 05:47:15 AM »
  Antonio,
How's your SPAD VII progressing my friend? Looking forward to seeing the latest,especially the PE nose pieces.
Highest Regards,
Gregory Jouette
" What Me Worry"

WarrenD

  • Guest
Re: Special Hobby 1/48 SPAD VII
« Reply #43 on: September 07, 2012, 10:00:17 AM »
Antonio,
             I look forward to more posts of your build as the SPAD VII is one of my faves.
(A 1/72nd MAC SPAD VII has been  languishing on my shelf of shame for a few years now. I thinned the upper wing, and just had to take one more stroke, and CRACK, the trailing edge shattered off.  :'(  )

Warren

Offline andonio64

  • Hero Member
  • *****
  • Posts: 1687
  • There's no hurry
Re: Special Hobby 1/48 SPAD VII
« Reply #44 on: September 07, 2012, 06:00:04 PM »
Hallo boys,
first of all thanks for the interest you dedicate to my build, I must apologize for not posting anything new since 20 days but I wasn't able to dedicate too much time to modeling due to energies being drained by work and family...
Anyway I am sure the incoming weekend will be much more fruitful and I will be able to post something.

I have postponed the treatment of the "chin" photoetched panel, I will deal with it after I close the fuselage.
I will complete my work on the tail piece tonight or tomorrow, I realized the holes on the horizontal plan for the pin of the fin were not aligned and I must re-do one of them.

I should refine something on the two pieces closing the engine place on top.

Then I need to manage the exhausts in order to have them ready and pierce the fuselage in the spots where they will be fixed. I want to use the PE terminals which have the correct slots on them, but this means to reduce the plastic  terminals otherwise the brass doesn't close. I will also replace the horrible strips fixing the tubes to the fuselage with something thinner and more realistic.

After this I will spray everything with primer and close the fuselage.

I hope your wait will be rewarded with some good results!!!!

Ciao

Antonio