Author Topic: Scratch build partial stripdown Vickers FB 5 Gunbus 1/32 scale: a tribute to Des  (Read 28045 times)

guitarlute101

  • Guest
Excellent, excellent progress, love it!!

Mark

Offline lone modeller

  • Hero Member
  • *****
  • Posts: 5300
Evening All,

Thank you Gary, Ondra, Manni, Rick, Juan, Andreas and Mark for those very encouraging and complimentary remarks whhich are very much appreciated.

Well the crab has stopped moving sideways, and after a minor scare when one of the wheels dropped off and the tail skid broke away when I was trying to fit the wheel for the machine gun mounting, (necessitating a couple of hours of very delicate repair and recovery, and some unrepeatable language), it finally jumped to the finish line and my dream has materialised.

I C.A.'d the tail skid to the base of the rudder post and made a spring from thin copper wire wound around a piece of brass rod. This was then assembled as per the plans and photos. Then I could fix the rudder and add the control cables, followed by the elevators and their control wires:


I followed up with the undercarriage unit. The legs were C.A.'d to the skids and when these were set I could CA the whole unit to the underside of the nacelle. This was left overnight as it seemed to be rather fragile: the following day I added the bracing from EZ line which seemed to make the assembly considerably stronger.


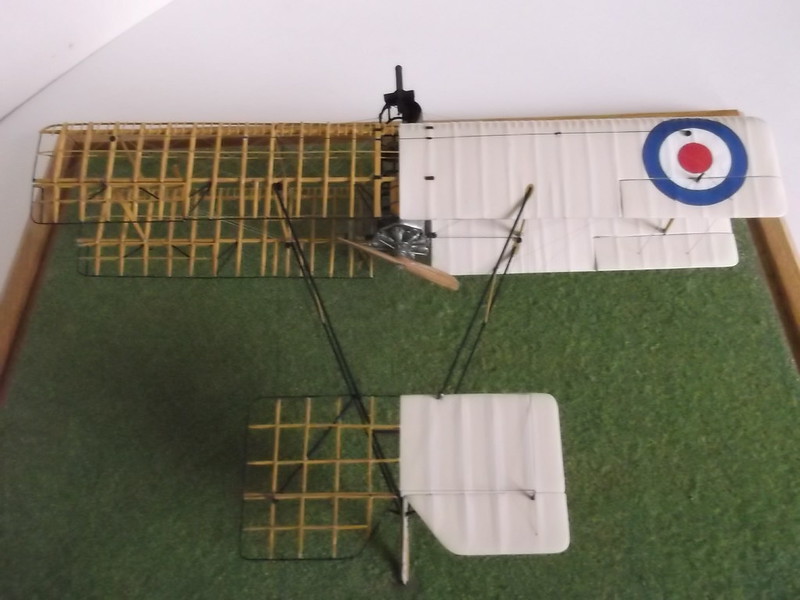
The propellow was next as I was concerned that I might not be able to reach into the rear without breaking something off:


The step to the cockpit was made from 20thou sheet - it too was C.A.'d in place - again care was needed not to knock this off twice - yes I managed to do so once!


Final details were the pitot tube on the front inner port (left) strut, the wing skids and picket rings, wheels and last, the machine gun and mounting and wheel for moving the mount.

The project is finished and I have completed my first pusher biplane in 1/32 scale, (I have built 14 others as kits, conversions or scratch builds in 172 scale), - it was not a pushover but it did not push me quite as far as I had anticipated except at the very end when as described a wheel and the tail skid broke off when I was trying to fit the machine gun wheel. So the sting was in the nose and the tail of this project.


My thanks to all who have followed this marathon and left supportive and encouraging comments on the way. I will post photos of the completed model in completed models section later when I have a little more time.

So if you have been, thanks for looking.

Stephen.

Offline gbrivio

  • Hero Member
  • *****
  • Posts: 1681
Applause is due: your build was a great show of modelling skills and artistry. Bravo!
Ciao
Giuseppe

Offline lcarroll

  • Administrator
  • Hero Member
  • ******
  • Posts: 8547
Stephen,
    To say this is an incredibly superb model is an understatement, it's your best yet and I'm lost for words to do it justice! Simply outstanding work and a magnificent debut into the "big scale", you must enter this beauty in a public show or contest, your artistry need be shared! Congratulations on completion of a really unique and spectacular model.
Cheers,
Lance

Offline Juan

  • Hero Member
  • *****
  • Posts: 2455
  • All gave some, some gave all.
Truly elegant both in workmanship and presentation.  Congratulations, it was truly an honor to follow your build.

Offline lone modeller

  • Hero Member
  • *****
  • Posts: 5300
Thank you Guiseppe, Lance and Juan for your very kind comments.

Lance: I will probab;ly take this to some local model shows because the chairman of my club will insist that I do! Unfortunately it is rather fragile, (as were the original machines), so I am thinking about how to transport it so that it doea not get damaged. This has been a bit of an experiment for me because it is the first time that I have scratch built anything in this scale and there are things that I would do differently now - part of the learning process of course. If I make another model in this scale I hope to be able to make it stronger.

Stephen.
« Last Edit: April 07, 2019, 07:25:59 AM by lone modeller »

guitarlute101

  • Guest
Absolutely beautiful work Stephen!

Mark

Bughunter

  • Guest
Stephen, this is a great piece of art and to follow your build report was a great journey! Thanks for that!

I transport my models in plastic storage boxes (DIY stores). I put some small peaces of foam in (with double sided adhesive tape), and pick out some foam with tweezers, so that there are holes for wheels or other model parts. Some other peaces below wing tips and it can be moved securely.

Cheers,
Frank

Offline kensar

  • Hero Member
  • *****
  • Posts: 2503
  • Reshaping the world - one piece at a time.
Great piece of scratchbuilding, Stephen.  Do share it by taking it to some shows.  You deserve to get the compliments.

Offline lone modeller

  • Hero Member
  • *****
  • Posts: 5300
Thank you Mark, Frank and Ken for your very generous comments.

Frank I already use a method of transport similar to the one which you describe for my smaller (1/72 scale) models. This one has to be fixed to a base because it leans heavily to one side as the solid wings are much heavier than the skeletal side. I have put pins in the tyres and used two guy ropes tied to the rings under the wings to help stop the tilting, but I have also had to add some temporary support under the solid wing in the form of foam. This is helping a great deal, but I notice that the model still leans a little if it is left for a time without the support: it has to do with the way the undercarriage is fixed to the nacelle and I cannot at the momet think of a solution without a major rebuild!

Ken I will present this at some local modle shows and possibly take it to Southern Expo next year.

Stephen.

Offline pepperman42

  • Hero Member
  • *****
  • Posts: 4431
  • Sergeant, my brown pants.......
Amazing work!!

Steve

Offline lone modeller

  • Hero Member
  • *****
  • Posts: 5300
Thanks Steve for the kind remark: much appreciated.

Stephen.

Offline Lozenge

  • Newbie
  • *
  • Posts: 35
  • Build models or make war...
Thats an astonishing pile of solutions and a wonderful craftmans workship - so you shouldn't place it on a green... could you place it on a single mirror to allow a view to the underside, too?

When this is the state of the modelling art I'm out in this very moment of competition.
"Well, how'd you do, Private William McBride?
Do you mind if I sit here down by your graveside?"
Eric Bogle - "No man's land"

Offline UFAG

  • Hero Member
  • *****
  • Posts: 644
been a while since I checked the scratch build section....this one is out of this world, beautifull !