Author Topic: SSW R 1 1/72  (Read 13691 times)

Offline Des

  • Administrator
  • Hero Member
  • ******
  • Posts: 9325
    • ww1aircraftmodels.com
Re: SSW R 1 1/72
« Reply #30 on: January 23, 2017, 06:20:22 AM »
Excellent work so far Stephen, it certainly is an usual fuselage but you are doing a superb job with it.

Des.
Late Founder of ww1aircraftmodels.com and forum.ww1aircraftmodels.com

Offline uncletony

  • Hero Member
  • *****
  • Posts: 4349
    • Aircraft In Pixels
Re: SSW R 1 1/72
« Reply #31 on: January 23, 2017, 06:37:17 AM »
very cool stuff Stephen.

Offline malaula

  • Sr. Member
  • ****
  • Posts: 267
Re: SSW R 1 1/72
« Reply #32 on: January 23, 2017, 07:09:46 AM »
Like Bo said:veeery cool stuff !!

Offline Juan

  • Hero Member
  • *****
  • Posts: 2455
  • All gave some, some gave all.
Re: SSW R 1 1/72
« Reply #33 on: January 23, 2017, 07:46:29 AM »
Beautifully done Stephen.  Cannot wait until your next update.

Offline coyotemagic

  • Hero Member
  • *****
  • Posts: 7710
  • "Here's to not buggering it up." -Winston Chuchill
    • My Models
Re: SSW R 1 1/72
« Reply #34 on: January 23, 2017, 01:02:36 PM »
Truly inspirational work, Stephen!
Cheers,
Bud
"All men dream: but not equally. Those who dream in the dark recesses of the night awake in the day to find all was vanity. But the dreamers of day are dangerous men, for they may act their dreams with open eyes, and make it possible." -T. E. Lawrence

Offline Manni

  • Hero Member
  • *****
  • Posts: 1768
    • Der Militärmodellbauer
Re: SSW R 1 1/72
« Reply #35 on: January 23, 2017, 07:18:41 PM »
Wow, stunning work. It makes me want to build this beast, too.
Looking worward, what is coming up next.
Manni
"Ich hab' da mal was vorbereitet.": Jean Pütz
"Warum noch mehr Bausätze?!?": meine Frau

Offline lone modeller

  • Hero Member
  • *****
  • Posts: 5300
Re: SSW R 1 1/72
« Reply #36 on: January 29, 2017, 05:40:18 AM »
Evening All,

Thank you Ian. Des, Bo, Malaula, Juan, Bud and Manni for dropping by and leaving supportive comments - I am going to need them in the near future.

Sometimes things happen in modelling - at least they do to me. Often we run into minor mishaps but usually I do not bother to post them because they are not significant and are easily and quickly remedied. Not so this time. Just as I thought that I was getting on well with this model……………………………. catastrophe.

I had glued the rear fuselage assembly to the top wing using a tab of card because this would otherwise be a butt joint and would be far too weak. Having allowed the cement to set I proceeded happily on my way to glue the sides of the central fuselage section to the underside of the top wing. This was so that the sides had something to hold them square and they would be rigid enough to take another sheet of 30 thou card across the bottom to make the underside of the fuselage. Here I hit what I mistakenly thought was a small problem - the fuselage sides were too high - the rear assembly did not fit properly. So I merrily trimmed the fuselage a bit until the rear section did fit, and afterwardsI glued the bottom plate into place. I then added a small extra piece of 20 thou card to the bottom to get the correct depth and filed the edges and added some filler etc and all was going well ….. Holes were drilled in the bottom of the fuselage sides to take the two pins (made from a paper clip), which would go into the wing roots and strengthen those joints later. I added some cross bracing to make this area stronger and made and painted an interior floor plate to cover it all up.
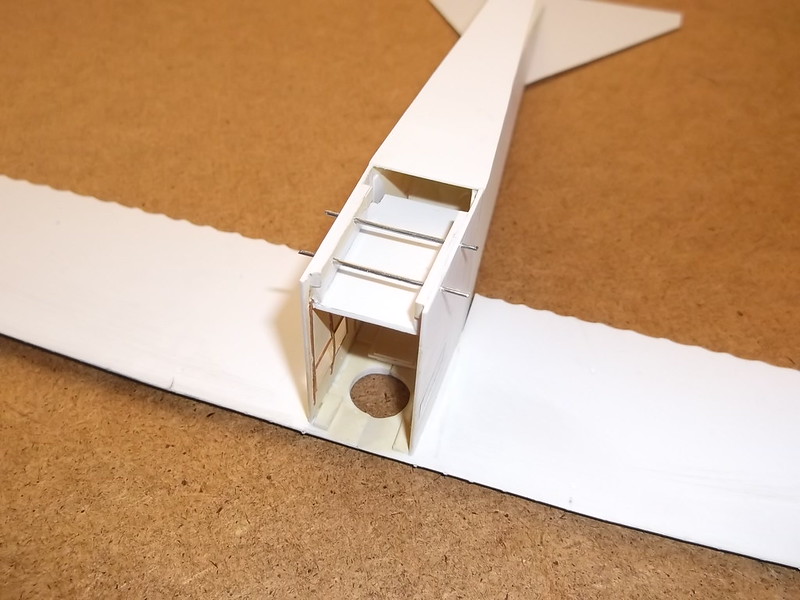


The upper gunners cylindrical position was made from 20 thou card wrapped around a thick piece of dowel and held with a piece of clear selotape - this will not be seen on the completed model and it holds the unit in shape - otherwise the joint will spring apart. This was glued into the top wing. Finally I added the nose sub-assembly to the front end of the fuselage and cleaned up all of the joints.
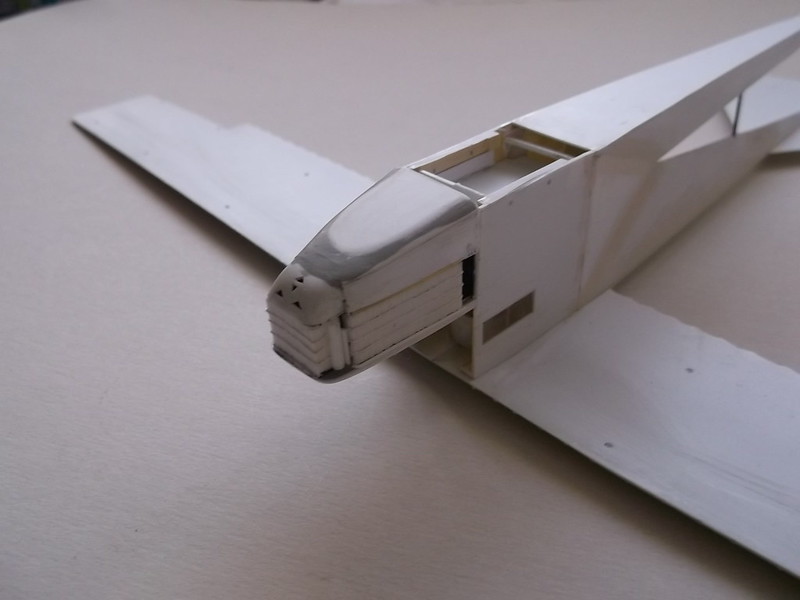


Now I was ready to start making the mould for the windscreen and canopy over the cockpit and I noticed something was not quite right but I could not see what it was…….. I carefully measured the drawings and the the model….. and found that the gap between the top of the nose in front of the cockpit and the top of the upper wing was 7mm TOO SMALLl!!!!   
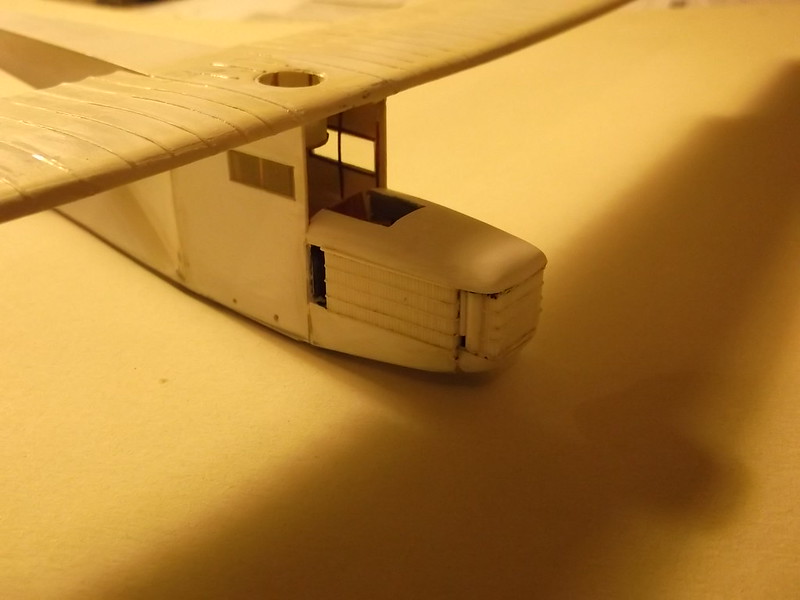


Aaaaaaaaaarrrrrrrrrrgggggggggghhhhhhhh******!!!***!!!******* (The rest has been censored to save the administrator a job!)

What to do? I sat for a full hour trying to work out what had gone wrong. At first I thought that it was the drawings - it was in part: they do not match in cross section and side elevation - there is a 2mm discrepancy, but that was not the entire problem. Somehow I had lost 7mm - I had cut off about 3-4mm from the sides as described above but even that was not sufficient to explain what had happened. The only answer that I could think of was that the side elevation drawings were not accurate because the triangular sides of the rear fuselage slope inwards and therefore using these as templates was not going to work. In the end I cut paper templates to try to determine out what the dimensions of the triangular fillet immediately behind the vertical fuselage sides would be. According to the side elevation in the drawings in the DatatFile, at point B they should be 24mm. From the cross section drawing this section should be 26mm but the sides are shown as flat when it is clear from photos (including those in the DataFile), that they were not: they had three faces with a slight angle between them. If 2mm does not seem much I can assure you that it translates into a significant difference in the length of the side of the triangle that joins the flat fuselage section. After cutting out paper templates of 24mm and 26mm I found that neither matched the vertical side of the central part of the fuselage. The actual size was 25mm according to my experiments, allowing for the angles of the faces, but I am still not sure whether that is going to fit when I assemble this thing again.

One of the advantages of scratch building is that you can always start again, so I dismantled the assembly to retrieve the top wing and the nose section. I have totally discarded the rear and central fuselage assembly and will make new ones. I think that I can restore the top of the nose which was slightly damaged but I may have to mould a new one of those too. 
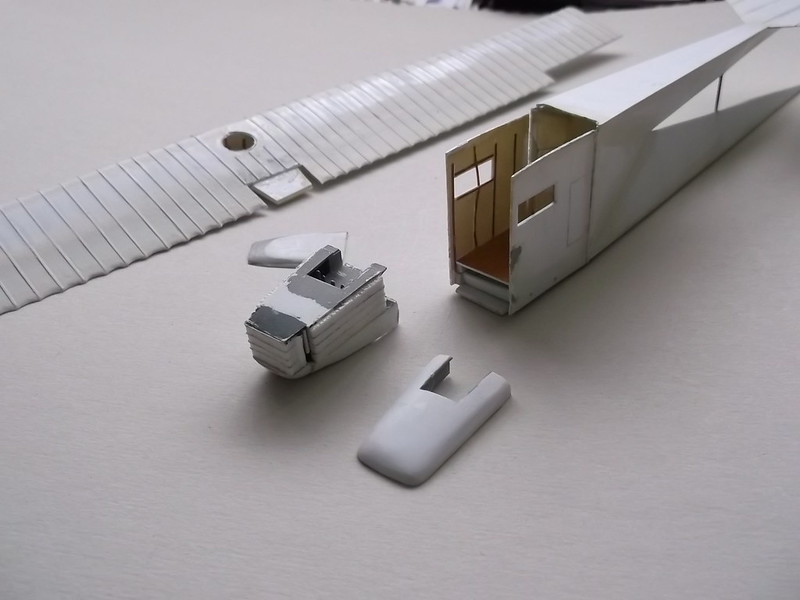


I will now rewrite the instructions to try to ensure that all of the parts fit properly. I have worked out that the dimensions of the upper and lower triangular sections of the rear fuselage are correct but that the triangular side panels between them and the flat fuselage sides will have to be cut to fit after the rear has been attached. I will also ensure that the junction between the top wing and the upper triangular rear fuselage section is at the correct angle - that is where the missing 2-3mm went on the first attempt. So the assembly sequence will need to be completely different and I will need to make a panel to fit into the rear of the flat fuselage section to hold the sides rigid as I will start construction from the bottom rather than the top. All will be revealed in the next post…..or not!

This time round I should be successful - the only problem is that I am having to go on one of my regular journeys this week so you may have to wait for a while to find out. More to follow.

Thanks for looking (and on this occasion at least, praying).

Stephen.

« Last Edit: February 12, 2017, 07:16:56 AM by lone modeller »

Offline RAGIII

  • Hero Member
  • *****
  • Posts: 18793
Re: SSW R 1 1/72
« Reply #37 on: January 29, 2017, 07:21:51 AM »
What a shame Stephen  :( I am sure your next attempt will fix the issue! Your perseverance in these builds is amazing  8)
RAGIII
"A man has to know his limitations": Harry Callahan

"Don't slop it on" Lynda Geisler

Offline lcarroll

  • Administrator
  • Hero Member
  • ******
  • Posts: 8547
Re: SSW R 1 1/72
« Reply #38 on: January 29, 2017, 10:15:50 AM »
Wow Stephen, that's a significant set back! You are working with a very complex design, and replication is difficult, but certainly not beyond your proven skills. I'll be watching closely for your re-visit to this obstacle, and the inevitable successful outcome. Break a leg! ;)
Cheers,
Lance

Offline Des

  • Administrator
  • Hero Member
  • ******
  • Posts: 9325
    • ww1aircraftmodels.com
Re: SSW R 1 1/72
« Reply #39 on: January 29, 2017, 10:37:09 AM »
It appears that you are well on top of the hiccup you have encountered, well done with the 'fix'. This is the beauty of scratch building, if an error has been made during the construction it doesn't take much to go back a few steps and start again, I have done the same thing many times with my own scratch builds.

Des.
Late Founder of ww1aircraftmodels.com and forum.ww1aircraftmodels.com

Offline Juan

  • Hero Member
  • *****
  • Posts: 2455
  • All gave some, some gave all.
Re: SSW R 1 1/72
« Reply #40 on: January 29, 2017, 11:44:18 AM »
Hi Stephen, don't fret, your build is looking awesome.  I am sure you will deal with this setback and come out ahead in the end.

Offline lone modeller

  • Hero Member
  • *****
  • Posts: 5300
Re: SSW R 1 1/72
« Reply #41 on: February 12, 2017, 07:36:36 AM »
Evening All,

Thanks to Rick, Lance, Des and Juan for your encouraging comments at a time when I was feeling a bit miffed! Malaula was right when he wrote that the fuselage would present some interesting problems. But now…..

….right. I have rewritten the instructions for this build and proceeded to start again with the fuselage behind the nose. I also had to make a new engine cover and re-assemble the remaining parts of the nose as these had come off when I dismantled the disaster as illustrated in the last post.


I made new sides and added some internal detail in the form of framing etc, a new floor and a rear panel - the latter was not on the real machine but I need one to hold the sides when I assemble all of the parts. Without a rear panel the sides will wave about and not stay square. 60-thou strips were glued to the lower parts of the cockpit sides as two pieces of paper clip have to be passed through - these will form pins to help strengthen the butt joints of the lower wings to fuselage. New triangular fuselage sections were constructed, this time the lower section will extend under the cockpit and join the base of the nose. A new bulkhead which will hold the front ends of the triangular fuselage sections was also made.


I should have made two bulkheads really as on the first attempt but I was frustrated and in a hurry - more haste less speed…! The horizontal tail surface was not attached to the upper fuselage triangle because it would get in the way later. The fronts of the cockpit sides were cut to fit into the rear of the nose section.

Now I could start construction agin, but this time following a different sequence. First the cockpit sides were glued to the front of the lower fuselage triangle, and the rear panel inserted to stop the sides from falling about. Two reinforcing strips were added to the front of the fuselage panel to strengthen it ready to add some more card on the underside later. Then the cockpit floor could be put in, this rests on the small blocks added to the bottoms of the cockpit sides earlier. The cockpit floor will conceal the reinforcing pins for the wings which were added later.


The bulkhead was glued into the lower triangular fuselage section.


Pins from an old paper clip were inserted through the holes in the bottom of the cockpit sides and superglued into place, followed by the nose section.


The upper fuselage triangular section could be lowered over the bulkhead and the wire support strut inserted into upper and lower rear fuselage units.


Now the upper and lower sections could be joined so that the top of the rear upper unit lined with the rear of the top wing.


Finally the triangular pieces which fill the gaps behind the cockpit were cut to fit - each had to be trimmed and adjusted from the pieces which I had previously made from using the card patterns illustrated above.These were then touched in with some filler.


Last the fuselage under the nose had a piece of 30 thou card glued and sanded to shape when it was dry and all the joints were treated with filler.


This assembly sequence works: certainly the gap for the front of the cockpit is now the correct size and the windscreen will not look too small when I get to fit it later.

Thanks for looking.

Stephen.

Offline Des

  • Administrator
  • Hero Member
  • ******
  • Posts: 9325
    • ww1aircraftmodels.com
Re: SSW R 1 1/72
« Reply #42 on: February 12, 2017, 07:58:13 AM »
That was a huge undertaking to disassemble, remake then re-assemble virtually the whole aeroplane, you have done a superb job Stephen with excellent results, I'm looking forward to seeing the next updates.

Des.
Late Founder of ww1aircraftmodels.com and forum.ww1aircraftmodels.com

Offline malaula

  • Sr. Member
  • ****
  • Posts: 267
Re: SSW R 1 1/72
« Reply #43 on: February 12, 2017, 09:27:26 AM »
Standing ovations for this,Stephen!

Offline ondra

  • Hero Member
  • *****
  • Posts: 910
Re: SSW R 1 1/72
« Reply #44 on: February 12, 2017, 11:20:33 PM »
I can not describe, what a fascinating build is going on here!

Just excellent work, Stephen. My hats off to your scratchbuilding skills and many thanks for sharing.

Cheers

Ondra