Author Topic: Blue Max 1:48 Sopwith Dolphin  (Read 18254 times)

Offline Trackpad

  • Hero Member
  • *****
  • Posts: 1306
Re: Blue Max 1:48 Sopwith Dolphin
« Reply #60 on: March 18, 2016, 01:03:09 AM »
Hello, Everyone,

Not too much done since my last post, as I was working all last week and the first two days of this week. However, a little progress has been made. The engine is together and painted, ready for a bit of detailing. The seat from the new CSM PE fret is done: I made a small cushion from Milliput to augment the item. Seat belts (from the same fret) are painted Tamiya Buff (with a bit of Mig's Pigment added (European Dust - what else would I use! ;)) to give a bit of wear and depth. Adding the radiators and forward panels (one rad scoop to go!) completed the progress over the past few days. With the seat finished, I'll be adding more details to the interior before closing up the fuselage.


Thanks for visiting!  8)

Cheers!
Gary

"It was an adventure, a great adventure. And, like all great adventures, we never knew where it would lead or how it would end."

Offline RAGIII

  • Hero Member
  • *****
  • Posts: 19694
Re: Blue Max 1:48 Sopwith Dolphin
« Reply #61 on: March 18, 2016, 01:10:53 AM »
Looking awesome!
RAGIII
"A man has to know his limitations": Harry Callahan

"Don't slop it on" Lynda Geisler

Offline lcarroll

  • Administrator
  • Hero Member
  • ******
  • Posts: 8659
Re: Blue Max 1:48 Sopwith Dolphin
« Reply #62 on: March 18, 2016, 03:29:21 AM »
Nice progress Gary, she's looking mighty fine now that the "extras" are coming into play.
Cheers,
Lance

Offline Des

  • Administrator
  • Hero Member
  • ******
  • Posts: 9325
    • ww1aircraftmodels.com
Re: Blue Max 1:48 Sopwith Dolphin
« Reply #63 on: March 18, 2016, 06:34:28 AM »
She is coming together beautifully Gary, looking forward to seeing more.

Des.
Late Founder of ww1aircraftmodels.com and forum.ww1aircraftmodels.com

Offline Trackpad

  • Hero Member
  • *****
  • Posts: 1306
Re: Blue Max 1:48 Sopwith Dolphin
« Reply #64 on: March 19, 2016, 12:46:25 AM »
RAGIII, Lance and Des,

Thanks for visiting. With nothing on the books work-wise until early April I should be able to get a bit more done in a bit less time! Still an enjoyable build, and the PE certainly works well so far.  8)
Cheers!
Gary

"It was an adventure, a great adventure. And, like all great adventures, we never knew where it would lead or how it would end."

Offline Trackpad

  • Hero Member
  • *****
  • Posts: 1306
Re: Blue Max 1:48 Sopwith Dolphin
« Reply #65 on: March 19, 2016, 07:27:37 AM »
Gary

Just in case you somehow missed that - the radiator windshields should be bend in the middle, so you can change the angle from opened radiator to closed versions.

Hi, Edgar,

You are right: I did miss that point. I've checked with my reference (the Windsock Datafile) and I've found a photo that shows the correct way to fit the PE part. I'll be doing that very soon.

Thanks for the information!
Cheers!
Gary

"It was an adventure, a great adventure. And, like all great adventures, we never knew where it would lead or how it would end."

Offline dr 1 ace

  • Hero Member
  • *****
  • Posts: 2448
Re: Blue Max 1:48 Sopwith Dolphin
« Reply #66 on: March 19, 2016, 10:01:12 AM »
Looking good Gary !

Ed
Life is short, enjoy it, nobody gets out alive.

Offline Trackpad

  • Hero Member
  • *****
  • Posts: 1306
Re: Blue Max 1:48 Sopwith Dolphin
« Reply #67 on: March 25, 2016, 02:22:33 AM »
Hi, Everyone,

I had all of the items required for the cockpit area on the table last night, and decided to tape the fuselage halves together to see how many could be fitted into place if the fuselage halves were glued together. So I taped the halves together and started to place the bits and bobs. One after another, they slipped into place (much to my amazement!). So I stripped them all out (keeping the fuselage taped up) and fitted the floor, then the seat (both with 5-minute epoxy), then the three wooden parts (Tamiya glue and PVA glue) and finally the rudder pedals (epoxy). Well, in for a penny, in for a pound, so out came the Tamiya glue again and the fuselage halves were glued together and clamped. Later that evening, feeling quite daring (!) I gave the underside seam a dose of Tamiya putty, followed by a good sanding earlier this morning. All to say that what started out as a bit of an experiment turned into a fairly extensive construction session!

Here are two photos of the cockpit area:


And the fuselage underside after its first sanding. More to do, of course, and I'll probably be using Superfine Milliput as there is quite a seam under the cockpit itself:


The engine seems to sit nicely as well on its bearers, but it will be another "multi-fitting exercise" with the engine, upper cover and nose plate to get that area together.

Thanks for visiting!
Cheers!
Gary

"It was an adventure, a great adventure. And, like all great adventures, we never knew where it would lead or how it would end."

Offline xmald

  • Hero Member
  • *****
  • Posts: 1099
Re: Blue Max 1:48 Sopwith Dolphin
« Reply #68 on: March 25, 2016, 06:12:45 AM »
Looking very good Gary! Keep up the good work!
Best regards
Filip

Offline Nigel Jackson

  • Hero Member
  • *****
  • Posts: 2608
Re: Blue Max 1:48 Sopwith Dolphin
« Reply #69 on: March 25, 2016, 05:36:38 PM »
What a productive session, Gary. This is looking really good.

Best wishes
Nigel

Offline RAGIII

  • Hero Member
  • *****
  • Posts: 19694
Re: Blue Max 1:48 Sopwith Dolphin
« Reply #70 on: March 25, 2016, 06:04:07 PM »
Excellent interior Gary! All of the Details look great, especially the seat and belt!
RGIII
"A man has to know his limitations": Harry Callahan

"Don't slop it on" Lynda Geisler

Offline Des

  • Administrator
  • Hero Member
  • ******
  • Posts: 9325
    • ww1aircraftmodels.com
Re: Blue Max 1:48 Sopwith Dolphin
« Reply #71 on: March 25, 2016, 06:12:17 PM »
Beautiful job with the fuselage interior Gary.

Des.
Late Founder of ww1aircraftmodels.com and forum.ww1aircraftmodels.com

Offline Trackpad

  • Hero Member
  • *****
  • Posts: 1306
Re: Blue Max 1:48 Sopwith Dolphin
« Reply #72 on: April 06, 2016, 04:56:11 AM »
Hi, Everyone,

Thanks to all for your kind support. Progress is slow, but it is being made.

Right now I'm facing a bit of a minefield. It all has to do with the fit of the upper forward fuselage to the main fuselage. Here's a photo of the "problem child and friends:"


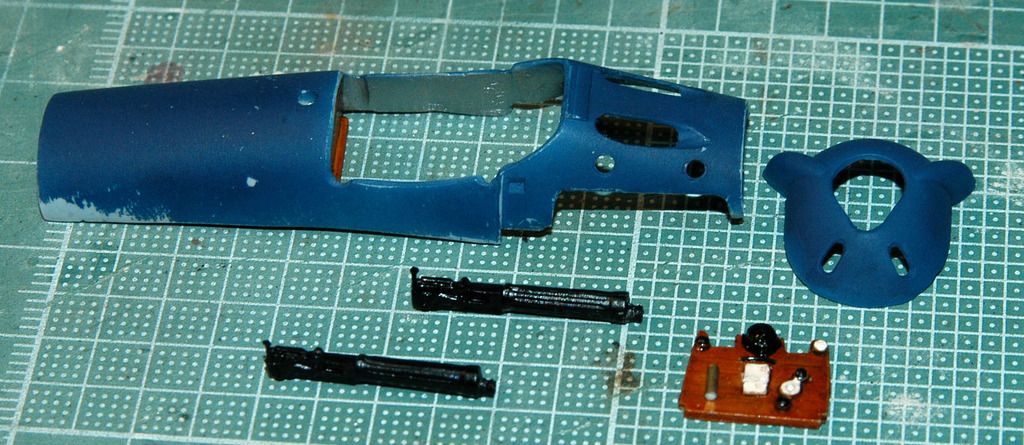
The problem child is the upper forward fuselage (top left). Although it fits nicely on the left side of the main fuselage, it's warped on the right side. The forward portion of the right side juts out from the main fuselage by about a millimeter. The machine guns and instrument panel have to be fitted inside the upper section before it is fitted to the main fuselage. The tripwire is getting the MG/instrument panel assembly in the right place so that it doesn't adversely affect the fitting of the upper section.

A follow-on problem is that, if I glue the left side of the upper section to the fuselage, let it dry/cure, and then force the right side into place and glue it, there is a slight misalignment of the fuselage "nose-cap" (right side of photo) to the main fuselage. The warpage of the upper section is an interesting problem!  ;D

After looking at this challenge from most angles, here's what I plan to do:

a. glue the machine guns to the instrument panel with 5-minute epoxy and align them as accurately as I can.
b. glue the above assembly into the upper section before the epoxy sets solid. This should give me a bit of time to get the alignment correctly set.
c. fit the upper section to the fuselage and glue the left side only firmly in place using Tenax-7R. This glue fuses the two mating surfaces together rather than just gluing them together.
d. Gently apply pressure to the right side by clamping to get it into place, then Tenax that side.
e. Glue the nose-cap into place and fill any anomalies with Milliput, then sand smooth.
f. Continue with what passes for "Normal" in this build!  ;)

I'm out of town for four days starting Thursday, so I hope to get at least the first few stages of this plan done before I leave. Any thoughts, ideas or suggestions on this course of action will be most welcome. Thanks for visiting!  8)
Cheers!
Gary

"It was an adventure, a great adventure. And, like all great adventures, we never knew where it would lead or how it would end."

Offline uncletony

  • Hero Member
  • *****
  • Posts: 4387
    • Aircraft In Pixels
Re: Blue Max 1:48 Sopwith Dolphin
« Reply #73 on: April 06, 2016, 05:37:36 AM »
I supposed you've already tried correcting the warpage with hot water...

Offline Trackpad

  • Hero Member
  • *****
  • Posts: 1306
Re: Blue Max 1:48 Sopwith Dolphin
« Reply #74 on: April 06, 2016, 06:03:02 AM »
I supposed you've already tried correcting the warpage with hot water...

Bo, I did think of that, but the variance of the plastic thickness throughout the upper section is such that the heat needed to correct one area might be too much heat for another. Thicker where the actual warp is, but noticeably thinner toward either end of the piece. That said, can you recommend a method to address that problem? TIA for any guidance!
Cheers!
Gary

"It was an adventure, a great adventure. And, like all great adventures, we never knew where it would lead or how it would end."